jonwally
Member
. . . . Realize still made a mistake, re-weld cut piece back on, measure again, cut again.


")
Here are a few of the reasons behind why I built mine this way:
1. The tool boxes are only about 18" deep, so any top resting on just the box(es) would not be able to be much deeper than that. A workbench frame can be much deeper, allowing a standard depth bench top.
2. If you set several rolling boxes in a row, the tops will only be as even as the variations in the floor allow. This means any top set over them will not be resting fully on all of the boxes all the time, and may "rock" or tilt as you use it. Also, if it is in a typical home garage, the floor slopes toward the door, making your bench top slope as well, which is extremely annoying when working with things that roll away.
3. The tops of the rolling tool boxes have a rim around three sides, which would require setting a wood slab or spacer inside the rim, then laying the top over that. With the rolling cabinet being 40" high on its wheels, by the time you have a good, solid top on that, your bench height would be well over 41" off the floor.
4. A steel frame, resting on leveled feet, which sit directly on the concrete floor can support a much greater load than a toolbox alone, and can do so much more solidly.
5. If you use the top of the box(es) to support a bench on which you mount a heavy vise, and then pound on things in the vise, you are beating down on the structure of the tool cabinet, which will eventually weaken or break the cabinet itself.
6. A HF tool cabinet with no wheels is a HELL of a lot cheaper than a Lista, Vidmar, Lyon or other industrial drawer cabinet, which is probably what we'd all use if we were wealthy.
I should also add that while I'm sure things will be fine, I would not make the horizontal members (which hold the entire weight to the cabinet) be completely dependent on the shear strength of the welds.
. . . .
Really?
I'd bet the weight of my entire workbench, cabinets and tools on the strength of one of those welds.
I'm sure that's the case. You seem to have excellent fabrication skills. Others may not.
My point is that if you do it the way I suggest you could hold the seams together with crazy glue and be fine.
I joke, of course, but the point is that there no direct stress on the welds.
Of course, a simple way to "correct" it is to add one more support in the front and back in the middle of the lower horizontal members. Done. Heck, just one support in the front would be plenty.
I'd hate to see an over-ambitious GJ member lose a foot if one of these things collapses.
It may be perfectly fine, but as a mechanical design engineer who designs large and dangerous test equipment, if there is a simple way to remove risk, I do it.
Quijote- thanks for posting your design suggestions... I am new to welding and fabrication and can't wait till winter to be able to spend more time in the garage welding... I was curious with your mock up how would you level the bench? Would you add 2in tubing then add adjustable feet? And there is this other thread on welding tips or maybe its called show what you welded, lots of great info I would definitely not trust one of my welds to hold ummm (insert heavy object that everyone can relate to)
I'd hate to see an over-ambitious GJ member lose a foot if one of these things collapses.
It may be perfectly fine, but as a mechanical design engineer who designs large and dangerous test equipment, if there is a simple way to remove risk, I do it.
Design opinions from experts in the field are definitely welcome. We should all learn from others' expertise in our various fields. As an engineer myself, I understand Quijote's point. His design, if you were to remove all welds, should, in theory, still stay put. This shows that none of the weight relies on welds. Rather, welds are used to fasten things together only. Houses are constructed in the same manner (99% of the time) where nails are used to fasten things together and not bear weight.I should also add that while I'm sure things will be fine, I would not make the horizontal members (which hold the entire weight to the cabinet) be completely dependent on the shear strength of the welds.
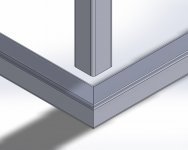
I would have made two rectangular horizontal sections with 45 miters welded together and joined them with vertical tubes between them at the corners. That way the weight of the box is not dependent on welds at all but purely the strength of the tubes.
I made a quick model of what I mean.

I'm sure that's the case. You seem to have excellent fabrication skills. Others may not.
My point is that if you do it the way I suggest you could hold the seams together with crazy glue and be fine.
I joke, of course, but the point is that there no direct stress on the welds.
Of course, a simple way to "correct" it is to add one more support in the front and back in the middle of the lower horizontal members. Done. Heck, just one support in the front would be plenty.
I'd hate to see an over-ambitious GJ member lose a foot if one of these things collapses.
It may be perfectly fine, but as a mechanical design engineer who designs large and dangerous test equipment, if there is a simple way to remove risk, I do it.
"Battle of the engineers"
As a fellow engineer (25 years), I think you are over thinking this design. It's a WORK BENCH, not a bridge or piece of dangerous test equipment.
No battle. Steevo did a great job with both the design and fabrication of his bench.
I also would trust a good weld in shear for holding a static load at this level.
When you build yours, feel free to show us how you went about it as all ideas are welcome.
Is it more than necessary? Yeah. But why not? It's not costing any more money. It was only a suggestion. And I didn't spend hours analyzing the design. I saw it and immediately felt I would have done it such that I don't rely on welds alone. It removes all uncertainty.
Over-designing is only bad if it costs more (money and/or time) than what it provides in return.
Absolutely. I said so myself.
That's the key. But the bigger point is that what I am suggesting is not significantly more effort and it completely removes any what-if's.
Just my point of view. Perhaps I do too many risk assessments at work.
I think it looks great and will work well no matter what.
I won't. Sadly I don't have the room, and for now, as my garage will start construction next week, I rather keep the boxes (I plan on getting 2) on wheels until I am certain of how I will use the space.
Hi Steevo,
Great concept and execution.......what is your secret for quickly locating the tool you need
in one of the 52 drawers to choose from?
Thanks,
Rick


How the heck do you remove the drawers from the HF rolling tool box?
Thanks IONH! I went home and tried it! SO easy, I feel like an idiot. I was looking for a tab like the one on the Craftman tool box.
Welcome to the site.
I'm glad to see this thread still going strong, it's a great build.
2 pages of the build and then 16+ pages of kudo's and questions of what to do with the space behind them and to stop stuff from going under them.... Am I the only one who is wondering what the hell this guy does for a living that he can afford or need a bench like this?

would someone with the HF 44" toolbox mind taking a measurement for me? I'd like to know the height of the box without the casters, thank you!
Steveo I read through your entire thread and love the build. Lots of inspiration... one question that I'm not sure I have seen asked.. what is the overhang on the face of you bench?
i.e. between bench top and toolbox face
The front edge of the bench overhangs the bench frame by 2", and the front of the toolboxes are 2-1/4" back from the edge. I was concerned about too much overhang making the back of the top drawers difficult to see into, or I would have gone with 4" or so.