Just wanted to add some hopefully useful info to this thread. I got my high lift working this week. My reason is slightly different, I have a 7 foot door that separates two parts of my shop building, after some mods it has an 8 foot header with a removable panel. The reason for this chicanery is to allow forklifts to pass thru moving machinery into the new section of the shop which should be infrequent. I didn't want to spend for a new 8 foot door at this time.
Door opening, tyvek wrap on the removable panel as it was outdoors for a time.

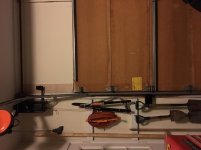
With the panel removed.

First step is to raise the "driveshaft" and bearing brackets upward, in my case I chose 12" from original.

Horizontal tracks raised the same amount and leveled...not pictured, but one end attaches to the bottom of the bearing bracket. I made the two steel brackets, just 1/4" x 1-1/2" steel welded at the corner. Basically this bracket supports the upforce from the steel cables which is pulling the driveshaft down. I took the horizontal track and spaced it out from the wall 3/4". Previously the horizontal angle was tight to the plane of the wall. This allows a short taper in the track to prevent the door from rubbing on the inside of the wall before it gets into the radius.

Section of new track (I bought a generic straight piece) makes up the difference. I used 1/4" drilled holes and button head screws temporarily to allow for adjustments. I have the spline-shouldered low-profile track screws in stock but didn't want to commit t those until I had it working. These are just fine and don't rub for setup purposes.

Flat stock bracket to join short track and radius. Just a series of drilled holes to allow everything to connect. The aluminum was "in stock" and could be much lighter gauge.

Another view of upper bracket and track.

New cables have to be made. From McMAster Carr I sourced 1/8" steel cable, 1/8" Nicopress copper "oval sleeves" and 1/8" Nicopress stop sleeves. I happen to own the Nicopress crimping pliers, so this can be done here. Without the pliers I would have attempted to approach a garage door company and see if they would make up the cables for me.

Stop sleeve in cable sheave.

After this its a matter of taking the slack out of both cables (clamp drive tube with vice grip braced against drywall) until the cable is taut under hand torque. The opposite side requires the sheave setscrews to be loosened and retightened once the sheave is clocked by hand. Then time to wind the spring. I had written down 7 turns previously when I unwound it the first time. This took some playing around but took 9 turns to get working acceptably and not have slack at the very top of the range. Cable sheaves have just enough groove in it to take up the additional cable...recall the bottom of my door must lift 12" higher than previous, so the cable sheave has to takeup more.
Its currently working great, track is smooth and no issues I can detect. Just wanted to illustrate that minimal materials are required as stated by a previous poster. Its more about time but there's nothing exotic here other than the crimping pliers for the cable sleeves, and this part could be outsourced pretty easily.


")