To avoid these ads, REGISTER NOW!

Home built blast cabinet

OP
M

mad57

Well-known member
Joined
Jan 30, 2009
Messages
1,698
Update: I primed it last night, and left the gun finish, it has a textured look just like the wall cabinets and the hf side box looks krinkle, did 3 coats of orange glow base, and 3 coats of clear, came out pretty nice i didnt put alot of prep into it at all its a blast cabinet not a car:) and with my knee recovery i just wanted to get it done to use it heres a pic.
 

Attachments

  • blast painted 1.jpg
    blast painted 1.jpg
    52.9 KB · Views: 244
To avoid these ads, REGISTER NOW!
OP
M

mad57

Well-known member
Joined
Jan 30, 2009
Messages
1,698
have you ever consider to put window on side door? Just crazy idea ...

Maybe not crazy. its big enough that i could install a window and set of gloves ,but at this point do i really need it:)
 

brownbagg

Well-known member
Joined
Mar 20, 2006
Messages
5,208
hell. might has well put windows and gloves in the back too. with a chain hoist system, you could slip a car body in there.
 

Omphaloskeptic

Well-known member
Joined
Oct 11, 2008
Messages
2,346
Location
Ultima Ratio, Wa.
mad57, very nice work! Looking forward to more pics as you fit it out.

That volume looks big enough to hold a mini-rotisserie for parts so you could blast away while it is slowing spinning. I've never seen anything like I've just described; seems like it would make life easier for near-production work. I've never used a blast cabinet before, but it must be a pain maneuvering parts with gloved hands and holding them somehow while using the gun. You guys who have used cabinets a lot must have some ideas on what would make the perfect blast cabinet. What other wild ideas could mad57 build into this monster cabinet?
:dunno:
 
OP
M

mad57

Well-known member
Joined
Jan 30, 2009
Messages
1,698
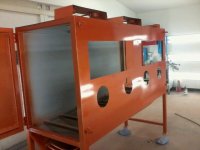
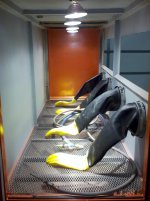
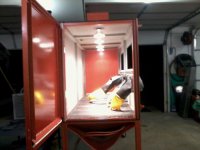
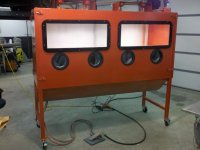
Here are a few more pics, got my 2 hose manifold hooked up with the lines run, the purpose of that is when the hoses enter the blast body i put a seam sealer to keep it tight so instead of changing the whole hose and cutting out the sealer i only have to change the lower out side hoses as the inner ones wont be moving, it has 4 90 watt flood lights, i used foam adhesive sealers for the doors, and **** glove flanges and gloves, there are 2 hoses in side the one airs the blast gun it self and the other is a blow off gun tip, the foot pedal has a 2 way valve down is gun foward is air gun. I need to find or make a reduce for the blast gun from 1/2 to 3/8 to feed air to it ,it has a 1/2 pick up hose which ill zip tie to the bottm of the cabinet with a hf 65lb magnet to keep it right in the media. I installed the chrome snapon style handles on both doors, now a trip this week to my buddy glass shop for glass panes and fab out my glass plastic trim and load it with media and get to work, i will post a video when complete so close.
 

Attachments

  • blast painted2.jpg
    blast painted2.jpg
    141.6 KB · Views: 129
  • blast painted3.jpg
    blast painted3.jpg
    140.7 KB · Views: 148
OP
M

mad57

Well-known member
Joined
Jan 30, 2009
Messages
1,698
mad57, very nice work! Looking forward to more pics as you fit it out.

That volume looks big enough to hold a mini-rotisserie for parts so you could blast away while it is slowing spinning. I've never seen anything like I've just described; seems like it would make life easier for near-production work. I've never used a blast cabinet before, but it must be a pain maneuvering parts with gloved hands and holding them somehow while using the gun. You guys who have used cabinets a lot must have some ideas on what would make the perfect blast cabinet. What other wild ideas could mad57 build into this monster cabinet?
:dunno:

Thanks for the thumbs up! yes i have a few ideas for rim rollers , a pipe slide track for rears, ect i will post as much as the gj wants to see. next build will be my huge powder oven.:beer:
 
OP
M

mad57

Well-known member
Joined
Jan 30, 2009
Messages
1,698
a few more....
 

Attachments

  • blast painted4.jpg
    blast painted4.jpg
    50.6 KB · Views: 58
  • blast painted5.jpg
    blast painted5.jpg
    59.1 KB · Views: 80

larry4406

Well-known member
Joined
Jan 27, 2006
Messages
19,325
Location
Northern Virginia
Very nice.

The TP tools versions have the glass on an inclined face while yours is vertical. Any pros/cons of either? I would think the inclined face would be easier on the neck for viewing?
 

Charles (in GA)

Well-known member
Joined
Jan 11, 2006
Messages
12,489
Location
50 mi south of Atlanta
Biggest problem is, when you are doing large parts, it takes FOREVER if you are using a 5 or 7.5 hp compressor of 18 to 24 cfm. I bought a large cabinet from TPTools thinking I might want to get something somewhat oversized in there. First even remotely large item was a 16 inch rim off the front of my tractor. Even with aggressive abrasive (and you get tired of changing out different grades real quick) it was so slow, doing a couple of inch square patch at a time. I gave up and scrapped the rim. CaseNewHolland has them reasonable and I bought one.

Charles
 
OP
M

mad57

Well-known member
Joined
Jan 30, 2009
Messages
1,698
Very nice.

The TP tools versions have the glass on an inclined face while yours is vertical. Any pros/cons of either? I would think the inclined face would be easier on the neck for viewing?

I loss about 3 1/2 inch s of view in the cabinet on the bottom under the gloves thats it but would have lost alot of realestate up top if it was angled, there goes my bike frames, quads ect. with it being square it will fit more items. I will let everyone know when shes done.
 
OP
M

mad57

Well-known member
Joined
Jan 30, 2009
Messages
1,698
Biggest problem is, when you are doing large parts, it takes FOREVER if you are using a 5 or 7.5 hp compressor of 18 to 24 cfm. I bought a large cabinet from TPTools thinking I might want to get something somewhat oversized in there. First even remotely large item was a 16 inch rim off the front of my tractor. Even with aggressive abrasive (and you get tired of changing out different grades real quick) it was so slow, doing a couple of inch square patch at a time. I gave up and scrapped the rim. CaseNewHolland has them reasonable and I bought one.

Charles

I agree it does take some time but i try to use a stripper on really bad stuff let that work for me than ill clean and blast. of course time is money if its my own piece i just hunker down and do it, if its a custys i charge accordingly. I also have my back up compressor as a second 60 gallons if i really need the air volume. And yes some times it doesnt pay to resurect an old piece if new is available on the cheap, thank god for google and amazon :)
 
To avoid these ads, REGISTER NOW!
OP
M

mad57

Well-known member
Joined
Jan 30, 2009
Messages
1,698
UPdate: I got the glass installed and plexi frame around it,again plexi was a free bee alittle beat up but free, got the air lines run and foot pedal working, charged it with air seems to be working 100% I will fill it with media today and give it a go :) ill post how she works later. 2 more pics.
 

Attachments

  • blast painted6.jpg
    blast painted6.jpg
    147.6 KB · Views: 74
  • blast painted 7.jpg
    blast painted 7.jpg
    137 KB · Views: 91

rburke65

Well-known member
Joined
Nov 10, 2007
Messages
12,349
Location
Canfield, Ohio
Not only a nice build but a nicely documented build. Thanks for all your time and effort for the "show-n-tell".
 
OP
M

mad57

Well-known member
Joined
Jan 30, 2009
Messages
1,698
Well i put in the blast media course crush glass, i installed the plexi glass inner panels to help protect the main glass panel, hooked up the ridged shop vac and had at it, IT WORKED GREAT!! the new gun really moves the glass, i bought it because it works with air compressors under 5hp, if i had a bigger air compressor i could blast anything, the plexi glass still had static on it so the glass dust stuck to it like glue:( other than those 2 minor things 100% build, im going to look into lessor (medium)media maybe a air pressure valve to regulate the air to slow it down a bit, made a media rake to help push the stuff back to center, my angled base works great but its so big it tends to say to sides, one last pic and this thread is done.Thanks for reading.
 

Mmfh

MEMBER EMERITUS
Joined
Oct 8, 2011
Messages
1,423
Location
Portland Oregon
That's a great looking cabinet! Love the color too, same as mine "Zero". Very cool being able to put a bike frame inside and close the door!
 

ears

Well-known member
Joined
Mar 23, 2008
Messages
943
Location
lorton VA
To help with the media you could bolt on a ********. Vibco style if you dont want to google that. Used they're dirt cheap one on eBay now for $10. Slight chance I even have a few left.

Sweet cabinet. One of these years I plan on a parts washer of a similar design and size.
 

1320stang

Well-known member
Joined
Dec 28, 2006
Messages
4,580
Location
Edmond, OK
Might want to think about adding a ******** to shake the sand down the low sloped funnel.

Wished I'd seen this earlier, I was thinking if the windows were spaced out, could you stretch aluminum screen flush with the cabinet? This would keep a bit of the sand from abbraiding the window so much, leave the bottom open and slope the box so any sand that does make it in would slide out.
 
OP
M

mad57

Well-known member
Joined
Jan 30, 2009
Messages
1,698
I actually found out why the media is spotty after about 5 min. the new gun i bought has a rating for a 5hp and under, my compressor is a champion from 1989 shes a bit tired, it blasts great for about 5 min while the air volume is full, it blazes a path about 1in wide clean, then after that it draws slower from loss of air. I m gonna try a few things: i have another air compressor about same age and also 60 gl tank. im gonna hook them together and see how that works, also the course crushed glass is too course, it requires alot of after sanding to get it back to smooth so im gonna buy a medium glass media, and possibly try to reg the air flow a bit to extend the blast time with just the 1 compressor than both see if i can get a longer blast. Oh man if i only had 3 phase i know where theres a nice screw compressor:) This might be my excuse to buy a new toy (compressor).
 
OP
M

mad57

Well-known member
Joined
Jan 30, 2009
Messages
1,698
Might want to think about adding a ******** to shake the sand down the low sloped funnel.

Wished I'd seen this earlier, I was thinking if the windows were spaced out, could you stretch aluminum screen flush with the cabinet? This would keep a bit of the sand from abbraiding the window so much, leave the bottom open and slope the box so any sand that does make it in would slide out.

It actually has a pretty good v -pan it does roll back to center pretty good since ive been using it, but at almost 85 inchs long it still needs a push back to center. the screen might work ill have to give it a try, where the glass is ,its pretty high the media so far has not even touch the plexi inner, its the dust and static thats the problem, but i did install a seperate blow off air tool it clears it pretty quick.
 

LutzTD

Well-known member
Joined
Dec 31, 2011
Messages
3,673
Location
Lutz, Florida
I actually found out why the media is spotty after about 5 min. the new gun i bought has a rating for a 5hp and under, my compressor is a champion from 1989 shes a bit tired, it blasts great for about 5 min while the air volume is full, it blazes a path about 1in wide clean, then after that it draws slower from loss of air. I m gonna try a few things: i have another air compressor about same age and also 60 gl tank. im gonna hook them together and see how that works, also the course crushed glass is too course, it requires alot of after sanding to get it back to smooth so im gonna buy a medium glass media, and possibly try to reg the air flow a bit to extend the blast time with just the 1 compressor than both see if i can get a longer blast. Oh man if i only had 3 phase i know where theres a nice screw compressor:) This might be my excuse to buy a new toy (compressor).

very nice design and build. when I had my corvette blasted by a commercial outfit they used plastic beads instead of glass, not so much dmage. Of course I have no idea where they got it or what it was, but it was their selling point. It did not do any damage to the fiberglass underneath so it must have been pretty good
 

472scout

Well-known member
Joined
Sep 18, 2010
Messages
1,278
Location
back 40
Sorry if I missed this but are you installing a vacuum to improve the visibility? I've always thought a vacuum was pretty much a necessity.

And great job on the cabinet. Most likely I will pick up an used pressurized blast cabinet on CL but if not I'm going to steal some of your ideas. :evil:
 
OP
M

mad57

Well-known member
Joined
Jan 30, 2009
Messages
1,698
Sorry if I missed this but are you installing a vacuum to improve the visibility? I've always thought a vacuum was pretty much a necessity.

And great job on the cabinet. Most likely I will pick up an used pressurized blast cabinet on CL but if not I'm going to steal some of your ideas. :evil:

Yes i installed a electrical coupler on the back top of the cabinet, my ridged shop vac hose nozel fits in there perfect, oddly i can blast in there for like 5 min with out vac on and its not really that cloudy, but than again its got 4 90watt bulbs:) i might just install a small squirrl cage blower fan to hose and out side, that vac gets pretty annoying after awhile.
 

BADSIX

Well-known member
Joined
Nov 30, 2010
Messages
895
Location
oregon coast
one thing i did was to make a filter screen that gos under your expaned metal. i used some widow screen frame and window screen, then welded some tabs for it to set on about 3-4 in below the expaned metal. it collects a lot of junk that can plug up your gun. i have a section of the expaned metal that i can lift out when it need attention.
 

larry4406

Well-known member
Joined
Jan 27, 2006
Messages
19,325
Location
Northern Virginia
Mad57 - how about an update on the cabinet after some use? Anything you would do differently? I am still impressed with this build.
 
To avoid these ads, REGISTER NOW!
Top Bottom