Provincial
Well-known member
I have a project that uses two IBC totes as a water tank on a flat bed truck. I need the totes to vent up to 11 gallons of water a minute. There are many vents on the market for IBC totes, but I didn't see any that were rated for this much flow. I decided to make vents from simple materials.
The standard tote cap has a 2" NPT plug in the center. I noticed that these plugs have recesses that would provide four slots 1/8" by 1/2" if I drilled through the recess into the open bottom. (Photo #1) I found that a 2"x1-1/4" slip PVC reducer bushing would cover the slots, and had a recess moulded in that would vent the slots into the center opening of the bushing, but make any splash water turn 90 degrees to get to the center opening.
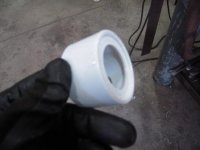
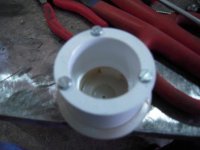
I machined the plugs to make a recess to center the bushing, and also a pilot hole for a stainless steel sheet metal screw that holds everything together. (Photos 1 and 3) I machined the reducer bushing to make them shorter just to match my screw length. I would have left them alone if I had to buy screws and just match the screws to the standard length. I drilled and installed three #8 by 3/8" sheet metal screws on the top flange to provide a vent space for the cap. (Photos 2,3 and 5)
For a cap I bought caps for the cheap, thin 3" PVC pipe. I cut them down for height to match my setup, and drilled a hole in the center for my screw.
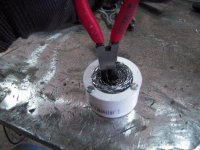
To keep the sloshing water restrained, I filled the center of the PVC bushing with screen. I took a "Hinged Gutter Screen" and cut full length strips from it to match the depth of the bushing hole. I wound the strip around a 5/8" tube I salvaged from a folding camp chair, but the resulting spiral is too big to fit in the hole. I wound up the coil with a pair of long nose pliers, which compressed it enough to fit in the hole, and expanding to lock in place. When working with the screen, wear good gloves, because the cut edges of the screen are EXTREMELY SHARP!!!!!!!
Once the screen was in place, I assembled the bushing and cap to the threaded plug, keeping everything centered.
I have too many photos for one post, so I am following up until they all are posted.
The standard tote cap has a 2" NPT plug in the center. I noticed that these plugs have recesses that would provide four slots 1/8" by 1/2" if I drilled through the recess into the open bottom. (Photo #1) I found that a 2"x1-1/4" slip PVC reducer bushing would cover the slots, and had a recess moulded in that would vent the slots into the center opening of the bushing, but make any splash water turn 90 degrees to get to the center opening.
I machined the plugs to make a recess to center the bushing, and also a pilot hole for a stainless steel sheet metal screw that holds everything together. (Photos 1 and 3) I machined the reducer bushing to make them shorter just to match my screw length. I would have left them alone if I had to buy screws and just match the screws to the standard length. I drilled and installed three #8 by 3/8" sheet metal screws on the top flange to provide a vent space for the cap. (Photos 2,3 and 5)
For a cap I bought caps for the cheap, thin 3" PVC pipe. I cut them down for height to match my setup, and drilled a hole in the center for my screw.
To keep the sloshing water restrained, I filled the center of the PVC bushing with screen. I took a "Hinged Gutter Screen" and cut full length strips from it to match the depth of the bushing hole. I wound the strip around a 5/8" tube I salvaged from a folding camp chair, but the resulting spiral is too big to fit in the hole. I wound up the coil with a pair of long nose pliers, which compressed it enough to fit in the hole, and expanding to lock in place. When working with the screen, wear good gloves, because the cut edges of the screen are EXTREMELY SHARP!!!!!!!
Once the screen was in place, I assembled the bushing and cap to the threaded plug, keeping everything centered.
I have too many photos for one post, so I am following up until they all are posted.
Attachments



Last edited: