superbovine
Well-known member
Hey guys,
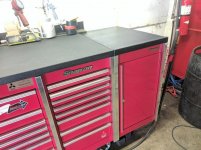
I held out as long as I could, but after building the DIY Snap On cabinet I couldn't stand the height difference between it and the rest of the box with the work surface. Not wanting to get involved in a shelf/hutch type solution to build over it, I decided to go ahead and give the work surface a go and it turned out alright.
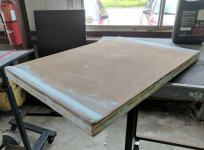
I started with some scrap plywood, layered two deep. Then to make up the extra 3/16 or so of height I added some scrap panel board. On the top/front edge where the Snap On surface has the raised lip, a small strip more of panel board was added.

I hemmed and hawed about how to mount it. I was determined to go from the bottom like Snap On does, particularly after my drillhog bits made short work of the bed frame support. After much over-thinking about how to anchor mounting nuts (no nutserts on hand and trying to minimize expense), I decided to keep it simple... just drilled holes in the bottom, put some HD sealant in them, then pound the **** out of some slightly larger nuts to drive them in. Worked a treat.

The top, the front, and the right side were smoothed in to make it look pretty where it will be exposed.

I fooled around with some 26ga galvanized I had lying around, but I couldn't get it to do what I wanted no matter how hard I tried. Perhaps it was the trying to do it after a long day at work, but it just wasn't happening. So I bailed on the idea and decided to just jump straight to the lining.
The one expense for the job, one gallon (overkill, a quart would have been fine) of bed liner coating. $40 at Harbor Freight (a gallon is pennies more than a quart of any other brand) plus some rollers and on it went... decently. I used a regular cotton-ish roller as apparently HF doesn't see fit to stock the plastic/nylon/whatever texture rollers to use with this stuff. They did fine, just had to watch the consistency as the material would tack up after a minute or two, if you let that happen it would claw up the coating as you rolled. Keeping it wet prevented that.
Heres a shot with one coat.

I held out as long as I could, but after building the DIY Snap On cabinet I couldn't stand the height difference between it and the rest of the box with the work surface. Not wanting to get involved in a shelf/hutch type solution to build over it, I decided to go ahead and give the work surface a go and it turned out alright.
I started with some scrap plywood, layered two deep. Then to make up the extra 3/16 or so of height I added some scrap panel board. On the top/front edge where the Snap On surface has the raised lip, a small strip more of panel board was added.
I hemmed and hawed about how to mount it. I was determined to go from the bottom like Snap On does, particularly after my drillhog bits made short work of the bed frame support. After much over-thinking about how to anchor mounting nuts (no nutserts on hand and trying to minimize expense), I decided to keep it simple... just drilled holes in the bottom, put some HD sealant in them, then pound the **** out of some slightly larger nuts to drive them in. Worked a treat.
The top, the front, and the right side were smoothed in to make it look pretty where it will be exposed.
I fooled around with some 26ga galvanized I had lying around, but I couldn't get it to do what I wanted no matter how hard I tried. Perhaps it was the trying to do it after a long day at work, but it just wasn't happening. So I bailed on the idea and decided to just jump straight to the lining.
The one expense for the job, one gallon (overkill, a quart would have been fine) of bed liner coating. $40 at Harbor Freight (a gallon is pennies more than a quart of any other brand) plus some rollers and on it went... decently. I used a regular cotton-ish roller as apparently HF doesn't see fit to stock the plastic/nylon/whatever texture rollers to use with this stuff. They did fine, just had to watch the consistency as the material would tack up after a minute or two, if you let that happen it would claw up the coating as you rolled. Keeping it wet prevented that.
Heres a shot with one coat.