To avoid these ads, REGISTER NOW!

Horsepower Hollow

Sideshow Bob

Active member
Joined
Nov 27, 2012
Messages
27
Location
Manitoba, Canada
Hi guys.

I've been looking into the Garage journal for quite some time now. As my new shop is finishing up, I felt it was time to share. I managed to take pics and document most of the build.

My shop is 32x40 with 10 foot ceiling on main floor with a full 8 foot second storey. There are 2 front dormers and the roof is a 12/12 pitch. The whole shop is clad in red and green steel siding.

I've got in-floor heating on main, baseboard electric for upstairs. It feels like there are miles of joint filler but slowly and surely my wife and I will get it done. No project cars inside just yet....it IS the project.

Take a peak at "Horsepower Hollow" and let me know what ya think! Bob
 
To avoid these ads, REGISTER NOW!
OP
S

Sideshow Bob

Active member
Joined
Nov 27, 2012
Messages
27
Location
Manitoba, Canada
Here's some pics of the new shop, driveway sign and the ongoing battle to move stuff outta the way to tape miles of drywall joints. (We're in Canada, it's cold and everything possible gets tucked back in the shop)

My wife Sharon and I beleive in supporting the local economy so we got a local designer, builder and supply house to provide the services and materials.

The floor plan was designed by Gus Finnson of Gimli, based on mine and my wife's rough drawings. It is 32 deep by 40 wide with engineered trusses that provide 18 inches between main floor and loft. The 2 dormers are 6x8 the rest of the loft is 16 x 40 +/- for framing.

We got the building materials from Gimli Home Hardware/Gimli Lumber. The owner there is an old snowmobiling buddy and I knew he'd treat us well.

I got Gimli Carpentry to erect the building. I've known these guys for many years (also from the local snowmobile club)They were patient and let me be the fourth (temporary) guy on the crew.

The main floor is 10 ft plus 2 top and 1 bottom plate totalling 10 foot 4.5 inches. This gave us just a bit more room for overhead without having to cut all the 2x6's to stud length. It turned out good for lighting (T8's and electric door openers.) The 18 inch truss between the main ceiling and upper floor allowed me to build in 4 oldschool Cerwin Vega speakers that really kick!

The floor has a 36 inch perimeter saddle with 20 mm rebar, the rest of the floor is reinforced with 10 mm rebar. It is 6 inches thich and I beleive is 3300 psi concrete (but it could be 3600 psi, I forget) There is a floordrain to keep the floor dry from any dripping vehicles.

The floor has 5 loops of floor heat, fired by an electric boiler rated at 18 kilowatts. This was installed by local installer Dean Kunz of "Fire and Ice" The upstairs is heated by electric baseboards. We may add a pellet stove at some point depending on hydro useage. This will be our first winter heating it.

We assembled the trusses in three parts on the ground and used a crane from "Ford Drillers" to hoist them into place. The shell is skinned in Melchers Green and Bright Red. (or is it Tile Red?)

The overhead doors are 8x10 insulated sectional units and the man-door is 36 inch 9 light. The original spec called for sprayfoam but the quote I got was $13,500 and simply was not do-able. It is old school fibreglass/vapour barrier/drywall.

I had a local electrician Hugh Collins and his capable crew do the elctrical and ensured plenty of plugs: both 110s and 220s and several GFI outdoor plugs. Heat detector on main floor, smoke detector in loft. He also re-wired the funky vintage light above the outdoor gas pump.

It's been a costly and lengthy endeavor but as it nears completion I am really looking forward to returning to the hot rod hobby. And I'm sure Sharon will be glad she doesn't have to share the t.v so much..........Bob
 

Attachments

  • IMG_2884.JPG
    IMG_2884.JPG
    103.1 KB · Views: 755
  • IMG_2883.JPG
    IMG_2883.JPG
    110.1 KB · Views: 678
  • IMG_2878.JPG
    IMG_2878.JPG
    108.5 KB · Views: 972
  • IMG_2877.JPG
    IMG_2877.JPG
    109.1 KB · Views: 772
  • IMG_2177.jpg
    IMG_2177.jpg
    62.3 KB · Views: 700
  • 004 (2) (640x480).jpg
    004 (2) (640x480).jpg
    136.3 KB · Views: 678
Last edited:

bacpacker

Well-known member
Joined
Sep 21, 2011
Messages
520
Location
East Tn
Very nice build. Gotta love the name of the place. Looks like you got plenty of room (at least for now). The dormers really set the shop off. CONGRATS!
 
OP
S

Sideshow Bob

Active member
Joined
Nov 27, 2012
Messages
27
Location
Manitoba, Canada
I've been collecting vintage B/A and Coaca-Cola collectibles for the upstairs mancave. Unfortunately, it will stay on the main floor until the upstairs is ready for it. At least the vehicles and sleds can easily be driven outta the way of scaffolds and ladders....Bob
 

46Nash

Well-known member
Joined
Jul 20, 2010
Messages
171
Location
NY
Thats very close to how my garage will look. Almost the same color red, white soffits, offset double doors, 12/12 pitch roof. I like it :)
 
OP
S

Sideshow Bob

Active member
Joined
Nov 27, 2012
Messages
27
Location
Manitoba, Canada
Thanks. The roof looks great but was a tough install. It's 30 feet to the peak. 28 foot sections to hoist and screw. When the snow slides down it can really make a pile in front of one of the doors too. My neighbor who installs eavestroughing predicted the snow would blow the eavestroughs right off...but so far, so good. Bob
 

driver

Well-known member
Joined
Mar 16, 2010
Messages
126
Thanks. The roof looks great but was a tough install. It's 30 feet to the peak. 28 foot sections to hoist and screw. When the snow slides down it can really make a pile in front of one of the doors too. My neighbor who installs eavestroughing predicted the snow would blow the eavestroughs right off...but so far, so good. Bob

The metal roofing people have horizontal strips that attach to the ribs of the roofing material to prevent the snow from sliding.
Our previous manufacturing plant had a roof that steep and after a sunny day the wet snow would bury the sidewalk all at once. Good thing nobody was ever under when it happened.
 
OP
S

Sideshow Bob

Active member
Joined
Nov 27, 2012
Messages
27
Location
Manitoba, Canada
Yes, I've seen those "snow bars" before. They're rather ugly on an otherwise handsome building. The one overhead door is susceptible to a large dump while the east one is actually half protected by the dormer. I slam the man-door to cause any avalanches and clear the pile from the doorway as needed.

Here are some more pics, as requested. Bob
 

Attachments

  • 027 (640x480).jpg
    027 (640x480).jpg
    121.8 KB · Views: 197
  • 025 (640x480).jpg
    025 (640x480).jpg
    139.5 KB · Views: 196
  • 010 (640x480).jpg
    010 (640x480).jpg
    105.5 KB · Views: 168
  • 009 (640x480).jpg
    009 (640x480).jpg
    101.5 KB · Views: 161
  • 008 (640x480).jpg
    008 (640x480).jpg
    125.3 KB · Views: 170
  • 006 (640x480).jpg
    006 (640x480).jpg
    107.6 KB · Views: 176
  • 005 (640x480) (640x480).jpg
    005 (640x480) (640x480).jpg
    142.6 KB · Views: 190

bigbadjim

Well-known member
Joined
Dec 11, 2009
Messages
96
Location
Saskatchewan, Canada
I like that you named your place....cool. The light over the pump is pretty cool too. What kind of material are those green cabinet doors made from?????
 
OP
S

Sideshow Bob

Active member
Joined
Nov 27, 2012
Messages
27
Location
Manitoba, Canada
The green cabinet doors were re-claimed from a defunct provincial labratory. I bought as many as I could fit onto my car hauler. They have magnetic closures and are a real focal point. I put the bottom ones on rollers w/brakes so I can move it easily.
 

bigbadjim

Well-known member
Joined
Dec 11, 2009
Messages
96
Location
Saskatchewan, Canada
The green cabinet doors were re-claimed from a defunct provincial labratory. I bought as many as I could fit onto my car hauler. They have magnetic closures and are a real focal point. I put the bottom ones on rollers w/brakes so I can move it easily.

I knew those looked familiar. Elementry schools had those when I was in school threw the 80's ......green, orange, yellow..Nice. good score.
 
To avoid these ads, REGISTER NOW!
OP
S

Sideshow Bob

Active member
Joined
Nov 27, 2012
Messages
27
Location
Manitoba, Canada
The primered car is a 1929 Ford Model A five window Sport Coupe. It's gone now, a persistant buddy of mine got it outta my hands. He'll do it well.
 
OP
S

Sideshow Bob

Active member
Joined
Nov 27, 2012
Messages
27
Location
Manitoba, Canada
A few more pics of Horsepower Hollow, located west of Gimli, Manitoba, Canada...5 miles west of Lake Winnipeg.
 

Attachments

  • 034 (640x480).jpg
    034 (640x480).jpg
    118.6 KB · Views: 89
  • 032 (640x480).jpg
    032 (640x480).jpg
    80.8 KB · Views: 70
  • 031 (640x480).jpg
    031 (640x480).jpg
    73.5 KB · Views: 72
  • 030 (640x480).jpg
    030 (640x480).jpg
    67.8 KB · Views: 81
  • 029 (640x480).jpg
    029 (640x480).jpg
    96.4 KB · Views: 88
  • 028 (640x480).jpg
    028 (640x480).jpg
    117.7 KB · Views: 86
  • 026 (640x480).jpg
    026 (640x480).jpg
    118.3 KB · Views: 83
OP
S

Sideshow Bob

Active member
Joined
Nov 27, 2012
Messages
27
Location
Manitoba, Canada
I'll post a few more interior pics soon. I'm close to final drywall sanding. Primer and paint next. I have a diner booth to go in one dormer, checkered tiles and doing a coca-cola theme with a Coke machine, antique Coke light and various Coca-Cola signage.

I'm a big Nascar fan, hockey fan and into vintage snowmobiles as well. There will be space for some of all of that. Lastly, there will be an area with my father's firefighter awards and nostalgia on display too.

The whole upstairs is for relaxing and hangin' out with friends and family.
 

Attachments

  • 094 (640x480).jpg
    094 (640x480).jpg
    88.2 KB · Views: 104
  • 079 (640x480) (640x480).jpg
    079 (640x480) (640x480).jpg
    113.7 KB · Views: 73
  • 045 (640x480).jpg
    045 (640x480).jpg
    91.1 KB · Views: 62
  • 044 (640x480).jpg
    044 (640x480).jpg
    100.1 KB · Views: 62
  • 036 (640x480).jpg
    036 (640x480).jpg
    104.3 KB · Views: 57
  • 035 (640x480).jpg
    035 (640x480).jpg
    94.6 KB · Views: 58
OP
S

Sideshow Bob

Active member
Joined
Nov 27, 2012
Messages
27
Location
Manitoba, Canada
Yeah, a cool vintage Triumph bobber or classic Sportster might look good nesteled in the corner or in the box of a similarly trimmed rodded truck! (Rootbeer brown and copper)
 

sreno

Well-known member
Joined
Dec 5, 2008
Messages
661
Location
Eastern Townships, Qc. Ca.
Wow! Great building, man!

The B/A gas pump brought back fond memories.

My dad was a B/A retailer starting around '56 until British American was bought out in Canada by GULF OIL. He stayed on a few years, unitl 1971, when he opened a brand new SHELL station.

But, as a kid the two-bay B/A was always my favourite. It was also a company that treated its retailers right.

I'll be following the build closely; nice work!

Shawn
 
OP
S

Sideshow Bob

Active member
Joined
Nov 27, 2012
Messages
27
Location
Manitoba, Canada
Thanks Shawn. The red and green B/A theme seemed a natural fit. The pump out front is actually made-over Tokhiem that was used at a Shell service station. At first my wife didn't think it was "old enough" but after she saw how it turned out, it has been a popular addition.

I've got pics of the in-floor heating system somewhere, and will upload soon.

Bob
 
OP
S

Sideshow Bob

Active member
Joined
Nov 27, 2012
Messages
27
Location
Manitoba, Canada
The main floor is 32 x 40 and will hold most of our stuff and provide a warm, dry place to work on future projects.

We excavated the build site, hauled in many loads of 4inch and down rock, tied it together with rip-stop landscape fabric. A 36 inch saddle with 20 mm rebar was installed around the perimeter, 6 inches of 3300 psi concrete was supported with 10 mm rebar inside that. We added a floor drain to accommodate dripping vehicles.


The concrete floor has 2 inch styrofoam underneath to reflect the floor heat upwards and inwards. Pressure treated 1/2 inch plywood is the barrier before the back fill. A 2 foot perimeter of 2 inch Styrofoam was placed on a 45 degree angle under the backfill to minimize heat loss outside the foundation. (And it works as the snow doesn’t melt at the base of the walls) To handle heating needs, a 5 circuit in-floor heating system was installed. The square footage determined a 12 kilowatt electric boiler would handle the heating task.

5 in-floor heat circuits, electric boiler, recirculating water pump installed in 6 inch concrete with 16 inch perimeter, 2 inch stryrofoam, 20 mm rebar saddle for the perimeter and 10 mm rebar floor re-inforcement on the rest of the floor. We put a slope and floor drain to control water run-off from any dripping vehicles.

I wasn’t planning on installing a vehicle hoist (though my 2 sons and buddy all urged me to) so I didn’t worry too much about any in-floor lag bolts. I have to admit though, that I am afraid to drill the floor to install other tools due to risk of hitting a floor heat tube. I’m hoping a thermal imager will help me accurately locate the heating lines if I need to drill in the future.

Instead of cutting the walls down to 10 foot studs we left the 2x6's at full 10 fee plus 1 bottom plate and 2 top plates totalling 10 ft 5.5 inches. This allowed for a pressure treated 2x6 baseboard below 10 feet of drywall.
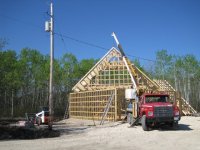
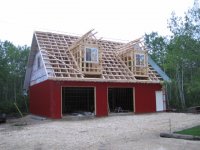
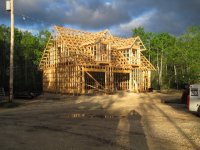
The Paslode power nailers and the crew’s many years of experience got the place framed up in a jiffy. The pre-engineered trusses were assembled on the ground for safety reasons. The trusses were built in three sections on the ground and were raised by crane. That was a bit nerve-racking as the crane was at it's limit for the mid-section containing 11 trusses!

Rick Ford from Ford Drilling brought his crane by and did a superb job of lifting and positioning the trusses right on the spot. Russell Johnson and Tyler Dey of Gimli Carpentry performed like they were from Cirque du Soleil! You'll notice these acrobats in some of the pics. The size of the shop becomes evident as it rises in the bush. Yikes! What have I done?

The main floor ceiling / loft floor is 18 inches engineered, this large hollow provided a great "cabinet" to enclose my large, floor model Cerwin Vega old-school speakers and really thump out the tunes!

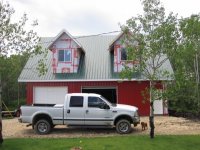
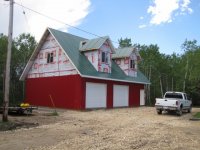
The upper loft is 16 feet by 39 with 8 foot ceiling, a couple 6x8 dormers, and 3 closets. This provides a generous “bonus room” for displaying antiques and collectibles and a party / games room.

The 2 dormers are 6 feet wide by 8 feet deep with 4x4 foot windows. One dormer will be done up with a diner style booth and table with jukebox and other novelties like you'd find back in the day. There are 4x4 windows at each gable end as well.

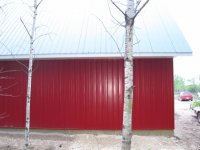
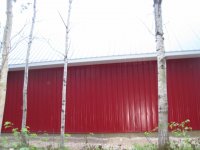
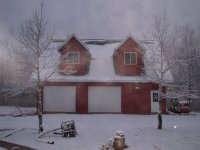
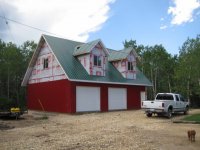
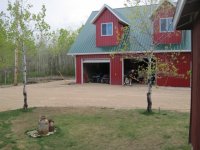
The whole place is clad with Melcher Green metal roofing and Brick Red metal siding to match the cabin, little barn and hay storage shed. White soffits, fascia and eavestroughing trim it out beautifully.

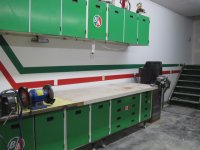
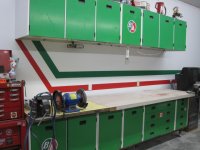
My initials are B. A. so my wife and I planned to run with the green and red now-defunct B/A (British American Oil Company) service station theme. We've been collecting various vintage B/A items for display. We had a local decal guy, Alan Wishnowski of Design Canada, cut an assortment of B/A logos for a gas pump I restored for out front and under the vintage porcelain service station light I dug up. I plan to dress up the green metal cabinets above and below my workbench as well as a funky old round-top garbage container. The green metal cabinets were reclaimed salvage from an old provincial laboratory.

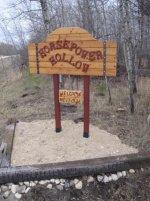
We decided to name the property "Horsepower Hollow" a play on mini-horses and hot-rods. I found some tongue and groove cedar planking and made a nice quality sign for the driveway.
 

Attachments

  • IMG_0989 (640x480).jpg
    IMG_0989 (640x480).jpg
    104.6 KB · Views: 97
  • IMG_0987 (480x640).jpg
    IMG_0987 (480x640).jpg
    105.6 KB · Views: 110
  • IMG_0986 (640x480).jpg
    IMG_0986 (640x480).jpg
    110.1 KB · Views: 101
  • IMG_0988 (640x480).jpg
    IMG_0988 (640x480).jpg
    101 KB · Views: 124
  • 7095064[1].jpg
    7095064[1].jpg
    22.4 KB · Views: 113
  • 7074867[1].jpg
    7074867[1].jpg
    23.9 KB · Views: 117
  • 5330992[1].jpg
    5330992[1].jpg
    39.2 KB · Views: 107
OP
S

Sideshow Bob

Active member
Joined
Nov 27, 2012
Messages
27
Location
Manitoba, Canada
The shop has a 200 amp service, three 220 volt outlets for compressor and welders, 2 rows of 7, 4 foot T8 fluorescent lights and a couple industrial fans for air circulation.

The floor is heated with 5 circuits of tubing secured to the rebar an inch under the concrete surface. It is fired by a 12 KW electric boiler and recirculation system. This is the first winter and I'm really impressed by the floor heat. Initially I was a bit concerned about heat recovery after the overhead doors have been opened, but it turned out that was not a problem afterall. I installed the chamberlain overhead door openers which greatly reduce the "open" time when moving vehicles.

You'll notice the green speaker enclosure in the ceiling. They are old school Cerwin Vega cabinets enclosed between the trusses. They can really pump out the tunes. They're outta the way, too!
 

Attachments

  • IMG_2930.JPG
    IMG_2930.JPG
    61.1 KB · Views: 110
  • IMG_2934.JPG
    IMG_2934.JPG
    90.4 KB · Views: 142
  • IMG_2929.JPG
    IMG_2929.JPG
    61.6 KB · Views: 129
  • IMG_2927.JPG
    IMG_2927.JPG
    82.6 KB · Views: 173
  • IMG_2931.JPG
    IMG_2931.JPG
    67.5 KB · Views: 124
  • IMG_2936.JPG
    IMG_2936.JPG
    72.2 KB · Views: 134
  • IMG_2923.JPG
    IMG_2923.JPG
    69.1 KB · Views: 139
OP
S

Sideshow Bob

Active member
Joined
Nov 27, 2012
Messages
27
Location
Manitoba, Canada
The shop is 32 x 40 by 10'5". There is a lot of drywall joint to fill and sand. I got the walls primed and realized it wouldn't be long before my stinky diesel would "oil" the walls. I got motivated to paint a semi-gloss finish for easy blow off and washing when necessary. Of course the semi-gloss really shows off the imperfections in my joint filling. To spice it up I added a couple contrasting green and red stripes. I left the far bay all white so it doesn't reflect in future autobody jobs. There is a bit of a trick to laying down the stripes. I used autobody thinking and went wet-on-wet to avoid another process of priming. This took a bit of time and several more beers. I used the green masking tape, pressed it on tight at the paint edge but left the other side just tacked. I used a foam paint applicator and swiped off the tape onto the stripe area to avoid pressing the pain under the tape. Once tacky, I came back with a small (4 inch?) roller to apply the semi-gloss red or green. I carefully pulled the tape off while the paint was still wet. Only a couple little touch-ups required. The finished product turned out great. Very impactful, almost a shame to put anything in front!
 

Attachments

  • IMG_2964.JPG
    IMG_2964.JPG
    94.7 KB · Views: 117
  • IMG_2963.JPG
    IMG_2963.JPG
    97.4 KB · Views: 135
  • IMG_2962.JPG
    IMG_2962.JPG
    70.1 KB · Views: 93
  • IMG_2960.JPG
    IMG_2960.JPG
    74.6 KB · Views: 89
  • IMG_2959.JPG
    IMG_2959.JPG
    70.2 KB · Views: 91
  • IMG_2955.JPG
    IMG_2955.JPG
    53.3 KB · Views: 85
  • IMG_2953.JPG
    IMG_2953.JPG
    61.7 KB · Views: 87

ShumanSS6.0

Well-known member
Joined
Nov 11, 2012
Messages
55
Location
Minnesota
Consider your speaker location idea stolen, that is brilliant.....and they are Cerwin Vega's, even better! I had a pair of 12's in my first car, people knew when I was in town. Like the stripes too! Not too often do you see dual stripes.
 
OP
S

Sideshow Bob

Active member
Joined
Nov 27, 2012
Messages
27
Location
Manitoba, Canada
The speakers were simply too big to put anywhere else. Luckily, my neighbor on the next acreage likes country music too, so I can listen to Zac Brown while cleaning the barn!
 

socapots

Well-known member
Joined
Jan 3, 2011
Messages
544
Location
Canada
very cool man.
I'll be asking you some questions in the future. Im looking to build a similar size just north of Winnipeg. Still in the very early stages of planning. I know what i want. just not sure how/if i can get it. lol
 
To avoid these ads, REGISTER NOW!
Top Bottom