To avoid these ads, REGISTER NOW!

House interior painting- edging tools?

vavet

Well-known member
Joined
Mar 6, 2012
Messages
5,330
Location
Ashland, VA
Are any of the edging tools to go around doors, windows, and other obstructions worthwhile? I was told a while ago the best way to do it to get a good angled brush and take your time. That’s the way I’ve done it since then. It’s a tedious process, but I’m not sure any of the gadgety tools are worthwhile.

thoughts?
 
Last edited:
To avoid these ads, REGISTER NOW!

demarpaint

Well-known member
Joined
Sep 17, 2010
Messages
1,237
Location
Long Island
Are any of the edging tools to go around doors, windows, and other obstructions worthwhile? I was told a while ago the best way to do it to get a good angled brush and take your time. That’s the way I’ve done it since then. It’s a tedious process, but I’m not sure anymof the gadgety tools are worthwhile.

thoughts?
A angular brush can be your best friend. If you're repainting the walls, paint the frames, and crown molding before painting the walls. Cutting in the walls after the trim I mentioned is done makes for a much better, faster, and easier job. The last thing painted in the room is the floor molding.
 

619DioFan

Well-known member
Joined
Apr 9, 2013
Messages
3,617
Location
San Diego , Ca.
I had some thin sheet metal laying around so just screwed a piece of scrap wood to it as a handle. I am not very good with a paint brush. For smaller areas I have some drywall joint compound blades that work.
 

four.cycle

Well-known member
Joined
Oct 19, 2015
Messages
29,140
Location
Tacoma, Washington
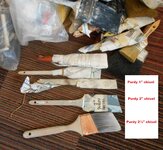
Never saw one yet that was worth hauling home.
I've never paid for one, but I've had dozens of them handed to me by homeowners who figured out they were in over their heads on a paint job and then called me.
Get a good Purdy chisel and take good care of it.
Thank me later.
 

Attachments

  • brushes 041223.jpg
    brushes 041223.jpg
    631.4 KB · Views: 51

ItsNemo

Well-known member
Joined
Mar 5, 2016
Messages
4,806
Location
Canada
Meh, frog tape the entire thing...unless you are a pro doing it daily, I've never seen anyone DIY hand cut edges worth a ****, always looks terrible.
 

djjsr

Well-known member
Joined
Sep 4, 2006
Messages
4,796
Location
In the cornfields
I recommend a Purdy "Dale" style brush. They are angled and tapered and available in a few different sizes. I use 1 1/2" and 2" with really good results. If you have a steady hand, you'll find that with a little practice you can do a lot of trim and cutting without masking or any edge tools.
 

nadogail

Well-known member
Joined
Jan 23, 2009
Messages
32,032
Location
Coronado, CA
Cheap Low Quality Brushes and Roller Covers are not a bargain. Good Paint is not cheap.

My "Paper Taper" which dispenses 6" wide masking paper with the tape attached has paid for itself many times with time and material savings over the years,
 

strutaeng

Well-known member
Joined
Dec 12, 2011
Messages
2,287
Location
Dallas, TX
I cut in by hand...looks like a professional did it.

A trick on the cut-in is to have a wet paper towel and a painter's multi tool (7 in 1). Use the tool's edge with the towel to wipe any little oops or drips along the defining edge. Patience is your friend. Take your time.


I guess tape is an option, but takes time as well and you may have paint lift off when you remove it.

A long time ago I tried the paint shield and the square sponge and didn't work as well as they advertised.
 

four.cycle

Well-known member
Joined
Oct 19, 2015
Messages
29,140
Location
Tacoma, Washington
use a Mahl stick or your other arm to steady the hand holding the brush. (and it's MAHL, godammit, NOT "Mall" or "Maul")

don't hold your breath while trying to cut an edge. breathe. don't try to paint while drinking or snorting cocaine - both will cause your hand to shake a bit.

takes a bit of practice but it can be done with just a brush. I work with my right hand free - left hand usually in back pocket.
 
To avoid these ads, REGISTER NOW!

danski0224

Well-known member
Joined
Jan 29, 2005
Messages
13,501
Location
Near Naperville, IL
A angular brush can be your best friend. If you're repainting the walls, paint the frames, and crown molding before painting the walls. Cutting in the walls after the trim I mentioned is done makes for a much better, faster, and easier job. The last thing painted in the room is the floor molding.
I do the base before the walls. Much easier for me to cut in the wall to the base.

Some painters tape along the top of the base (not on the wall) to catch/deflect drips/spots.
 

danski0224

Well-known member
Joined
Jan 29, 2005
Messages
13,501
Location
Near Naperville, IL
Are any of the edging tools to go around doors, windows, and other obstructions worthwhile? I was told a while ago the best way to do it to get a good angled brush and take your time. That’s the way I’ve done it since then. It’s a tedious process, but I’m not sure any of the gadgety tools are worthwhile.

thoughts?

Either cut it in by hand, or tape it off.

There's a trick to taping it off, though.

The "delicate" Frog Tape (yellow) is much thinner than the green stuff.

There are several videos out there, but the summary is to put the tape down, then put a tiny smidgen of white or clear latex caulking (MUST be latex) along the tape edge, make a pass with a caulking tool or finger to get almost all of the caulk off, paint/cut in over the caulk (gently), then peel the tape before stuff dries.

Obviously, you can only caulk whatever tape you can paint over and then pull within a few minutes.

I've tried it, and it works great. MUCH better than relying on tape alone.
 

billconner

Well-known member
Joined
Jul 20, 2021
Messages
6,971
Location
Thousand Islands NYS
Either cut it in by hand, or tape it off.

There's a trick to taping it off, though.

The "delicate" Frog Tape (yellow) is much thinner than the green stuff.

There are several videos out there, but the summary is to put the tape down, then put a tiny smidgen of white or clear latex caulking (MUST be latex) along the tape edge, make a pass with a caulking tool or finger to get almost all of the caulk off, paint/cut in over the caulk (gently), then peel the tape before stuff dries.

Obviously, you can only caulk whatever tape you can paint over and then pull within a few minutes.

I've tried it, and it works great. MUCH better than relying on tape alone.
Put tape on trim and press good, seal edge with trim paint, then paint wall and don't worry about wall paint creeping under tape edge.
 

demarpaint

Well-known member
Joined
Sep 17, 2010
Messages
1,237
Location
Long Island
I do the base before the walls. Much easier for me to cut in the wall to the base.

Some painters tape along the top of the base (not on the wall) to catch/deflect drips/spots.
If that works for you then there's nothing wrong with doing it that way. The only time I use masking tape is if we're hanging paper and the client did the ceiling and trim painting. If so then I'll mask off the floor trim before I prime the walls for paper.
 
Last edited:
OP
V

vavet

Well-known member
Joined
Mar 6, 2012
Messages
5,330
Location
Ashland, VA
I’ve been reading lots of stuff and watching some YT about proper painting techniques. One thing I can’t understand hs to do with keeping a wet edge of your paint. My room has 4 walls and 4 corners. At some point, I’m painting in the corner. how do I handle the first and also the last corner because it’s going to be dry by the time I work all the way around the room. Do I try to only paint to the corner on wall 1 and not go onto wall 4 initially?
 

four.cycle

Well-known member
Joined
Oct 19, 2015
Messages
29,140
Location
Tacoma, Washington
vavet said:
I’ve been reading lots of stuff and watching some YT about proper painting techniques......

Well, it's obviously simply not possible to always be painting into a wet edge.
I MASK the mopboard at the bottom of the wall.
Remove all electrical cover plates and fixtures. (Ceiling fixtures can usually be suspended by the wiring or use a piece of coathanger.)
I do not mask glass - it's too easy to clean up boo-boos with a razor scraper afterwards to screw around taping windows.

I have a 3-inch flat "slop brush". Cheap. Fairly stiff Nylon bristles. Beat to hell.
I'll use that and "glop" the paint into all the corners - using the brush as one would use a stencil brush - "dab-dab-dab-dab" - NOT "stroke".
Go around the entire room like that - lay it on in the corners so there's a "feathered" edge all the way around that you will meet up with when you go back with the roller. No brushstrokes. After two days everything will look even.
 

saltwater4life

Well-known member
Joined
Dec 20, 2009
Messages
95
Green frog tape everything you don’t want painted. Press it into trim firmly multiple passes. Paint completely over it then remove tape from wet edge.
 
OP
V

vavet

Well-known member
Joined
Mar 6, 2012
Messages
5,330
Location
Ashland, VA
Well, it's obviously simply not possible to always be painting into a wet edge.
I MASK the mopboard at the bottom of the wall.
Remove all electrical cover plates and fixtures. (Ceiling fixtures can usually be suspended by the wiring or use a piece of coathanger.)
I do not mask glass - it's too easy to clean up boo-boos with a razor scraper afterwards to screw around taping windows.

I have a 3-inch flat "slop brush". Cheap. Fairly stiff Nylon bristles. Beat to hell.
I'll use that and "glop" the paint into all the corners - using the brush as one would use a stencil brush - "dab-dab-dab-dab" - NOT "stroke".
Go around the entire room like that - lay it on in the corners so there's a "feathered" edge all the way around that you will meet up with when you go back with the roller. No brushstrokes. After two days everything will look even.
Mopboard? I’m assuming that’s what I call baseboard- the wood trim at the bottom of the wall serving as a junction with the floor. Maybe it’s a regional term? Or maybe I’m the one speaking in regional terms.
anyway…thanks for the help everyone, we got through it. Didn’t mask anything, just tried to take my time and did all my cuts in by hand. It’s not perfect, but it’s somewhere between a pro job and a “pro” job.
we actually decided to go ahead and paint the living room too. It’s been 17 years since we painted it, a pale yellow. We could not find the name of the paint color anywhere, although Im pretty sure it was moon-something. Moonlit path, moon beam, moon light….I cut away a little piece of drywall paper that will be hidden by a receptacle face plate and took it to the store yesterday…too small to use the color matching computer, but we eyeballed it against some paint chips in the store And picked one. We nailed it..which is good and bad. The good is that the cuts ins don’t have to be perfect because no one will notice the difference. The bad is that it’s near impossible to see where the new paint is and is not. we will see what it looks like tomorrow.
the first room we did Saturday looks decent but there are some spots where the paint went on too thin and you can see the white primer peeking through. Two of the walls in that room were dark green and the other two were light brown, sort of a woodland camo theme. We painted all 4 walls a slightly lighter shade of that brown (whole wheat) but we primed the two dark green walls with kilz before Painting.
Im coming to appreciate that painting is like a lot of other things….the people who make it look easy are really good at it. Anyone can do it. It takes skill to do it well and do it fast. You can sub time for skill to some extent.
 
To avoid these ads, REGISTER NOW!
Top Bottom