To avoid these ads, REGISTER NOW!

How do I fix this bad surface finish?

FastKat

Well-known member
Joined
Jan 4, 2010
Messages
553
I got a bad surface finish on this aluminum casting. Why did this happen, how do I fix it, and how do I prevent it in the future?

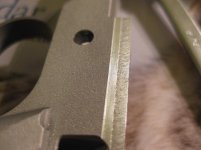
The cut in question is the one on the right. You can see the surface finish is bad. It was cut dry with the side of a new 1/8" 2 flute carbide end mill, turning somewhere around 1300 rpms I think, feeding at... well I have no idea what the power feed rate is on the current gear set. I don't know anything about feeds, speeds, etc.

Why is the surface finish so bad?
I have 2 theories:

1) I cut in the wrong direction (left to right vs right to left)

2) I might have been pushing chips up against the cut on the right when I was making the cut on the left. (The cuts were made in the upright position with the side of the mill.)


How do I fix the surface finish?
I was thinking about running a stone over it to clean it up but I don't know what grit, wet or dry, etc. I do not want to put it in the machine and recut. It is already on the low side of the tolerance.

How do I prevent this in the future? Different end mill speed, more flutes, lube, etc?

This might be a rookie mistake but I am learning and having fun doing it!
 

Attachments

  • rough finish on cut.jpg
    rough finish on cut.jpg
    67 KB · Views: 416
To avoid these ads, REGISTER NOW!

zkling

Well-known member
Joined
Jan 23, 2007
Messages
16,939
Bump up your cutting speed (RPM) for that small of a carbide cutter. You should probably be using a HSS end mill for the machine you have(?). Depth of cut ~0.010" on the finish pass and use a shot of WD40 to clear the chips, moderate feed rate. Do you have to use that small of an end mill? If not use a larger end mill to gain rigidity.

I don't know what side of the cutter you were on, but typically climb milling aluminum will give a better surface finish, just have to be careful of the machines tightness and grabbing surrounding chips.

To fix the surface finish you have, I'd use sanding stick belts, or a block of square steel tightly wrapped in wet/dry sand paper lubed with WD40, staring at ~320grit work your way up till you're happy with the finish. Right around 600-800 is usually enough.

Edit, hard to tell from the pics, but is that a pistol frame?
 
Last edited:

A_Pmech

Well-known member
Joined
May 8, 2007
Messages
8,002
Location
IL
First, the cause of the problem:

That's a classic case of re-cutting chips affecting the surface finish. It's a common problem with Aluminum and mild steel. Basically, the tool pulls in chips between it and the workpiece. Then, the chips either dent the finish or get friction welded to the workpiece and torn away.

Solutions to the problem:

1) Climb milling.

2) Using a stream of coolant to remove the chips when conventional milling.

3) Minimizing the depth of cut on the finish pass.

The line is caused by making multiple depth passes on the part with varying chip loads. What you're seeing is a combination of the surface finish problem and differential endmill deflection.

Always use the same depth of cut when making multiple passes on a part. Alternatively, leave .005" for cleanup and climb mill the final pass full depth. Shifting to a larger end mill, or a carbide end mill will also mitigate the lines.

Regarding fixing it:

If it were mine, I'd consider welding it and then stress relieving and re-heat treating.
 
OP
F

FastKat

Well-known member
Joined
Jan 4, 2010
Messages
553
Thanks for all the feedback guys. I have a mix of HSS and carbide stuff. That particular size I had carbide. I might be able to step up to a 3/16 end mill. A 1/4" end mill will not fit due to the fixture I am using. I think my mill's max speed is about 1900rpms. Also, why would HSS be better here? I thought their cut qualities were the same? (I know carbide is more brittle but stays sharper longer, and HSS is tougher but dulls more quickly... and in that size range their about the same price.)

So climb milling is when cutting edge is cutting in the same direction or opposite direction the tool is moving? Should all cuts like this be climb cuts?

Also, that second cut (the one on the left) is not to the same depth. It was a slightly shallower cut. I abandoned it when I realized I did not need to do it. (Oops!) That area will but cut with a keyseat cutter later.
 
Last edited:

A_Pmech

Well-known member
Joined
May 8, 2007
Messages
8,002
Location
IL
Kat,

This page illustrates climb versus conventional milling:

http://en.wikipedia.org/wiki/Milling_cutter#Conventional_milling_versus_climb_milling

Remember that your tool is always deflecting. Making accurate cuts depends on two factors:

1) Knowing which direction your tool will deflect.

2) Predicting the magnitude of the tool deflection.

Number 1 involves basic visualization of forces. Number two involves taking multiple cuts of the same chip load and observing the result. In other words, touching the end mill off on the side of the part, then moving .2" into the part and taking a side milling cut is not going to remove .2" of material. It will remove more if conventional milling and less if climb milling.

To counteract this problem you need to make several light finishing passes in the SAME direction until the dimension stabilizes predictably. With practice, you can get away with one roughing and one finishing pass. Until that time, leave yourself at least .015" for cleanup. Take a .005" climb milling pass and measure the result. Then take another .005" pass and make sure the machine took off .005". If everything is spot on, a final .005" pass will have you on-size.
 

iajonesy

Well-known member
Joined
Feb 8, 2009
Messages
2,467
Location
Iowa
His work piece looks to be cast aluminum,which will not cut as well as forged or extruded. With that working against him and the small dia. of the end mill he was going yo have problems from the git go.

Mike
 
OP
F

FastKat

Well-known member
Joined
Jan 4, 2010
Messages
553
Thanks for the info guys. That was a good link.

What do I want my chips to look like? When I did the other side I think they looked like little splinters and the surface finish there was good.

It seems like climb milling is the way to go. I have an older but pretty stout machine and I think in the manual it said there was a backlash eliminator. I guess I'll experiment and see how it goes.

Also, any advantage going up to a 3 or 4 flute end mill?
 

iajonesy

Well-known member
Joined
Feb 8, 2009
Messages
2,467
Location
Iowa
More flutes will clean the cut a little better than a 2 flute. You might have a hard time finding more than 2 flute 1/8" cutters,not really sure if they are made.

Mike
 

k-os

Well-known member
Joined
Dec 29, 2012
Messages
995
Location
WI
2 Flute is usually preferred for aluminum for chip clearing.
 
To avoid these ads, REGISTER NOW!

A_Pmech

Well-known member
Joined
May 8, 2007
Messages
8,002
Location
IL
For as light a cut as you should be taking for finish passes, you won't have any trouble with the tool trying to grab.
 

ranger302

Well-known member
Joined
Apr 4, 2011
Messages
288
Location
RALEIGH NC
Cutting aluminum = the fastest speed the spindle will go. My Ex-Cel-O mill tops out at 3800rpm and I sometimes want more. Also try flood coolant with WD-40.
 
OP
F

FastKat

Well-known member
Joined
Jan 4, 2010
Messages
553
Okay sounds good. I tried on my highest spindle speed (I think around 1900 rpm) but I got a screeching sound at the beginning of the cut. After a second or two it went away. I dialed back the speed a little and no more screeching sound. What was that all about?

Also, I thought I saw somewhere that you are supposed to cut dry with carbide?

What should my chips look like? At one point they looked like little needles and the finish was pretty good I think.
 
OP
F

FastKat

Well-known member
Joined
Jan 4, 2010
Messages
553
So aside from recutting, how can I fix that surface finish? Maybe a stone? Some sort of lube? Anybody have some specific suggestions?
 

zkling

Well-known member
Joined
Jan 23, 2007
Messages
16,939
So aside from recutting, how can I fix that surface finish? Maybe a stone? Some sort of lube? Anybody have some specific suggestions?

I don't like using stones on aluminum, they load up too easily.

To fix the surface finish you have, I'd use sanding stick belts, or a block of square steel tightly wrapped in wet/dry sand paper lubed with WD40, staring at ~320grit work your way up till you're happy with the finish. Right around 600-800 is usually enough.

Realize to improve the surface finish you will have to take material off; reducing the peaks into the valleys. Surface finish is all about decreasing the peaks of the surface to reflect light.
 

Kevin54

MEMBER EMERITUS
Joined
Jan 12, 2005
Messages
29,341
Location
Urbana, Ohio
Dave....one thing to remember for a good finish, climb vs. conventional is and outside cut is clockwise, inside is counterclockwise.

With what you have now, if you can't recut it, take a medium to fine stone and some WD40 and stone it down to get the finish smoothed out.
 

bobss396

Active member
Joined
Jan 3, 2008
Messages
40
Location
Long Island, NY
Outside of taking a finish pass, there's not much you can do with it. Castings also may not clean up as well as wrought materials, like plate and bar stock.

Part of the problem is having to use such a small diameter end mill. Something like that I'd use a 3/8" or 1/2" end mill that I keep in holders for general machining.
 
To avoid these ads, REGISTER NOW!
Top Bottom