
You are using an out of date browser. It may not display this or other websites correctly.
You should upgrade or use an alternative browser.
You should upgrade or use an alternative browser.
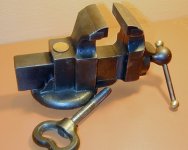
How do I fix this vise ?
- Thread starter Jeanke
- Start date
Thanks for the info, I will search around for info. Pre-1900 is just insane in my opinionYes, that is an early Parker, you can tell by the style and the jaws. Most vises with the center post like that are pre-1900... Newer vises they switched to multiple holes in the base for mounting, and eventually swivel bases and such.
Looks like the slide broke and it was repaired a long time ago. I'm sure it will continue to work just fine for a long long time.
The only ad I have showing an old parker with the one center post is from 1901 and it's a different model. I don't really get into those models so I don't keep any info I come across, though you can probably find some scanned catalog images on eBay if you search for "Parker Vise".

I put a second coat of primer on this morning (after waiting the appropriate amount of time). It did get a lot less 'thick' overnight, so a second layer didn't seem to be an issue anymore. I'll put the final coat(s) of paint on this weekend. I'm curious how many layers of rustoleum I should put on that? Is it only one? Two? Three?
Can someone let me know if it is a good/bad idea to rub WD40 over the slide to prevent it from rusting? Or can I put that same grease I put on the screw on the slide? Or preferably not? I can not get my hands on that wax, not sure why, but I can not find it. So am asking for alternatives in this area..
Also, does the 'handle' require any treatment? I would put some oil on it, but as I also use this vise (or will use) with woodworking, it would be a bit of a hassle to have an oily handle when I'm holding on to untreated wood.
Many thanks for all the replies!
edit :I have https://www.google.be/search?q=RAL+5012&safe=off&espv=210&es_sm=93&source=lnms&tbm=isch&sa=X&ei=VKHXUorWEomRtQbmv4CICQ&ved=0CAkQ_AUoAQ&biw=1600&bih=798 color
Last edited:
Update here after the second layer has been setting a bit, I took of the masking tape at this stage and will reapply before putting on the coat of blue. I prefer to take masking tape of between primer & paint for risk of the primer/paint afterwards peeling off with the tape. The masking is not super perfect, but definitely more than good enough for a vise!
I must say, I'm very happy that I followed your advise on putting the primer and putting two layers. It definitely looks a lot sharper just by that..


I must say, I'm very happy that I followed your advise on putting the primer and putting two layers. It definitely looks a lot sharper just by that..
never seen yellow masking tape over here in US. by the way is the pizza good in your town?
That's a funny fact, here I'd say yellow is the most common one, from a company called 'Tesa'
The blue one, which I have aswell, is less 'sticky' and is used when you have to tape off a delicate surface (for example, on a painted wall, where too strong a tape could tear off the paint from the wall afterwards).
The pizza is delicious here, it is just around the corner
I came to the strange conclusion today, that I'm gonne need to build a workbench for this vise...
 Until now I postponed that project, mostly working either on the floor or with the Workmate..
 Don't mind the mess, but against that wall I'll build one long bench, or at least that's my plan. Depends on the height of the bench and whether or not I will fit the rolling cart under it, or next to it. Mind you the brown on the walls is not water or humidity, that is just my very un-neat way of applying PUR isolation in the corners lol.. First thing I'm gonne do, looking at that picture, is fix up that nasty window, ugh...

EOC_Jason
Well-known member
Can someone let me know if it is a good/bad idea to rub WD40 over the slide to prevent it from rusting? Or can I put that same grease I put on the screw on the slide? Or preferably not? I can not get my hands on that wax, not sure why, but I can not find it. So am asking for alternatives in this area..
Also, does the 'handle' require any treatment? I would put some oil on it, but as I also use this vise (or will use) with woodworking, it would be a bit of a hassle to have an oily handle when I'm holding on to untreated wood.
If you can't find paste wax, you can also use car wax... Or WD40 will also work just fine, a little surface rust isn't going to hurt anything.
I usually put a thin layer of heavy grease on the bottom part of the slide, to reduce the friction as it goes in & out of the static housing.
Handle you can wax also, I've also seen some people paint them.
Handle you can wax also, I've also seen some people paint them.
Definitely not going to paint the handle, somehow that makes absolutely no sense to me
Good tip on the grease at the bottom, I will certainly do that. And thanks for the info on WD40, luckily this is available everywhere and can be used for pretty much anything
Would it be possible to link to (I assume there is) the tread where you detail the vise in your avatar? Looks really nice. Scrap that, I found your thread. Funny thing you mention somewhere along that huge thread that you were "Waiting on the sticker to arrive for the other side, but other than that it's good to go!" Sounds like the thing I'm thinking of doing on both sides, or are we talkig about a different sticker here? Any chance of getting some info on that?
Last edited:
EOC_Jason
Well-known member
Would it be possible to link to (I assume there is) the tread where you detail the vise in your avatar? Looks really nice. Scrap that, I found your thread. Funny thing you mention somewhere along that huge thread that you were "Waiting on the sticker to arrive for the other side, but other than that it's good to go!" Sounds like the thing I'm thinking of doing on both sides, or are we talkig about a different sticker here? Any chance of getting some info on that?
The vise in my Avatar is my Ridgid 41SN... The one with a sticker was a Parker 974-1/2B.... It was only the union parkers' that had a sticker. Most old vises had the info cast into the side with raised letters. Probably over time yours might have worn down.
Ah but no, it does not have it cast, and to me it seems that it had 'stickers' bolted on each side, as evidence by the two holes here on the side and the exact same two holes on the other side. There is no grinding on the side that would point that the casted 'parkers' has been worn off.

drivesitfar
Well-known member
not sure what materials you have or how big a piece you can transport, but commercial doors are a good source for a workbench top. if there is any remodeling of a nice office building going on around you sometimes the contractor will give you or sell the doors he is removing fairly cheap if you have the ability to haul it off. if you happen to get one long enough to cover the span under the window all you'll need to do is screw a couple 2 x 4's into the walls on each side, screw the bench top (door) onto the 2 x 4's and put the door knob hole at the back in the middle and uses for wires and you can roll the carts and tool boxes under it. make sense??
or just buy a 4x8 sheet of 3/4 inch plywood and cut it into 2 pieces that are 2 x 8 and treat that as your bench top. if the span is wider than 8 foot then you'll have to build some sort of legs and support other than using the walls.
mineral oil works and even olive oil might to keep the rust at bay and just an FYI WD 40 works and will dry out fairly quick so will have to keep applying as you propbably will with the oils.
I have some old Rock Island vises that have a tag on them, but I've never seen a Parker tag. some guys tape off the jaw portion a little different and the paint the parts you left unpainted where the handle goes in, but you are doing a great job and looking forward to seeing the final blue color on Gramp's vise. coats depends on the way you want it to look and the climate. i'd probably put a couple coats on and see how it looks when dry and add another if you like or if you have a muggy climate in the summer months.
good luck
not sure what materials you have or how big a piece you can transport, but commercial doors are a good source for a workbench top. if there is any remodeling of a nice office building going on around you sometimes the contractor will give you or sell the doors he is removing fairly cheap if you have the ability to haul it off. if you happen to get one long enough to cover the span under the window all you'll need to do is screw a couple 2 x 4's into the walls on each side, screw the bench top (door) onto the 2 x 4's and put the door knob hole at the back in the middle and uses for wires and you can roll the carts and tool boxes under it. make sense??
or just buy a 4x8 sheet of 3/4 inch plywood and cut it into 2 pieces that are 2 x 8 and treat that as your bench top. if the span is wider than 8 foot then you'll have to build some sort of legs and support other than using the walls.
mineral oil works and even olive oil might to keep the rust at bay and just an FYI WD 40 works and will dry out fairly quick so will have to keep applying as you propbably will with the oils.
I have some old Rock Island vises that have a tag on them, but I've never seen a Parker tag. some guys tape off the jaw portion a little different and the paint the parts you left unpainted where the handle goes in, but you are doing a great job and looking forward to seeing the final blue color on Gramp's vise. coats depends on the way you want it to look and the climate. i'd probably put a couple coats on and see how it looks when dry and add another if you like or if you have a muggy climate in the summer months.
good luck
Thanks for the info, I certainly have a general idea how I will put the bench together, I just never got to it
Just have to make up my mind on the size/shape of the thing and how/if to integrate the tool cart & Workmate.Thanks for the confirmation for WD40
drivesitfar
Well-known member
my rule is a bench or a vise can never be too big because I tend to use them as collection areas when not using them.
glad the pizza is close by and good.
glad the pizza is close by and good.
Childhood flashbacks right now, I just noticed that without the caps, the jaws don't fully close, with the caps they close perfectly. yep, this surely is the vise I used when running around in his garage :-D I could get them to line up tightly by filing away at the weld a tiny bit, but if he never saw the use in doing it, then why would I... With the caps, which I should use in any case, the alignment is perfect.
I assembled everything together to check where I should take away primer/avoid painting. Glad I did that, I also spotted some spots that actually could use some paint/rust protection.
Received a new Estwing hammer today, so included it in the pic


I assembled everything together to check where I should take away primer/avoid painting. Glad I did that, I also spotted some spots that actually could use some paint/rust protection.
Received a new Estwing hammer today, so included it in the pic
EOC_Jason
Well-known member
is it possible those holes (2 each side of moving jaw) are to 'oil' the inside of the vise or something? I'm really wondering what they are there for..
I've only seen an oil hole on the late-model Reed's. And if it was an oil hole you would only need 1.
They seem a little large to affix a tag, the few I've seen just have one tag on the side and they are held in with rivets.
It's really impossible to know for sure. They could of held some tag in place, or it could of been for some pins for some sort of custom fixture. I've seen some vises with holes up around the jaws, but never down there.
Probably just going to end up being one of the greater mysteries in life.
Finished vise looks good.


Mohawk Dave
Well-known member
looking good. What is that thing in the background with the wheel and shocks on it? A baby stroller????
drivesitfar
Well-known member
you are doing great and I almost always use my copper jaws so no reason to get vise to shut any more. Gramps jaw covers look perfect on that vise.
keep up the good work and maybe this weekend a finished blue vise with pictures for us to enjoy.
i'm with Jason that usually only one oil hole and I've only seen them on the older Reed vises. you know some of the guys attached things to some of their tools. Did your Gramps vise ever have anything there attached or holding a punch or something?
Holes in the jaw - maybe for pins that originally pinned the slide in? I've seen some vises that had what appeared to be pins in this locations, but surely only to hold it for brazing or welding a separate slide into the jaw??? WAGging here!
looking good. What is that thing in the background with the wheel and shocks on it? A baby stroller????
Haha, yes indeed, the Misses had just parked it there, I moved it afterwards to avoid any accidents while working there
In case you're looking for one, very happy with this one albeit extremely expensive:

you are doing great and I almost always use my copper jaws so no reason to get vise to shut any more. Gramps jaw covers look perfect on that vise.
keep up the good work and maybe this weekend a finished blue vise with pictures for us to enjoy.
i'm with Jason that usually only one oil hole and I've only seen them on the older Reed vises. you know some of the guys attached things to some of their tools. Did your Gramps vise ever have anything there attached or holding a punch or something?
Thanks for the feedback all. I will of course post the finished blue vise, I can't wait to see it myself
I can not remember anything being attached here, but I didn't know my gramps that long as I was a late arrival in the family, so who knows what they did with their tools. It will remain a mistery as you all stated indeed.
It would just be cool if I could be certain that it is a Parker vise, but I guess there is no way of being certain
Mohawk Dave
Well-known member
Thanks so much for digging through your vises!µ
They do look almost identical, I also like how the 'weld' wasn't super clean yet at that time, it adds character
I have the impression that mine is slightly less old thatn that one, as the part just behind that moving 'ball' which most people polish (as did you) to me is not forged fixed, but screws on (it is the part that allows the vise to not only screw in, but also outwards).
Mohawk Dave
Well-known member
Right on, but just to clarify, that is not my vise. I started saving pictures on my computer of all vises, I have probably a couple thousand photos, labeled with size and weight if it was given. Just a little database.
Yours has been added as well.
Yours has been added as well.
Right on, but just to clarify, that is not my vise. I started saving pictures on my computer of all vises, I have probably a couple thousand photos, labeled with size and weight if it was given. Just a little database.
Yours has been added as well.
Oh very interesting, I hope you also store pictures of the finished vise in this case, and not only in it's rusty naked form
I will see if I can find a scale to weigh it. FYI - The jaws are 9cm wide, just shy of 10cm.
EOC_Jason
Well-known member
It would just be cool if I could be certain that it is a Parker vise, but I guess there is no way of being certain
I can say with 100% certainty it IS a Charles Parker vise.
You have to realize too, sometimes the vise makers would sell their vises without any labeling on them to other companies (in this case hardware / general stores) to sell under their own house brand. (Today's term it's called "rebadging".)
If you look at the pictures of all these Parkers, you can see all the style cues that give it away. Parker was the only company to make those arched jaw inserts that cover the top.
http://dayid.org/mediawiki/index.php/Charles_Parker_Vise
.
So cool, thank you very much for that. I will somehow mark it as a parker then, not sure how yet, but I must Am thinking of somehow painting it with my art-fu skills on the vise in block letters, but not sure how easy that is! Any rule on writing Parker, or Chas. Parker or anything else along those lines?
Like this for example

Not sure if to write it on the moving or stationary jaw
Am thinking of somehow painting it with my art-fu skills on the vise in block letters, but not sure how easy that is! Any rule on writing Parker, or Chas. Parker or anything else along those lines?Like this for example
Not sure if to write it on the moving or stationary jaw
Last edited:
drivesitfar
Well-known member
for a second I thought Gramp's vise gained a swivel jaw and some size. nice choice of a example by the way. that Parker name is in the cast on that vise and it has raised lettering. the owner of that nice swivel jaw Parker bought a small brush and some model paint at the hobby store and took a fair amount of time to paint them white. some of the more talented guys might do it sort of like pin striping a car by taping off and painting it all at once.
i'd say not to freehand a Parker name on your vise unless you have that skillset which you may have and since you have a blank canvas put Parker wherever you wish.
i'd say not to freehand a Parker name on your vise unless you have that skillset which you may have and since you have a blank canvas put Parker wherever you wish.
EOC_Jason
Well-known member
Since you have the holes on the end of the dynamic jaw, why not make a little plate or something then rivet or screw it to the vise?
I did indeed want to make a plate, but not sure if i have the skillset to make anything goodlooking, i want to avoid having to buy all sorts of gear just to makepr etty plates of course if you have a solution as to make nice looking plates, that would be welcome information!
I think i will tape the letters, then spray paint with the blue, it will look retro i think. So the parker would be perfectly written in fleshy color, and the rest in blue. Sorta like this classic bianchi bike:

I would put parker on the fixed jaw in this case...
of course if you have a solution as to make nice looking plates, that would be welcome information!I think i will tape the letters, then spray paint with the blue, it will look retro i think. So the parker would be perfectly written in fleshy color, and the rest in blue. Sorta like this classic bianchi bike:
I would put parker on the fixed jaw in this case...
Last edited:
drivesitfar
Well-known member
give it a try and maybe take a peak after one coat of blue to see if you like it and if you do then replace the tape and shoot another coat of blue with the Parker there. if you don't like it then just pull the tape and paint the entire vise blue.
Jason had another great idea and maybe a local shop in your area can punch you out a tag sort of like the old military dog tags. my rusty Rock Island 577 that is on the list to restore has a small tag. maybe put on Gramps name with a phrase he said or just details or information about you. or just Parker if that is what you like. just throwing out ideas and you are doing great so far.
Jason had another great idea and maybe a local shop in your area can punch you out a tag sort of like the old military dog tags. my rusty Rock Island 577 that is on the list to restore has a small tag. maybe put on Gramps name with a phrase he said or just details or information about you. or just Parker if that is what you like. just throwing out ideas and you are doing great so far.
Attachments

I definitely like the tag idea, it is my favorite one. Just wouldnt know how to make them. Perhaps i can order online?
Also,small update, i started polishing the knob based on that blacj vise, i think it looks better and makes sense, i think the paint would strip off there very fast.
Also,small update, i started polishing the knob based on that blacj vise, i think it looks better and makes sense, i think the paint would strip off there very fast.
Another tag idea I've used: Whip up a nice design on your computer - doesn't require those pesky brush-pinstriping skills! Then mirror-reverse it and laser-print on clear film. Then you can glue the film to a nice metal plate and rivet it in place. I've done this on smooth surfaces - it probably wouldn't work directly on the rough cast iron.
I say to mirror-image it because then the printed side is bonded to the plate and protected from scratches by the film.
Be sure to get film that is rated for LASER printing! If not, it will melt in the fusing assembly and make a horrible, probably irreparable mess.
I haven't tried this with inkjet printers; don't know whether there even is a clear film that will work with them.
Very good idea, that might actually work. But I figure I can always 'add' them later if I feel the vise is missing something I have indeed seen that idea you mentioned above, on the forum, perhaps it was your thread (I believe it was a grinder or something that was superbly restored).
Update prior to the paint tomorrow/this weekend, I have taken off the paint from the knob and polished as far as I wanted to go (no point in mirror finish for me). Very glad I did this, waaaaay better result. Looks like a sturdy vise again
Here in the middle of cleaning up, with the help of my Workmate table vise...

The final result prior to final paint

I also polished the little screw, to finish it all off


Edit:
Ah yes, and on the vise, I found this ONE marking, it is on the knob. No clue what it means or stands for, but it seems to come from the factory and not afterwards like the weld for example

L2, or 12? Or something along those lines? It is not aligned perfectly..
I have indeed seen that idea you mentioned above, on the forum, perhaps it was your thread (I believe it was a grinder or something that was superbly restored).Update prior to the paint tomorrow/this weekend, I have taken off the paint from the knob and polished as far as I wanted to go (no point in mirror finish for me). Very glad I did this, waaaaay better result. Looks like a sturdy vise again
Here in the middle of cleaning up, with the help of my Workmate table vise...
The final result prior to final paint
I also polished the little screw, to finish it all off
Edit:
Ah yes, and on the vise, I found this ONE marking, it is on the knob. No clue what it means or stands for, but it seems to come from the factory and not afterwards like the weld for example
L2, or 12? Or something along those lines? It is not aligned perfectly..
Last edited:
EOC_Jason
Well-known member
Ah yes, and on the vise, I found this ONE marking, it is on the knob. No clue what it means or stands for, but it seems to come from the factory and not afterwards like the weld for example
L2, or 12? Or something along those lines? It is not aligned perfectly..
Some vise makers would stamp each set of parts (typically on the bottom) with a number so they would be kept together through the production process. Since many parts were hand-fitted together, especially earlier vises.
Instead of using WD40 consider using garage door lube. I use PB Blaster garage door lube on bare metal and so far it works great. It dries to a slick non greasy finish. I used it on my Reed 6" 206 swivel base vise and it made a world of difference. I also used it on my anvil and arbor press. The bare metal shows no sign of rust even in the humid air we have here.
Light and colors are a bit off here, it is not that bright as in the picture Picture while the paint is drying...
Any clue how long the wait time is for rustoleum before I can put these together? They are sitting outside, didn't think this through, it may just start raining later today... fingers crossed :O


Picture while the paint is drying... Any clue how long the wait time is for rustoleum before I can put these together? They are sitting outside, didn't think this through, it may just start raining later today... fingers crossed :O
Outlawmws
Well-known member
Looks great Jean,
I'd get those inside once the initial cure is done, and under a heat lamp, not too close.
Its too cold this time of year to cure fast outside. (unless you are down under...) Check your paint can cure time instructions and add a day, as in my experience their times are optimistic... And this presumes you get then under a heat source...
Looks great Jean,
I'd get those inside once the initial cure is done, and under a heat lamp, not too close.
Its too cold this time of year to cure fast outside. (unless you are down under...) Check your paint can cure time instructions and add a day, as in my experience their times are optimistic... And this presumes you get then under a heat source...
Thanks Outlaw, I had no choice but to move them inside due to pending rain. I seem to have done no damage, so far so good. They are now drying in the basement around 16°C
Should I leave them there a week or so? There are no drying instructions on the can, only repaint within 1 hour or 48hrs, nothing else.

Wow at my camera, they are really not THAT blue lol
drivesitfar
Well-known member
I'm guessing you went outside so you didn't have to worry as much about the over spray? Spray paint works best when over 60 degrees and not sure it is that warm where you live especially at night. Outlaw is right you should get them inside ASAP and even under a desk lamp next to it will help. not sure if you own a heat gun, but that can help and again not too close.
Really nice job on put Parker on both sides and not entirely sure how you did that. also since you did a couple coats of primer you might only need the one coat of blue if you like the finish.
maybe next time you need to spray if the weather is iffy just set project on your pizza boxes in the corner on the floor or on a small box and put some more cardboard up against the wall and that might help control the over spray.
again you are doing a great job and inspiring me to get some of my vises done that are needing a tune up desperately.
Outlawmws
Well-known member
What is the full cure time on your paint, and at what temp? It is on the can.
Yes most paints work best @ 60F (16C) + or so (again, it's on the can).
I've painted many time using a large box (Washer/dryer/refer? or U haul sell large cube boxes and wardrobes....) as a temp paint booth. Heck, one was in my parent's garage when I was young so long it was near permanent. The biggest issuer there is fumes, and back floating mist. so a respirator with suitable cartilages is in order... clamp on work light with a flood or heat bulb and you are in business...
I've done the same outside for the shooting, and then moved the parts inside for drying; same basic setup. Just plan for it and done tumble the parts when wet...