To avoid these ads, REGISTER NOW!

How hard is it to replace a door frame and door?

To avoid these ads, REGISTER NOW!

loganb

ALLIANCE MEMBER
Joined
Dec 29, 2011
Messages
5,634
Location
Omaha, NE
Going to need pictures of the existing door to give a better answer.

Sent from The Garage Journal mobile app
 

58Yeoman

Well-known member
Joined
Oct 1, 2010
Messages
8,999
Location
Central IL
Home Depot has a video showing the basics on how to do it. I just replaced my second door (Menards) on my garage. I had everything level and plumb, but the inside jamb didn't line up with the drywall like the old door. I'd already burned the old door jambs, so I couldn't see if there was any difference. I'm suspecting the drywall in the garage was the culprit.

Be sure to use silicone sealant on the bottom of the threshold, three strips.
 

The Cobbler

Super Moderator
Staff member
Joined
Oct 24, 2013
Messages
25,994
Location
Niagara Region, Ontario, Canada
this is a case of easier to show someone how to do it than to explain on a forum.
set the door frame plumb with the hinge side. if the frame width is the same as the width of your wall, set flush with outside wall. screw the hinge side plumb with as few shims as you can . be sure the floor is level, if not shim under the low side to level it. you want equal space along the top, bottom and edge of the door. shim & screw accordingly . keep trying the door as you progress to be sure it has a nice open /close feel to it. make sure the door closes flush and equal on the latch side , don't just go by the framing of the building.
Hope this helps
 

nadogail

Well-known member
Joined
Jan 23, 2009
Messages
32,051
Location
Coronado, CA
In order to build a house you are going to need a bunch of shingles for shims because not everything is truly vertical, level, or square.
 
OP
F

FTG-05

Well-known member
Joined
Oct 11, 2012
Messages
1,543
Location
TN
Home Depot has a video showing the basics on how to do it. I just replaced my second door (Menards) on my garage. I had everything level and plumb, but the inside jamb didn't line up with the drywall like the old door. I'd already burned the old door jambs, so I couldn't see if there was any difference. I'm suspecting the drywall in the garage was the culprit.

Be sure to use silicone sealant on the bottom of the threshold, three strips.

On my list for tomorrow! Thanks.
 
OP
F

FTG-05

Well-known member
Joined
Oct 11, 2012
Messages
1,543
Location
TN
In order to build a house you are going to need a bunch of shingles for shims because not everything is truly vertical, level, or square.

Got tons of shims. For some reason HD have a 5 pack minimum to order it. ????? :headscrat
 

ddawg16

Well-known member
Joined
Jul 11, 2008
Messages
21,005
Location
S. California
Rule #1.....walls are not straight....

If the existing one is rotted out, expect the king studs to also be rotted.

Be prepared to have something to cover the opening while you do the work. It may require major surgery. Rip out the existing frame....it's basic carnage.

If you have molding around the door, pull it first. Then a prybar to pull off one side....then the top...and then the other side.
 

Glemon

Well-known member
Joined
Aug 29, 2020
Messages
2,195
Location
NE
What ddawg16 said, pull the old trim off (gently if you want to try to re-use it). A lot will be revealed, in the perfect world the new door frame will match the old and you can just put the new one in the same way the old was installed. It might also point you to where you need to shim, but once again, check for plumb and square and trial fit before you commit. As with any new job, a lot becomes clear as you dive in, but it usually doesn't work out quite as you expect.
 
OP
F

FTG-05

Well-known member
Joined
Oct 11, 2012
Messages
1,543
Location
TN
Rule #1.....walls are not straight....

If the existing one is rotted out, expect the king studs to also be rotted.


Be prepared to have something to cover the opening while you do the work. It may require major surgery. Rip out the existing frame....it's basic carnage.

If you have molding around the door, pull it first. Then a prybar to pull off one side....then the top...and then the other side.

Uh oh. :(
 

matt_i

Well-known member
Joined
Mar 14, 2008
Messages
10,752
Location
SE Michigan
Like any job you tear into it and see what problems develop along the way. Could be a snap done in an afternoon with zero additional trips for supplies, could be very difficult with custom modifications needed at every step of the way...

I would say a good hard look at weatherproofing and flashing(s) is(are) in order as to not repeat this job in the future.
 

Dustball

Well-known member
Joined
Jun 25, 2011
Messages
2,081
Location
Hudson, WI
To remove the old door/jamb-
Cut any caulking sealing the exterior brick mold to the siding.
Pull door hinge pins out and pull off door.
Pull off interior trim.
Remove the hinge screws going into the frame. Some of these screws may be long.
Use a reciprocating saw to cut any nails going from the jamb into the framing.
Push out on the jamb/brick mold to free it from the house. There will probably be nails attaching the brick mold to the house.
 

Showkey

"MEMBER EMERITUS"
Joined
Aug 9, 2014
Messages
8,638
Location
Wausau WI
Very common job on any service door 20 years old.......10 years if subject to excessive rain splash. Often extra added seal can really help.

Worse case the sill damage would require more work if the area under the sill is wood. Garage the sill support is likely concrete.

:dunno:Second door should take less than 1/2 day all in.:)

Repair with a Dutchman or splice on the lower corners is very common.
If the rot was found and treated in reasonable time frame 90% chance no structure damage.

Splice repair shown:
57C9FC3B-223A-4EBD-94D4-706EF2A8B88A.jpg
 
Last edited:

niget2002

Well-known member
Joined
Oct 2, 2012
Messages
11,260
Location
Josephine, TX

Dang it. Someone beat me.

Most used tool when I replaced the two doors I've replaced.

BTW. If you ever buy a DR Horton house without a back porch, expect to have to replace the back door at some point. They don't properly seal the bottom of the door jams.
 

ez-duzit

Well-known member
Joined
Jun 24, 2013
Messages
5,104
Location
Marina del Rey
"How hard is it to replace a door frame and door?"...any tips, tricks and suggestions?..,

If it was easy everyone would DIY it and there would be no specialists. :)

Easiest to buy the door already set in the frame with hardware. Then all you need to do is install it. No locksets or hinges to mortice.
 

Falcon67

Well-known member
Joined
Jun 11, 2009
Messages
18,371
Location
Merkel, TX
Not terribly hard, but every one I've done has been a different adventure. And yes, no walls are plumb, no opening square. I re-trimmed out back door inside to match changes to the front door trim when I put the new fancy front in the house. I had to do all kinds of weird little tweaks to the trim because the drywall and the door frame were proud of the frame in the top 1/3 of the strike side.
 
To avoid these ads, REGISTER NOW!

theoldwizard1

Well-known member
Joined
Feb 22, 2011
Messages
43,294
Location
SE MI
The real trick is removing and re-installing the molding and making it look good enough for the "inspector" !
 
OP
F

FTG-05

Well-known member
Joined
Oct 11, 2012
Messages
1,543
Location
TN
Rule #1.....walls are not straight....

If the existing one is rotted out, expect the king studs to also be rotted.


Be prepared to have something to cover the opening while you do the work. It may require major surgery. Rip out the existing frame....it's basic carnage.

If you have molding around the door, pull it first. Then a prybar to pull off one side....then the top...and then the other side.

You and your prediction forked me up.

Hence, I'm putting a pex on you!

Hardware store, then HD to get the door/window sealing tape. Then your forking prediction - back to HD for some treated 2x4's. I was exhausted and I hadn't done ****-poop all day except drive!

I'm on my 2nd drink, sue me! :lol_hitti
 

ddawg16

Well-known member
Joined
Jul 11, 2008
Messages
21,005
Location
S. California
You and your prediction forked me up.

Hence, I'm putting a pex on you!

Hardware store, then HD to get the door/window sealing tape. Then your forking prediction - back to HD for some treated 2x4's. I was exhausted and I hadn't done ****-poop all day except drive!

I'm on my 2nd drink, sue me! :lol_hitti

:lol_hitti

:beer:

Be sure to post pics.

Just remember....all of us have been there.....
 

yeldogt

Well-known member
Joined
Jan 2, 2012
Messages
18,184
Most doors rot because they are not installed correctly --- doors need a waterproof pan that wraps up the sides ... caulking the sill often causes the rot problem as it does not allow the wood to dry. Remember -- everything leaks. You want to allow drying when you build.

Another problem with pre-hung doors is the sill -- if the door is exposed to any weather it needs a sub-sill. Look at any old house -- the door sill extends past the building to allow water to drain and drip off and away .... this is almost never done.

The laws of fluid dynamics have not changed -- with no dip edge the water whips around and wets the sill.
 

58Yeoman

Well-known member
Joined
Oct 1, 2010
Messages
8,999
Location
Central IL
Both my replacement doors were in the garage with cement floor and aluminum thresholds. Now, the potting shed in the back yard is another story; it was here when we bought the place and is literally dissolving in place. I think we're going to replace the whole shed next year.
 
OP
F

FTG-05

Well-known member
Joined
Oct 11, 2012
Messages
1,543
Location
TN
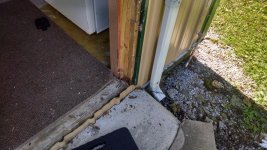
Pics:

Shop Personnel door. You can see the rot along the frame. More about that later.
 

Attachments

  • IMG_20200930_091913136 (Large).jpg
    IMG_20200930_091913136 (Large).jpg
    54.4 KB · Views: 69
  • IMG_20201002_132614673 (Large).jpg
    IMG_20201002_132614673 (Large).jpg
    147.9 KB · Views: 123
  • IMG_20201002_132617634_HDR (Large).jpg
    IMG_20201002_132617634_HDR (Large).jpg
    156.5 KB · Views: 61
  • IMG_20201002_132622722 (Large).jpg
    IMG_20201002_132622722 (Large).jpg
    152.8 KB · Views: 60
  • IMG_20201002_132626554 (Large).jpg
    IMG_20201002_132626554 (Large).jpg
    148.8 KB · Views: 58
OP
F

FTG-05

Well-known member
Joined
Oct 11, 2012
Messages
1,543
Location
TN
See that green frame around the door in the first pic above, especially at the top?

Here's what it looks like when it was removed:

It's a basically a U-shaped piece of metal *designed* to catch water, trapping it, then direct it to the frame area to essentially purposefully rot the frame. :mad::mad::mad: I guess they figured the gutter with some cheap **** foam was going to keep all the water out of that sub-gutter flashing.

So after getting the trim out, I see all the rot. Back to HD I go for some PT 2x4's. Fortunately, they had some. What they didn't have was any decent Z flashing that I could install above the door to shed - instead of capturing - water. So back to Discount Metals Monday AM (they're closed Saturday) - a local metal roofing supplier.

I've got most of the 2x4's replaced now with PT. What I don't know what to do about is the horizontal 2x6's. They go all the way to the main shop 6x6's and are about 7' long. To get to them, I'd need to remove siding panels, which are about 3' wide, but the full height of the building. :confused:

Thanks for looking!
 

Attachments

  • IMG_20201002_141008779 (Large).jpg
    IMG_20201002_141008779 (Large).jpg
    159.1 KB · Views: 49
OP
F

FTG-05

Well-known member
Joined
Oct 11, 2012
Messages
1,543
Location
TN
One of the questions I'm going to ask Discount Metals. Surely this isn't the first time someone has had a problem with this.

:eyecrazy:
 

dogdog

Well-known member
Joined
Nov 15, 2011
Messages
12,711
The bottom is wicking water up I think...

The top seems might be missing some drop edge... You might have to take that gutter out and install the drip edge properly... I think my garage header was like that no drop edge installed, and ultimately rotted through after 14 years of seeping water.
 

Bert_

Well-known member
Joined
Dec 24, 2016
Messages
9,777
Location
NW Iowa
Doesn't look like it had much for flashing. Of course it leaked
 
Last edited:
OP
F

FTG-05

Well-known member
Joined
Oct 11, 2012
Messages
1,543
Location
TN
The bottom is wicking water up I think...

The top seems might be missing some drop edge... You might have to take that gutter out and install the drip edge properly... I think my garage header was like that no drop edge installed, and ultimately rotted through after 14 years of seeping water.

That be the plan. I'm getting rid of the gutter altogether.
 

dogdog

Well-known member
Joined
Nov 15, 2011
Messages
12,711
on the front bottom, you can try to see if it is a structural part that holds weight, if it is not, then you can saw cut about 1/4 or 1/8" gap and stuff it with caulking or plastic sheet to prevent it from drawing moisture or water from the concrete .... if it is at least try to get something in between to prevent moisture contact.
 

MikeF2316

Well-known member
Joined
Dec 29, 2012
Messages
9,605
Location
Thornhill, ON
Pics:

Shop Personnel door. You can see the rot along the frame. More about that later.

attachment.php


That siding in front of the threshold is bad news. It's funneling water behind it, and keeping it from ever drying out. Ideally you want a threshold that extends above your step and have the step slope away from the building slightly.
 
To avoid these ads, REGISTER NOW!
Top Bottom