To avoid these ads, REGISTER NOW!

How much material is removed when cutting? (wood)

peejay75

Well-known member
Joined
Sep 4, 2017
Messages
312
Okay, I may be overthinking this, but maybe not!

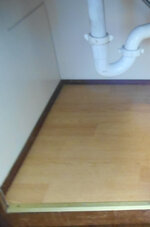
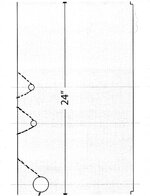
Need to replace the "floor thingy" under the kitchen sink. Let's say the board needs to measure 24" wide, and I cut out holes for the plumbing fixtures, then cut that board into 3 pieces (along the dotted lines) to slip over the fixtures. When I go to join the boards together, will it measures less than 24" wide? And if so, how much less? The width of the saw blade? Same goes for the circles, will they no longer be true circles once rejoined? And if all this is true, and I need a finished width of 24", do I need to get a wider piece of wood to start with, and trim from the ends once all is said-and-done to get to 24"? Thanks!

sink_floor_GJ_30.png
 
To avoid these ads, REGISTER NOW!

PCustoms

Well-known member
Joined
Jul 23, 2011
Messages
22,621
Location
VT
You loose the kerf (width) of the blade.

The holes should be slightly oversized to accommodate measurement error. You can get trim escutcheons to pretty it up.

Yes you will need to start with a slightly larger piece of wood.
 
Last edited:

The Cobbler

Super Moderator
Staff member
Joined
Oct 24, 2013
Messages
25,867
Location
Niagara Region, Ontario, Canada
suggestion, I would cut it a bit differently . cut V shapes towards the back of your pipes. install the base. add some blocking to support the v's and fasten them in. caulk any seams .
to get a tighter fit, cut the v's , reattach them , drill your holes for the pipes , remove then & do your install .
that way the front looks good, and no one really sees the back
 
OP
P

peejay75

Well-known member
Joined
Sep 4, 2017
Messages
312
You loose the keef (width) of the blade.

The holes should be slightly oversized to accommodate measurement error. You can get trim escutcheons to pretty it up.

Yes you will need to start with a slightly larger piece of wood.
Perfect! Thanks!
 

MoonRise

Well-known member
Joined
Nov 5, 2010
Messages
4,028
Location
NJ
Yes, cutting something results in a loss of material in the piece that you just cut.

How much material is lost depends on the specific cutting method and the tools (and skill) used to make the cut.

The cut 'gap' is called the "kerf".

For critical or important dimensions, the kerf width does have to be accounted for.

IMNSHO, the wood panel on the bottom of a kitchen cabinet is usually not all that critical and does not have to be super precise.

A common kerf width for a wood cutting circular saw blade is about 1/8" or so. A bandsaw blade kerf is usually smaller than that, a jig saw blade kerf is usually less than a circular saw blade kerf, a scroll saw blade kerf can be smaller too.

If you are making your cuts with a circular saw blade with a ~1/8" kerf, you have two cuts shown so you would lose ~1/4" of material with those two cuts. (1/8" x 2 = 1/4")

If you want to be super precise, you can take your (slightly) oversized panel and make the two straight cuts, then **** the three pieces together and secure them (clamps or maybe double-sided tape onto a carrier board) and then drill your holes (remember to allow a slight gap so that the wood is not rubbing/scraping on the piping and so that you can actually install the wooden panel), make your exterior perimeter cuts to final size and shape, and then install your three-piece panel in your cabinet.

Or you can cut slots in the panel for the piping clearance instead of circular holes. Your choice on whether to save the slot off-cut pieces and install them after the panel is slipped into place. Caulk, glue, or tape from below are a few possible ways to hold the cut-off pieces in place.

+1 on adding trim escutcheons if you want/need to cover the clearance gap between the panels and the piping.
 

four.cycle

Well-known member
Joined
Oct 19, 2015
Messages
28,713
Location
Tacoma, Washington
the answer is: "the kerf"

of course, there is always the option of not giving a damn how accurate the cut is - you can always trim it out and cover the entire mess with a scrap of vinyl flooring dirt cheap:
 

Attachments

  • DSCN3727.JPG
    DSCN3727.JPG
    858.7 KB · Views: 25
  • DSCN3728.JPG
    DSCN3728.JPG
    639.4 KB · Views: 30
Last edited:
OP
P

peejay75

Well-known member
Joined
Sep 4, 2017
Messages
312
suggestion, I would cut it a bit differently . cut V shapes towards the back of your pipes. install the base. add some blocking to support the v's and fasten them in. caulk any seams .
to get a tighter fit, cut the v's , reattach them , drill your holes for the pipes , remove then & do your install .
that way the front looks good, and no one really sees the back
This sounds interesting, got a sketch or something so I can see how this works? I was planning to run "joists" that stop just short of the pipes, and cut the boards in a "puzzle" alternating style (kinda like a hinge) to rest on the joists.
 
Last edited:
OP
P

peejay75

Well-known member
Joined
Sep 4, 2017
Messages
312
Yes, cutting something results in a loss of material in the piece that you just cut.

How much material is lost depends on the specific cutting method and the tools (and skill) used to make the cut.

The cut 'gap' is called the "kerf".

For critical or important dimensions, the kerf width does have to be accounted for.

IMNSHO, the wood panel on the bottom of a kitchen cabinet is usually not all that critical and does not have to be super precise.

A common kerf width for a wood cutting circular saw blade is about 1/8" or so. A bandsaw blade kerf is usually smaller than that, a jig saw blade kerf is usually less than a circular saw blade kerf, a scroll saw blade kerf can be smaller too.

If you are making your cuts with a circular saw blade with a ~1/8" kerf, you have two cuts shown so you would lose ~1/4" of material with those two cuts. (1/8" x 2 = 1/4")

If you want to be super precise, you can take your (slightly) oversized panel and make the two straight cuts, then **** the three pieces together and secure them (clamps or maybe double-sided tape onto a carrier board) and then drill your holes (remember to allow a slight gap so that the wood is not rubbing/scraping on the piping and so that you can actually install the wooden panel), make your exterior perimeter cuts to final size and shape, and then install your three-piece panel in your cabinet.

Or you can cut slots in the panel for the piping clearance instead of circular holes. Your choice on whether to save the slot off-cut pieces and install them after the panel is slipped into place. Caulk, glue, or tape from below are a few possible ways to hold the cut-off pieces in place.

+1 on adding trim escutcheons if you want/need to cover the clearance gap between the panels and the piping.
Blammo! Make the panel cuts FIRST (will be using a circular saw), THEN cut the holes (hole saws), that makes more sense, thanks!

(And on paper, i'm thinking of 1/4” gap around the pipes, but that might be, ahem, cutting it close!)
 
OP
P

peejay75

Well-known member
Joined
Sep 4, 2017
Messages
312
The answer is: "the kerf"

of course, there is always the option of not giving a damn how accurate the cut is - you can always trim it out and cover the entire mess with a scrap of vinyl flooring dirt cheap:
That looks clean enough to eat off of...near!
 
To avoid these ads, REGISTER NOW!

Jeff Ivers

Well-known member
Joined
Apr 9, 2010
Messages
2,556
Location
Oklahoma
Take a piece of scrap wood and cut part way thru it with the saw you will be using. Measure the width of the cut - probably 1/8" if using circular saw or table saw. Multiply that measurement by the number of dotted lines (3). Cut your board to that much longer than 24". Cut your 3 dotted lines. Clamp the 3 pieces together and drill your circular holes. Install.
 

four.cycle

Well-known member
Joined
Oct 19, 2015
Messages
28,713
Location
Tacoma, Washington
That looks clean enough to eat off of...near!
The house is just over 50 years old. The panel below the sink had been covered with contact paper and was partially rotted away, and I didn't realize it until I put something down there and it went right through the contact paper. I ended up ripping it all out, cutting out the rotten section of plywood, cutting a piece for a "patch", figuring out how to attach "feet" to the underside of both panels so they were both level and even. That all got covered up with the scrap of vinyl flooring (free) and I trimmed it out with a scrap of quarter-round I had in the garage, nailed and glued the quarter-round in, and then ran a bead of silicone glue all around the perimeter. Any leaks from the sink are going to end up on the kitchen floor right under my feet - not hidden under that damn panel where I don't notice them for 25 years.
I primed it and painted it to clean it up - it was a mess under there. I think the most expensive part was that fancy brass trim strip I tacked down at the front end.

And I don't use that space for anything other than a drip pan and my trash can and the box of dishwasher detergent. I have another place to store "household cleaning products".
 

paulsomlo

Well-known member
Joined
Jul 16, 2013
Messages
3,871
Location
Northern Colorado
The way I did mine, was to drill the holes, then slot them all the way to the back - that way, since my pipes were in the back of the cabinet, I could just slide the board in.
 
Last edited:

The Cobbler

Super Moderator
Staff member
Joined
Oct 24, 2013
Messages
25,867
Location
Niagara Region, Ontario, Canada
got a sketch or something so I can see how this works
the dotted lines would represent your cuts . add bracing underneath to support the V cut outs.you could even screw material to the underside before you install the base to hold the cutouts in place can even glue the cutouts back in . if you wanted nice tight joints at the cuts, cut the v out first, then secure it in place , pushed towards the cut to close the cut line up. , drill your hole for the pipes
 

Attachments

  • CCI20240918.jpg
    CCI20240918.jpg
    828.2 KB · Views: 15
Last edited:
OP
P

peejay75

Well-known member
Joined
Sep 4, 2017
Messages
312
the dotted lines would represent your cuts . add bracing underneath to support the V cut outs.you could even screw material to the underside before you install the base to hold the cutouts in place can even glue the cutouts back in . if you wanted nice tight joints at the cuts, cut the v out first, then secure it in place , pushed towards the cut to close the cut line up. , drill your hole for the pipes
Loud and clear now, sorry for the extra trouble, that clears it up!
 
OP
P

peejay75

Well-known member
Joined
Sep 4, 2017
Messages
312
Take a piece of scrap wood and cut part way thru it with the saw you will be using. Measure the width of the cut - probably 1/8" if using circular saw or table saw. Multiply that measurement by the number of dotted lines (3). Cut your board to that much longer than 24". Cut your 3 dotted lines. Clamp the 3 pieces together and drill your circular holes. Install.
The scrap, yes...adding that to the 'measure once' technique, thanks.
 
To avoid these ads, REGISTER NOW!
Top Bottom