To avoid these ads, REGISTER NOW!

How to create stronger rafters.

ekautz

New member
Joined
Nov 7, 2013
Messages
2
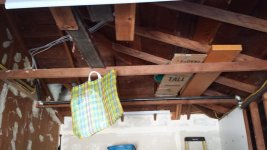
20140822_092843.jpg Hi. I've got a one car garage that, thanks to you, I've been motivated to improve. I installed a circuit of outlets and a light circuit with a switch as there was none there before. I did this all on the right wall with the open studs. I'm in the process of covering it with peg board as you can see one 8x4 up already in the back right corner.
attachment.jpg
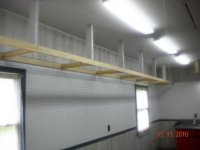
The best ideas are copied haha.
This pic is from this forum. It's what I'm trying to copy for my garage. I want to install hanging shelves from the ceiling. But my rafters aren't able to hold weight. How can I get this done? Thank you in advance for your suggestions.
 
To avoid these ads, REGISTER NOW!

theoldwizard1

Well-known member
Joined
Feb 22, 2011
Messages
43,650
Location
SE MI
First lets get the terminology straight.

The 2x6(?) running horizontally, side to side is a joist (ceiling or floor). Their primary structural purpose is to prevent the side wall from bowing out at the top. A joist is attached on each end to the top plate of wall. Rafter run up to the ridge on an angle and the roof deck is attach to them,

Your joists appear to be spaced 24" O.C. You could temporarily run a cable with a come-a-long to the top of each wall near the joist and then remove it. Install new joists at 16" O.C.

The problem with this is that you probably can not fit a 1 piece joist back in under the roof deck. This is likely not to code, but should be plenty safe because a joist is in tension (horizontal load) and has little, if any, vertical load. Use 6' (or better yet, those 92-5/8" stud length) 2x6s. Cut the ends so that they fit under the roof deck (use the old joist as a template). Fit the cut end of each half-joist on top of the wall top plate and under the roof deck. Swing the other end up in the center of the garage. There will be an overlap. Use construction adhesive and couple of through bolts, to hold your new joist together.

Take careful measurement of the space between the bottom plates of the wall at each stud. To insure the wall is truly vertical, you may have to use a come-a-long to pull the wall in at the top before you attach the ends of the joists to the top plate of the wall.
 

sands35

Well-known member
Joined
May 29, 2012
Messages
936
Location
St. Joseph, MI
Brace it against the wall, not the rafters. Simple triangle. Either below the shelf or above it.

I used 2x4s for the brace and an OSB triangle as a gusset. I ended up sheet rocking over it, so needed some doublers and blocking to make the sheet rock work.
 
Last edited:

Chuck

Active member
Joined
Aug 30, 2005
Messages
42
Location
Smithfield, VA
Or, rather than monkeying with replacing the joists entirely, just sister them. Take a board sized for however much load you're anticipating, put it up against the side of each existing 2x4 joist from support to support, and through nail it every 6 inches or so from alternate sides with 10d coated sinkers.

Bevel the top of the new board on the low end of the deck to clear the deck, just make sure it's bearing on the wall top plates so you're not trying to feed the load back through that 2x4.

To finish, take one long 2x4 (or multiple sections spliced if you need the length), laid flat on top of the new sistered boards at the middle of the span, and nail it into the top of each sistered board with two 10d nails. Your current 2x4s are under tension and didn't need the bracing, but your new boards will be under combined tension and bending, so they do need at least that little bit of bracing at the center.

You can scale this approach to hold however much weight you need, within reason. Higher loads might need more bracing, and higher loads farther apart might actually require you to sister a few extra 2x4s to wall studs underneath. A lot depends on what you're planning to hang. For what you'd normally put up in a bunch of rubbermaid bins in the garage, sistered 2x6 boards and the bracing described would probably be adequate.
 
To avoid these ads, REGISTER NOW!

theoldwizard1

Well-known member
Joined
Feb 22, 2011
Messages
43,650
Location
SE MI
Or, rather than monkeying with replacing the joists entirely, just sister them. Take a board sized for however much load you're anticipating, put it up against the side of each existing 2x4 joist from support to support, and through nail it every 6 inches or so from alternate sides with 10d coated sinkers.

Bevel the top of the new board on the low end of the deck to clear the deck, just make sure it's bearing on the wall top plates so you're not trying to feed the load back through that 2x4.
With 24" O.C. spacing of the joist you might be able to do this. With less difference between joist (not the case here), Probably not.

To finish, take one long 2x4 (or multiple sections spliced if you need the length), laid flat on top of the new sistered boards at the middle of the span, and nail it into the top of each sistered board with two 10d nails. Your current 2x4s are under tension and didn't need the bracing, but your new boards will be under combined tension and bending, so they do need at least that little bit of bracing at the center.
Why not take a 2x4 that is a couple of inches longer than the distance between the center of the joist and the floor. Jam it in between and keep hitting the bottom of this board toward vertical until the original joist is close to level or loses most of its center "bow", Don't spare the nails. (I would say use construction adhesive between the old and newly sistered joist, but most require a 24 hour cure time.)
 

lksdrinker

Well-known member
Joined
Apr 29, 2014
Messages
64
First lets get the terminology straight.

Your joists appear to be spaced 24" O.C. You could temporarily run a cable with a come-a-long to the top of each wall near the joist and then remove it. Install new joists at 16" O.C.

.

I'd like to see the OP take some measurements here. The rafters look to be spaced at 16" or maybe 24" so that would make the joists 32" or possibly 48" apart?

Actually the more I look at that photo the more confused I get. Is this an attached garage? I guess we're looking at one side of a hip roof?
 
To avoid these ads, REGISTER NOW!
Top Bottom