To avoid these ads, REGISTER NOW!

How to Fix Sagging Header

Vallea

Member
Joined
Jul 21, 2015
Messages
6
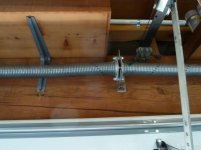
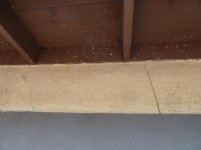
Hi All! I am new to this forum. I am hoping to have smarter folks than me help me figure out how to solve the problem with my sagging garage door header. It is a 4" x 12" x16' header, house built in 1979. It's not "general" sagging though, or an undersized problem. It's sagging because, lucky me, the header is splitting along the grain, which just happens to get to the bottom of the header right exactly at the middle where the load is maximum. I didn't include a general outside front view, I just jumped right to the details. I attached a picture of the grain split and the resulting crack in the stucco outside. It's been split since I bought the house in 1986 but it's been getting worse and now it's looking really bad, so I think it's time to fix it.

We are a DIY family and I am considering either gusset plates or a steel face plate. Which is better in my situation? And my BIG question is, what size steel plate? thickness? the whole 16'? And should it be on the inside face? Is there any value to putting it or another one underneath? Or using an angle of the inside bottom edge? I was thinking we (well, mainly my very handy and smart 18 and 20 year old sons) would use a hydraulic car jack to raise the center of the sag then install the plate.

Thanks!
Valle
 

Attachments

  • P1100472 (800x600).jpg
    P1100472 (800x600).jpg
    49.6 KB · Views: 491
  • P1100474 (800x600).jpg
    P1100474 (800x600).jpg
    40.5 KB · Views: 472
To avoid these ads, REGISTER NOW!

BD1

Well-known member
Joined
Mar 18, 2007
Messages
4,602
Location
north side
My local code is two 2 x 12's with a 1/2'' x 12'' thick plate between the wood. The header and plate are required to extend 6'' beyond the door opening on both sides. I would say do the same except exposed on the inside . Predrill the plate and use lag screws or through bolt it if accessible. 1/2'' all thread rod will work too.
As for the through bolt, you could weld a flat washer to the all thread and poke it through from the outside and the washer will be flat on the wood face. AND as you said have the boys jack it up and get going.
 

SH7mi

Well-known member
Joined
Feb 3, 2014
Messages
186
Location
SE Pennsylvania
Remove the garage door and the shelf above the spring. Shore up the ceiling and rafters. Remove damaged/sagging header and replace with the appropriate glue lam header.
Do it right.
That is how I would fix it.
 

Boomer343

Well-known member
Joined
Mar 19, 2012
Messages
519
That sag won't come out by jacking because as you said their isn't any weight on it so all that will happen is the whole beam will lift sag and all. The lumber is old and hard.

Cut it out and put a new one in..... easier to control the damage rather than have to replace it and fix the damage you will cause. A good blade on a sawzall will make short work of it.
 

dirttracker18

Well-known member
Joined
Aug 10, 2009
Messages
3,191
Location
Slate River, ON
Remove the garage door and the shelf above the spring. Shore up the ceiling and rafters. Remove damaged/sagging header and replace with the appropriate glue lam header.
Do it right.
That is how I would fix it.

^^^^ This would be my recommendation as well. From your inside picture you can get at it so just replace it. Build a temp wall and R&R the header.
 

James-W

Well-known member
Joined
Feb 3, 2013
Messages
12,432
Location
Southeastern Wisconsin
Remove the garage door and the shelf above the spring. Shore up the ceiling and rafters. Remove damaged/sagging header and replace with the appropriate glue lam header.
Do it right.
That is how I would fix it.
I agree totally, this is the correct way to fix it. I realize it may not be what the opening poster wants to hear, but it is the correct way to repair the problem.
 

boobag

Well-known member
Joined
Aug 15, 2010
Messages
397
the big question is, whats above that header? you may want to go to LVL if there is another floor on top, or a lot of roof bearing on there.
 

brownbagg

Well-known member
Joined
Mar 20, 2006
Messages
5,208
its sagging because its not built right, we always did two 2x12 , with plywood in the center. the plywood important, keeps the 2x from splitting and also make the depth right
 

boobag

Well-known member
Joined
Aug 15, 2010
Messages
397
it must be a california home. they used a lot of douglas fir solid headers out there.


its sagging because its not built right, we always did two 2x12 , with plywood in the center. the plywood important, keeps the 2x from splitting and also make the depth right


the plywood is not recognized by code as providing strength. its only used for spacing.
 
OP
V

Vallea

Member
Joined
Jul 21, 2015
Messages
6
You guys are completely right about the 2x12, my apologies! I had no idea it might be that way and I hadn't gotten out a mirror and flashlight to have a look at the top. But YES, it is 2 2"x12"s with plywood in between. Does that change anything? And there is NO floor above the garage, but it is concrete tiles, so there's a bit of weight. Thanks!
 

Cyberbear

Well-known member
Joined
Nov 23, 2013
Messages
1,524
Location
California
The patch job probably will not solve the problem. Now days glue-lam beams are all the rage, probably because all the commercial old growth fir has been cut down, but if you could find a 6 x 12, that should do the job nicely and do what you must to replace the entire header with a new one. I'm presently using two glue lam headers and they are starting to separate at the end seams.
 

rsanter

Well-known member
Joined
Dec 22, 2007
Messages
18,487
Location
visalia ca
That happened at my dads house.
He had it removed and replaced. It was actually easier than I thought it was going to be

Bob
 

matt_i

Well-known member
Joined
Mar 14, 2008
Messages
10,722
Location
SE Michigan
In my mind steel plate is going to be the best as its not going to change dimension after initial loading. I would put it full length, even if its not full height. For example, you can go to a steel yard and get a piece of A36 HR flat bar 1/2" x 10" x 24' long. This won't be the full height of an 11-1/4" tall 2x12 but if you bolt the sandwich it will be very solid. I recommend a drill press for knocking a bunch of holes thru the steel plate if you don't own an ironworker :)
 

Mikes145

Member
Joined
Mar 1, 2014
Messages
13
Location
Michigan
I fixed mine about 20 years ago. It's a 2 car garage and I used floor jacks with some 4x4's on the top. I jacked the garage up to level or a little more, then put in a steel beam, a channel in a C shape, and lag bolted it to the wood header. The steel yard burned holes in the steel beam for me. It was cheap and easy. It hasn't moved yet.
 

Falcon67

Well-known member
Joined
Jun 11, 2009
Messages
18,371
Location
Merkel, TX
That's the same header I used here - 2x12x20 + 1/2 ply spacer, screwed and sandwich buttered with construction glue. I would as above, cut the old out and replace with same or a gluelam beam. Then bang the structural engineer's wife. (GJ inside joke)
 

MoonRise

Well-known member
Joined
Nov 5, 2010
Messages
4,028
Location
NJ
+23 on remove the split/broken header and go from there.

New 'sandwich' header or glulam or LVL header (get the new header before removing the old one!).
 

ddawg16

Well-known member
Joined
Jul 11, 2008
Messages
21,005
Location
S. California
Remove the garage door and the shelf above the spring. Shore up the ceiling and rafters. Remove damaged/sagging header and replace with the appropriate glue lam header.
Do it right.
That is how I would fix it.

I also agree....though I would be more inclined to use a PSL beam. A bit stiffer over an LVL.

Ever heard of house insurance?

I really doubt insurance will cover it.
 
To avoid these ads, REGISTER NOW!
OP
V

Vallea

Member
Joined
Jul 21, 2015
Messages
6
Thank you for the comments! Some replies: I'm positive insurance doesn't cover this kind of slowly cracking situation - they only cover sudden stuff.

I understand the suggestions to R & R, and you're all right, it's the right way to do it, and I'm considering that, but first I want to consider the easier, cheaper option ......

Mikes145 - You put the channel on the bottom? What dimensions for the C channel? Thickness? Obviously the width of the header, and what dimension for the 2 vertical sides? I'm tempted to try this. But first I might do a trial run and just try jacking up the header and see if the split closes or if it lifts "sag and all" as Boomer343 thinks. And you bolted it on the sides only, or bottom too? Bolts about how close?

I'm wondering if just an angle on the inside bottom edge, nice and thick would have the same effect?

Thanks All!
 
Last edited:

CNGsaves

Well-known member
Joined
Sep 26, 2012
Messages
13,233
Location
KS and OK
There was episode of This Old House where floor joists in house had been severely weakened with large holes drilled in them improperly.

They added the steel stiffener that was lag bolted through.

QUESTION: OP are you planning on removing exterior stucco so you could sandwich an angle-iron steel stiffener on both sides ??? If not, then you'll need thicker steel if you just attach to one side in "angle iron" shape . . ie an L.

Both a R&R and stiffener approach will work. Get estimates both ways.
 

James-W

Well-known member
Joined
Feb 3, 2013
Messages
12,432
Location
Southeastern Wisconsin
I fixed mine about 20 years ago. It's a 2 car garage and I used floor jacks with some 4x4's on the top. I jacked the garage up to level or a little more, then put in a steel beam, a channel in a C shape, and lag bolted it to the wood header. The steel yard burned holes in the steel beam for me. It was cheap and easy. It hasn't moved yet.
I don't know what steel costs where you are, but around here a channel iron heavy enough to span that much distance and support the weight would cost a small fortune. I agree it would work OK, but I doubt it would be economically feasible. I still think he would be better off with an engineered beam rated for this purpose.
 
Last edited:

CNGsaves

Well-known member
Joined
Sep 26, 2012
Messages
13,233
Location
KS and OK
OP doesn't need steel stiffener the entire length of the header. What he'll need is wide enough to offset the weak cracking section. Maybe guru like Zeke will chime in on how wide, but the This Old House episode only did about half of massive floor joist that had giant HVAC hole cut in the joist.

My WAG of what he'd need is about half of span in the middle, depending on how thick steel he uses.
 

T_R

Well-known member
Joined
Jul 2, 2015
Messages
902
Location
Maine
I would just take the door down, temporarily support and jack up all the joists. You could probably do that with some cheap 4x4 posts or even some landscape timbers or rail road ties. Then just cut the header out with a sawzall and replace it with new 2x12x20 with 1.2 ply in the middle. It's not a difficult job and won't take long. It would probably take longer to do some hokey patch fix.
 

jack stand

Well-known member
Joined
Feb 29, 2012
Messages
3,305
Location
Lakes Region Maine
Remove the garage door and the shelf above the spring. Shore up the ceiling and rafters. Remove damaged/sagging header and replace with the appropriate glue lam header.
Do it right.
That is how I would fix it.

Another vote for this method.
I would tend to believe that your problem is from being undersized, not by much but it prolly has helped, (over time) with your cracking. The steel, or Flitch plate as we called them, is going to be very heavy and unruly to handle, even at .5" thick. And then you still have a fastening problem with the access to only one side as well as the compromised lumber to whitch you are trying to fasten it to. In a (original build) situation with a large header when we used steel/wood, the steel was allways in between the wood ply's to provide stability to the steel, or keeping the load on the steel on it's strongest dimension (verticaly) and avoid it's tendancy (with a load want) to "curl" inward or outward.
 

marctheprop

Active member
Joined
Mar 25, 2013
Messages
34
Location
New Kent , Va
You've gotten pretty good advice-if you go w/dimensional lumber and a flitch plate its actually easy. Build a temp. wall far enough in to give yourself room to work. Buy stuff to replace it with. Measure the header to be replaced and cut your 2X material. The flitch plate should come w/1/2" holes-ready to go to work. Get your 2-2X12's and a pair of sawhorses. Lay one 2x12 down and put the plate on top and drill your holes. Drop in 2 bolts to hold the 2 pieces together and roll them on top of the other 2X12. Drill your holes-drop in 2 bolts and remove the first 2 and finish drilling. Decide which face is the outside. if you're making a 3 1/2" sandwich get 4" carriage bolts and drive them in from the outside face. Remove the existing header and install your new piece. Then slide the flitch plate over the bolts. Then slide/push/drive on the second 2X12 and put on the washers and nuts. That's how you do it with 2 guys. If you have plenty of help then make up the header as one piece and install. Do not leave out bolts-it may seem that there are too many (yes the design is usually overkill) but put them in. It saves second-guessing from the neighbors and smart alecks on Garage Journal. Good luck with your project.
 

willymakeit

Well-known member
Joined
Apr 27, 2009
Messages
1,242
Location
Springfield Mo.
If your going to do a steel flitch plate, have the supplier punch the holes, costs more but is a time saver when installing. Make sure and get someone to help as these plates are hard to handle when installing [mentioned before]. Plan your work since these plates when they slip can cause a lot of pain. Ive seen them punched with a alternating pattern top and bottom or 2,1,2. Thru bolt is better if you can do it.
Lets us know how it works out.
 

CTyankee

Well-known member
Joined
Jan 13, 2013
Messages
3,792
Location
CT
Aren't you done yet?...:lol_hitti

JMO, but I think the whole flitch plate thing is making this a lot more complicated then it needs to be. Me thinks a couple of LVL's as mentioned would do the job here...
 

iminocca

Active member
Joined
Apr 9, 2015
Messages
39
Location
Orange County, CA
I'm surprised no one has mentioned a structural engineer with stamped drawings, yet.

you're kidding, right?

Here in So Cal and I'm sure a lot of other locations you won't get a permit for that type of repair without a stamped plan and structural calcs. Chances are the engineer will call out strong walls and new anchoring on either side of the opening as well. Like all things real estate related it's about location, location, location....
 

boobag

Well-known member
Joined
Aug 15, 2010
Messages
397
Here in So Cal and I'm sure a lot of other locations you won't get a permit for that type of repair without a stamped plan and structural calcs. Chances are the engineer will call out strong walls and new anchoring on either side of the opening as well. Like all things real estate related it's about location, location, location....

just skip the permit. :bounce:

serious, if you go by the book, you have to get a permit to even change a water heater.
sometimes you just got to bend the rules a bit. luckily i dont build in california. :)
replacing a cracked header with a new header, for a simple house is not that complicated.
 

KenC

Well-known member
Joined
Dec 20, 2009
Messages
2,576
Lots of good advice, and some others too! The replace crowd is right, up to a point. It would be the 'best' solution, until you consider the stucco on the outside. Replacing the header will probably destroy the outside finish. Given the age of the house, it is probably real stucco, not one of the faster cheaper imitations. Repair of that will probably cost more than the header.

So, I'd look into a flitch plate. It won't take as thick a plate as you may think at first glance. Get some expert advice on sizing it.

As to jacking it up: It probably won't come up quickly. Plan on placing jacks and raising them a little bit daily for a week. That will prevent the ends from lifting rather than the center raising. Once straight, or a little high in the middle install the plate.

If it were my home, it would likely get a 12' plate 1/4" thick and 10" high centered on the header and lag bolted top and bottom every 12" and another row in the center offset 6". Like the 2-1-2 another poster mentioned.
 

Rudyjr

Well-known member
Joined
Dec 28, 2009
Messages
555
Location
Central Ohio
Remove the garage door and the shelf above the spring. Shore up the ceiling and rafters. Remove damaged/sagging header and replace with the appropriate glue lam header.
Do it right.
That is how I would fix it.

I did this to two different houses on my street almost 20 years ago. Both are still straight as an arrow.
 
OP
V

Vallea

Member
Joined
Jul 21, 2015
Messages
6
I'm the original poster. Haven't done it yet, still figuring out the details. I plan to use 3/8" thick plate, 4" lag bolts, but what size lag bolts? Is 3/8" enough? every 12" off center?
 

readhead

Well-known member
Joined
Dec 8, 2012
Messages
6,175
Location
Durango, Co.
This is the steel guy. First thing I would say is consult an engineer. Since that probably won't happen then I will offer up my experience doing this kind of fix.
A channel will perform much better than a flat plate in this situation. A C12x20.7 with 5/8" lags top and bottom @ 12" on center will probably do the job.
The best choice would be to replace the header.
 

toplessHO

Well-known member
Joined
Oct 20, 2014
Messages
14,007
Location
central florida
only one person has addressed the major issue of the existing stucco .
it will be very costly to replace vs repair for this reason.
agree to slowly jack a little each day until you are above being straight(use a dry line to determine).A plate with thru carriage bolts will work best or even better sandwich a gluelam with adhesive to the inside and redo the hangers for the door to suit.Adhesive is key in anything you add to the face of the beam.
 

readhead

Well-known member
Joined
Dec 8, 2012
Messages
6,175
Location
Durango, Co.
I don't think the stucco was ignored. It was a given that the stucco would have to be replaced if the header was replaced. We have done this type of repair before and the fix is satisfactory at best. It is difficult to return everything back to level. The stucco will still have to be repaired. If you are going to go through all this mess you might as well just do it right.
 
To avoid these ads, REGISTER NOW!
Top Bottom