To avoid these ads, REGISTER NOW!

How to Insulate my Ceiling / roof deck

Kels

Well-known member
Joined
May 14, 2013
Messages
211
Location
Silverdale WA State
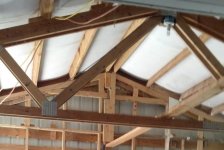
I have a pole building with metal siding, wood framing. The ceiling/roof currently has 2" vinyl backed fiberglass blanket insulation. I want to increase the insulation value of the roof without putting in an actual ceiling if possible. I don't think my trusses are engineered for a ceiling. and they are spaced way far apart. There is NO eve vents or any vents. If I need to vent I would lean more towards gable vents as I have no eve overhang to work with so would have to re roof all together. The goal here is to do this correctly with as little cost as possible and still keeping it simple.

The insulation blanket that is in place right now is in good condition.

I have talked with insulation companies and have gotten very conflicting information.
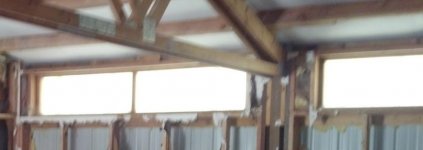
1. One place told me to just add in F-Glass rolls between purlins (no air gaps) then put another vapor barrier on the purlins and call it good. (My concern here is there is a double vapor barrier...maybe this is ok )
2. I was also told to slit the current blanket then add in the F-Glass insulation then put in a new vapor barrier. (my concern here is if moisture gets in the insulation the purlins will be in the we insulation ... maybe causing rot?)
3. I have also been told to just use spay foam directly on the current insulation blanket. (Not sure if the spay foam would damage the insulation blanket, and would be $$$ but might work with no ventilation)

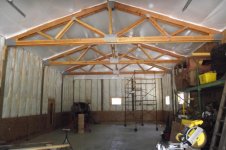
I really do not want to put a flat ceiling in as it would be a very very short ceiling and I would loose a good amount of light as you can see where the bottom of the truss is in this photo. I am also not sure with all the construction and lumber I would need if it would save that much money over spray foam in the worst case scenario, More information would be needed on that. Spray foam for 2" would be ~1,200 and ~1,800 for 3"

If idea number 1 would work that would be cheapest and easiest....

I also have no had wiring done so I was thinking I would run conduit on the ceiling to avoid having wiring coming in and out of the vapor barrier so the VB would be as perfect as possible.......

Sorry about the Blurry Photos.

This room will be used as a computer shop / workout room
 

Attachments

  • Ceiling VB.jpg
    Ceiling VB.jpg
    58.6 KB · Views: 70
  • Ceiling.jpg
    Ceiling.jpg
    110.3 KB · Views: 64
  • CeilingTrussHeight.jpg
    CeilingTrussHeight.jpg
    134.6 KB · Views: 54
To avoid these ads, REGISTER NOW!

Nowater

Well-known member
Joined
Nov 29, 2011
Messages
744
Location
Southwest Florida
Check if the spray foam needs a fire resistant covering.

If you use regular insulation, put in enough that the dew point remains well inside the insulation and not along your purlins.
 

HomeBrewA4

Well-known member
Joined
Aug 18, 2010
Messages
94
Location
Amish-Land, PA
spray foam is extremely flammable and should be coated in a resistant coating.

i'd slit the current barrier every bay, get some "Basement blanket", cut to fit and face nail it to the perlins with cap nails.

(fyi, i've been doing insulation for 4.5 years, batts, blown and spray. I also live in zone 5, we love our insulation and heat this time of the year)
 
OP
K

Kels

Well-known member
Joined
May 14, 2013
Messages
211
Location
Silverdale WA State

Krodad

Well-known member
Joined
Mar 25, 2006
Messages
304
Location
Iowa
I would leave the existing insulation just as it is, and add EPS foam directly attached to the purlins, so you have continuous insulation sheething between the trusses. Use the blanket nails with plastic washers, and seal gaps and joints with low expanding foam (so you don't have too much oozing out to trim up later.) Even 1" would do a world of good, and it's white so you'll still have good reflective value for lighting. Not terribly durable if you're going to poke it with things, but neither is the blanket.
This will leave a dead air gap between the foam and the blanket as well.
 
OP
K

Kels

Well-known member
Joined
May 14, 2013
Messages
211
Location
Silverdale WA State
OK, so I have been reading more... found this site :: http://www.suspenderbar.com/About-Suspender-Bar.html :: and it looks like they are doing the first idea where I would slit the current insulation blanket and add to it then put up a new vapor barrier ... The difference would be that I have wood framing and this is done with steel framing.

I only hesitate with this method because I am unsure about having the purlins in the insulation... then I would be messing up what is currently in place and I don't want to mess up a system that is working with something that will be a problem.

I do think if I did my wiring on the inside of the shop in conduit that was exposed it would drastically lessen the chance of having air leaks in the vapor barrier and perhaps make a difference in the success of the insulation method...

Has anyone done this method with success?
 
OP
K

Kels

Well-known member
Joined
May 14, 2013
Messages
211
Location
Silverdale WA State
Was just given this information from 3 insulation companies

2 places gave this advise with only one difference ::
"We do these pole buildings all the time. The most practical and affordable way to insulate your ceiling is to leave the condensation blanket intact. DO NOT SLICE THE CONDENSATION BLANKET. This is the only thing stopping condensation from coming into the building. BATT the 24" cavities with either a R19 BATT or an R21 BATT. R21 is preferred. Then staple on a WMPVR perforated. This is the same product that is on the walls and ceiling at a Costco building. There are two types, one is a vapor barrier and the other is perforated as to not have a double vapor barrier issue. This is what you will want. It has a high light reflect quality and looks good when done. Typically the only thing that needs to be done for this type of work would to be sure there is a backer board at the top of the wall where the wall and ceiling meet as to give something to attach the WMPVR to. If one doesn't exist it is as easy as adding a 2x6 at that point. "

The other places said to do 2 vapor barriers (not perforated WMPVR)

My thought on this now is that if it is perforated would there be so much air movement that the insulation properties of the Batts would be lost? or is the air movement restricted enough to not loose much r value

The 3rd place said this :: "I’ve had the best luck removing the existing insulation, adding 1.5” of spray foam which mathematically eliminates the potential for dew point, and then filling the perlins with batt insulation and covering with a white vapor barrier that looks similar to the existing vinyl."

To me that seems like an expensive way to do the same thing with out a perforated second vapor barrier
 

Krodad

Well-known member
Joined
Mar 25, 2006
Messages
304
Location
Iowa
I suspect some people get confused when we're talking about vapor barriers and insulation in respect to roofs and/or attics. It's absolutely true that you don't want to have 2 intact vapor barriers in certain situations...the most common is when adding insulation to a ventilated attic. Some people have used kraft faced insulation blankets laid down over the existing insulation with a vapor retarder on the warm side (against the ceiling sheetrock). Regardless of whether the kraft face is laid down or up, you have encapsulated the existing insulation between two vapor retarders on the cold side of the structure. This leads to problems.

In YOUR case, we are already on the warm side. adding inslulation to the warm side still keeps the old insulation on A warm side...just not as warm as the "new" warm side. Also, you have to remember that your blanket insulation is terribly ineffective where it is compressed by the purlins. Trust me, if the dewpoint is going to happen anywhere in your assembly, it will be there. Just so happens it also has penetrations in the vapor retarder there also...not the greatest theory in insulation.
So, by adding rigid insulation over the purlins as I described earlier, you are moving that dewpoint away from that area, which is the biggest benefit. You also get a monolithic insulation layer which is at least theoretically easy to seal as positively as can be done. How well you do simply depends on your attention to detail. Also, for anyone that still thinks this whole theory is bad because of some incorrect idea about how vapor barriers and insulation and dewpoints work... 1-3 inches of EPS is going to be classified as a class III vapor retarder...not a "vapor barrier", which, in this case means that if there ever was a vapor pressure in this building which would drive moisture into the insulation, it would actually allow this, and the dewpoint would occur within this layer as it is completely de-coupled from the other insulation layer. The beauty of EPS is that it dries out even easier than it takes on moisture. Not that it matters because this won't happen if installed as described. I really don't see a method to add an EFFECTIVE insulation to your roof that is any more cost effective and get's you the end result you wanted.
 
OP
K

Kels

Well-known member
Joined
May 14, 2013
Messages
211
Location
Silverdale WA State
Krodad What are your thoughts on adding in un-faced insulation between the purlins then doing as you say with EPS foam? This might give me the highest R value with out adding more vapor barriers. (I have a lot of F/Glass insulation at my disposal that Is new in the package from when the shop was built)
 

Krodad

Well-known member
Joined
Mar 25, 2006
Messages
304
Location
Iowa
That would be fine if you can't return it or otherwise make a buck from the new in package fiberglass. The great thing is that if you do add the EPS, you've made the fiberglass even more effective because you're putting it in what will really be a dead airspace.
Nothing in my previous suggestion is adding an additional vapor barrier material...the EPS acts as a class III VR as it is...truly that is the only material you need except for cap nails and canned foam to seal the seams and gaps.

Is this shop going to be heated 24/7 or just incidental heat when you're out there?
 

Krodad

Well-known member
Joined
Mar 25, 2006
Messages
304
Location
Iowa
I looked at your pics again...remember that with those double trusses, you will also want to friction fit EPS in between the truss gap so you don't have an open area there that would lose energy for you.

Also had another thought about adding additional fiberglass like you asked...

If you go with say 1" EPS attached to the purlins, I might be a little concerned that the weight of the fiberglass would make the EPS bow a little. Not a huge deal, but you might not like the looks. The unfaced fiberglass would certainly want to droop and the existing fiberglass blanket is "draped" so this would amplify the tendency I would think. If you used 2" EPS it would be strong enough to handle this.

You could also go XPS if you want to, but baby blue or baby pink vaulted ceiling is probably not what you are going for here. And it's considerably higher priced.

When it's all done, add a few ceiling fans up there to keep the warm air circulated back down to you, or you'll have a nice toasty vaulted area and cold toes.
 
Last edited:

Mike Miller

Well-known member
Joined
Jul 9, 2012
Messages
297
Location
La Pine Or.
here's what I did. I had an insulation company come in and put up R 21 un backed bats then they covered them with a vinyl skin.
 

Attachments

  • 27.jpg
    27.jpg
    133 KB · Views: 85
To avoid these ads, REGISTER NOW!

Krodad

Well-known member
Joined
Mar 25, 2006
Messages
304
Location
Iowa
here's what I did. I had an insulation company come in and put up R 21 un backed bats then they covered them with a vinyl skin.

I like your lighting. Are they standard t8's?

Sent from my SCH-I535 using Tapatalk
 

Mike Miller

Well-known member
Joined
Jul 9, 2012
Messages
297
Location
La Pine Or.
They are high intensity with electronic ballast, I went to one of the local electric supply house armed with ceiling height and sq. footage and he figured out how many and what type. Where I would be only guessing he hit it spot on. The place is as close to daylight inside as it can get.
 

Krodad

Well-known member
Joined
Mar 25, 2006
Messages
304
Location
Iowa
That is literally double the bulbs I was planning, and I don't have the reflectance you have. Guess I'm gonna double my lighting budget. Are they T5 HO's then? If so, I'm tripling the number. Yikes!

Sent from my SCH-I535 using Tapatalk
 

Krodad

Well-known member
Joined
Mar 25, 2006
Messages
304
Location
Iowa
Okay, that makes me feel a little better. I'm at 8...but I'm still bumping it up a notch. Your pic just cost me more money, but I'll be a lot happier with light like yours.

Thanks!
 

70C-10

Well-known member
Joined
Mar 14, 2013
Messages
201
Location
Mn
If Kels has no vents & no overhang to install intake vents then his installation would be a hot roof design, correct ?
 

Krodad

Well-known member
Joined
Mar 25, 2006
Messages
304
Location
Iowa
If Kels has no vents & no overhang to install intake vents then his installation would be a hot roof design, correct ?

In the sense that it has direct-coupled insulation to the roof deck, without any intended ventilation, then yes. The difference is that in a properly insulated hot roof design, there would be monolithic rigid insulation between the roofing material and a roof sub-deck, etc. There is a slight difference also in that the steel ribs are going to allow for a limited airflow, though that will be hindered by the fiberglass blanket sealing of a good portion of the rib cross section.

In this case, the fibrous insulation is compressed at the purlins, giving virtually zero R-value, though there is a vapor retarder. Hot roof designs rely so heavily on a perfectly executed vapor retarder, and effective insulation at all points to keep the dewpoint under control. In the OP's case, that compressed insulation is of great concern to me...this is where condensate could form where the insulation and underside of the steel roof deck meet. Then there are the penetrations in the VR from the roofing screws.

So why does this actually rarely cause a major problem in these buildings? Because they don't often have high relative humidity inside, the delta-T across the assembly is usually lower than residential applications, and they often aren't heated 24/7...at least not at 70 degrees in an extreme northern climate. Nor are they often cooled. When you have swings in temps inside, this easing of vapor drive allows materials to dry (hopefully), especially if they are causing condensate on a material with an ability to store the moisture for a time, like lumber. Steel is a different story because it has no ability to take on the moisture.

If the OP's insulation, as it is now, was in a home with a few people taking showers, breathing, possibly running a humidifier in the middle of a Minnesota winter, I'd bet the mortgage that the compressed insulation between the purlin and the steel roof would be a wet sponge, and any snow on the roof would have some really interesting parallel lines, slowly getting thicker and thicker.

But, this is a shop. I don't see this actually happening at all in his case...though adding insulation in some way would help to control the heat loss so it's not a bad idea to go ahead and do that.
 
Last edited:
OP
K

Kels

Well-known member
Joined
May 14, 2013
Messages
211
Location
Silverdale WA State
here's what I did. I had an insulation company come in and put up R 21 un backed bats then they covered them with a vinyl skin.

Do you know if the vinyl skin is perforated or not? I looks really good!

Also what are the layers from your metal roof down? Curious if you had a moisture blanket as well?
 
OP
K

Kels

Well-known member
Joined
May 14, 2013
Messages
211
Location
Silverdale WA State
Also the building will be heated...

Kept above freezing ~50 when not in use then heated when in use. I suspect it will get used more often then not but not necessarily 5 days a week for 8 hours more a few hour a day half of the week.

We have a wood stove in the room that CRANKS out the heat....

The shop is in a L shape and we are "finishing" the small part of the L. Plan on creating a vent that I can open and close to the LARGE part of the shop when the stove starts cranking out too much heat or just opening the door to the large area when working out there and cranking the heat so it works its way into that area.

When we got the property it already had the shop on it and unfortunately we are not super mechanically inclined. But I hope to get the wood room back up and running to work on small projects. There are two vehicle bays one with a ~18 ft garage door the other is standard.

The larger side is ~ 2 stories maybe a little shorter, There is a loft on one end but its more storage then an extra room since the head room is a little limited.

We recently removed the siding on the small side, mice had gotten into insulation that was there previously and had a heyday. We then installed Tyvek on those walls so we could insulate the side walls with out having issues with insulation on the metal siding.

Heck I might be willing to wait until spring or summer and remove the ceiling on the small side. However I am guessing that my roof was NOT designed for a ceiling load. The Room is 24 ft long and has 1 double truss. so there isn't really any way to put a ceiling in with out adding a lot of frame work and it would be very awkward to do from what I can tell. So my gut is telling me that taking the roof off then perhaps putting down plywood (roof decking) / felt paper then putting the metal back up would put me in the same position I am in now only with more weight on the roof.... unless maybe I put down eps foam on the roof decking then the metal back?
 

Mike Miller

Well-known member
Joined
Jul 9, 2012
Messages
297
Location
La Pine Or.
Do you know if the vinyl skin is perforated or not? I looks really good!

Also what are the layers from your metal roof down? Curious if you had a moisture blanket as well?

The skin is not perforated, it's foil backed and has threads running through it, very light weight. There is a moisture blanket above the purliens , the r 21 is not backed and is friction fit between the 2X8 purlins. You can see little snitches of it in these pictures along with the insulation in the ceiling and walls. The work men were done in a day and the job cost was just shy of $2500.00. The building is easy to heat and almost sound proof.
 

Attachments

  • 11.jpg
    11.jpg
    139.8 KB · Views: 16
  • 15.jpg
    15.jpg
    135.8 KB · Views: 21
OP
K

Kels

Well-known member
Joined
May 14, 2013
Messages
211
Location
Silverdale WA State
The skin is not perforated, it's foil backed and has threads running through it, very light weight. There is a moisture blanket above the purliens , the r 21 is not backed and is friction fit between the 2X8 purlins. You can see little snitches of it in these pictures along with the insulation in the ceiling and walls. The work men were done in a day and the job cost was just shy of $2500.00. The building is easy to heat and almost sound proof.

Mike is your moisture blanket a vapor barrier as well? Wanting to confirm that you do indeed have 2 vapor barriers and the system is working with out issues. 2 places have said I would be fine doing that as We are not adding much in vapor to the building but I want to be sure of that before pulling the trigger.
 
To avoid these ads, REGISTER NOW!
Top Bottom