To avoid these ads, REGISTER NOW!

How to make this rotator plate

larry4406

Well-known member
Joined
Jan 27, 2006
Messages
19,393
Location
Northern Virginia
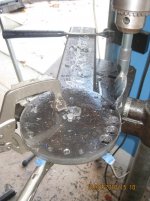
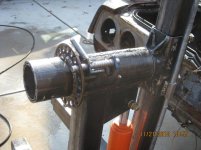
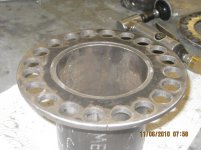
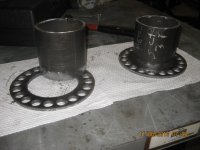
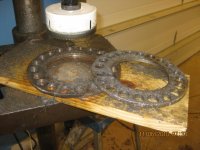
How would one go about making this rotator plate at home? In particular, the circular perimeter. This is for a rotisserie. I do not have a torch, plasma cutter, or 8" hole saw. I do have a a drill press. The indexed holes are easy; I want the large circular OD.

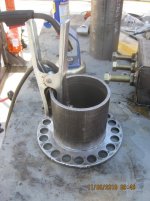
Thoughts include getting a carbide cutter, mounting the plate to the drill press via a bolt and spinning the plate while engaging the cutter to make the OD (poor man's lathe) followed by a pilot hole saw for the interior 4" hole. Other thoughts include making the interior hole and then using a friend's brake lathe piloted on the interior 4" hole to cut the perimeter.
 

Attachments

  • Rotator Plate.JPG
    Rotator Plate.JPG
    120 KB · Views: 339
To avoid these ads, REGISTER NOW!

welder4956

Well-known member
Joined
Apr 8, 2010
Messages
3,072
Location
Birmingham, AL USA
Forget the drill press, it's an easy way to get hurt seriously. The brake lathe sounds like an option. I would find a local welding shop to flame cut it, or get a tech school student to do it for a few bucks. Or, use it as a good excuse to purchase a new plasma cutter or oxy-acetylene torch.
 

murph64

Well-known member
Joined
Jan 7, 2009
Messages
240
Location
Mohegan Lake, NY
why does it have to be round? how about octagonal?

bob

Yup. It really doesn't matter what shape the OD is, as long as the pin holes are fairly true to the center. A Sharpie, scribe, straightedge and protractor is all you need. Then centerpunch and drill.


Andy
 
OP
L

larry4406

Well-known member
Joined
Jan 27, 2006
Messages
19,393
Location
Northern Virginia
I agree that it the round exterior is not a functional requirement and mitered perimeter would work (i.e, octogon). This is 1/4" plate - will a jig saw with fine blade actually do this? I have contemplated using this as the excuse to buy more tools (plasma, torch, etc).
 

metal1313

Well-known member
Joined
Apr 28, 2009
Messages
3,416
Location
clinton NJ
ive done rounds by hand with a grinder then spent time, lots of it grinding the plate to round. that said a decent jig saw and plenty of oil along with good blades should do the job as well
 

rsanter

Well-known member
Joined
Dec 22, 2007
Messages
18,521
Location
visalia ca
I agree that it the round exterior is not a functional requirement and mitered perimeter would work (i.e, octogon). This is 1/4" plate - will a jig saw with fine blade actually do this? I have contemplated using this as the excuse to buy more tools (plasma, torch, etc).

draw your circle, drill a series of 1/8 holes around that line. place them close together but not breaking through. use the jig saw to complete and the grind to a finished circle

look for a piece that is already round that you can retask to what you want.
I have seen scrap places that have round blanks that have been cut out from a plate (where they wanted a round hole) and to that company the blank/plug is scrap

however, if you have a horizontal bandsaw or abrasive cit off saw, the octogon will be the easiest

bob
 

reinhardt

Well-known member
Joined
Jun 2, 2010
Messages
384
4 inch grinder w/ a cut off wheel. draw the circle w/ a sharpie, cut close to the line, then grind to it w/ a grinding wheel.
 
To avoid these ads, REGISTER NOW!

c_mccann

Well-known member
Joined
Mar 30, 2010
Messages
919
string, sharpie, center punch, drill and a jig saw will get you there.
 

filtered

Well-known member
Joined
Feb 25, 2010
Messages
811
Location
Berks Co. PA
I have a friend with a CNC plasma table that can cut that plate for you. All the holes and everything. All you'd need to do is supply him with the dimensions, address to ship to, and payment.
 

kbs2244

Well-known member
Joined
Nov 11, 2006
Messages
14,065
"How about drilling your indexes in a brake disc? "

Great idea.

Do you need that many holes?

An 8 hole rotor will work with little modification.
 
OP
L

larry4406

Well-known member
Joined
Jan 27, 2006
Messages
19,393
Location
Northern Virginia
My plans are as follow:
Drill a 1/4 inch pilot hole in the center of the plate. Insert pin in the pilot hole. Make a fixture to hold a cutting torch, rotate the plate on the pin while cutting the perimeter with the torch. Repeat for second plate. Grind/sand perimeter smooth.

Drill 4 holes in one plate about 1 inch eccentric to the pilot hole. Stack plates and tack weld (plug weld) together via these holes.

Using the pilot hole as pivot, match drill the plates for the indexing holes. Once complete, use a hole saw indexed on the pilot hole. The hole saw will remove the core along with the plug tack welds and separate the plates.

Now all I need is time.
 
OP
L

larry4406

Well-known member
Joined
Jan 27, 2006
Messages
19,393
Location
Northern Virginia
Not perfect, but will work for me. Second plate cut better after installing 2 washers between it and the turntable base - molten slag interferred with rotation.

The first drilled hole wandered off punch - tried to drill the 11/16 hole in one shot. Changed to 1/4 inch thru hole and followed by the 11/16 which self centered and then clamped in to position. Should not have thru drilled as the cutting oil drained out each hole.

Next is drilling out core with 4" hole saw.
 

Attachments

  • IMG_5343.jpg
    IMG_5343.jpg
    137.4 KB · Views: 67
  • IMG_5340.jpg
    IMG_5340.jpg
    142 KB · Views: 64
  • IMG_5337.jpg
    IMG_5337.jpg
    126.7 KB · Views: 57
  • IMG_5335.jpg
    IMG_5335.jpg
    130.4 KB · Views: 57
  • IMG_5331.jpg
    IMG_5331.jpg
    138.8 KB · Views: 67
  • IMG_5327.jpg
    IMG_5327.jpg
    132.4 KB · Views: 55
  • IMG_5326.jpg
    IMG_5326.jpg
    138.1 KB · Views: 54

bobj49f2

Banned
Joined
Nov 13, 2009
Messages
430
Location
SE Wisconsin
I just came on on this post. I bought a rotesseri last fall to work on my '37 Buick. I got it fairly cheap on eBay, it was custom built by the seller but it lacked being adjustable and I wanted a better way of locking at different angles. I first made all bracing adjustable and use a large sprocket I had laying around but the local farm supply sells for around $30. I drill a whole every 10° and installed a spring loaded locking pin.

As a bought it:

picture013.jpg


The upgrades I made:

picture014.jpg


picture015.jpg


picture016.jpg


A '37 Buick body is fairly large and heavy, this set up works great.

picture063.jpg


picture064.jpg
 
OP
L

larry4406

Well-known member
Joined
Jan 27, 2006
Messages
19,393
Location
Northern Virginia
Here are some additional pictures after removing the core with the hole saw, welding in the pipe sleeve, the index pin with hold-open stop and the final test run. I need to rework the front brackets as I ran out of room to adjust the CG. The threaded rod runs in bushings in the T-arm with washers. The big nut on the bottom I use an imact on to raise/lower to adjust CG.
 

Attachments

  • IMG_6032.jpg
    IMG_6032.jpg
    147.9 KB · Views: 40
  • IMG_6021.jpg
    IMG_6021.jpg
    135.2 KB · Views: 44
  • IMG_5524.jpg
    IMG_5524.jpg
    139.6 KB · Views: 38
  • IMG_5507.jpg
    IMG_5507.jpg
    136.8 KB · Views: 37
  • IMG_5506.jpg
    IMG_5506.jpg
    139.1 KB · Views: 36
  • IMG_5503.jpg
    IMG_5503.jpg
    142.9 KB · Views: 37
  • IMG_6013.jpg
    IMG_6013.jpg
    141.2 KB · Views: 36

WSMC633

Well-known member
Joined
Jul 20, 2008
Messages
484
Location
Los Angeles, CA
Came out nice. Good job! I'm guessing by the shininess of that torch you did end up using the project for an excuse to buy a new tool?
 
OP
L

larry4406

Well-known member
Joined
Jan 27, 2006
Messages
19,393
Location
Northern Virginia
Came out nice. Good job! I'm guessing by the shininess of that torch you did end up using the project for an excuse to buy a new tool?

Thank you.

I inherited my dad's old torch and tank set. The oxygen regulator on that stuck and exploded a new hose at the base of the torch handle - hurt my ears, stung my fingers and leg. First instinct was to count all the fingers. I then bought a torch set from HF for ~$100 after 20% coupon. Works extremely nice and appears well made, has a cutting tip and one other tip. The old torch set will likely be dumpster food - it is a Victor circa 1977.
 
To avoid these ads, REGISTER NOW!
Top Bottom