To avoid these ads, REGISTER NOW!

How to mount a breaker box in a pole barn?

drg5490

Well-known member
Joined
Dec 10, 2012
Messages
120
Getting ready to install electric in the pole barn. How is everyone mounting their breaker box in their pole barns?

1. Mount 200 amp box to horizontal purlins, that have the metal screwed to on the other side

2. Build a stud wall flush between 2 post and install the box flush within the studd wall

Any pics of your set-up would be great:)
 
To avoid these ads, REGISTER NOW!

NUTTSGT

Super Moderator
Staff member
Joined
Sep 14, 2009
Messages
51,166
Location
Northern Central Ohio
The first response you'll probably get is mount it to code. I believe there are a few different codes between the US and Canada.

Second, I would take into account how you plan on running your wire, in conduit on the outside of the wall or NM (romex) in the wall.

How do you plan on finishing the walls ?
 

wedge40

Well-known member
Joined
Oct 31, 2009
Messages
335
Location
Bloomington, IN
Not sure how big your barn is. But think about or layout all the outlets and lights you plan on hooking to the box. This may have an effect of where the box is ultimately located.
I'll shoot some photos of mine. Mine was placed that in the end I can take the cover off and drywall.

Wedge
 
OP
D

drg5490

Well-known member
Joined
Dec 10, 2012
Messages
120
Right now I have no walls just the post with the exterior 2x6 mounted to the outside of the post for the tin to be mounted on ceiling is open, I have a pretty good idea as where the box will go , just wondering what the best way to mount it. I'm guessing off the purlins and on a stud wall for ease of accessibility and room for running wires
 
OP
D

drg5490

Well-known member
Joined
Dec 10, 2012
Messages
120
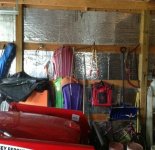
This is the wall where it will go
 

Attachments

  • image.jpg
    image.jpg
    61.2 KB · Views: 345

Ghost Rider

Member
Joined
Jul 27, 2012
Messages
20
Location
Dayton Ohio
Attach 3/4 inch ply wood to the purlins and mount the panel on the plywood. If you plan to insulate in the future, maybe you should use 2x4 or 2x6 spacers so you can fill the space with insulation and mount the 3/4" plywood over that.
 

Norcal

Well-known member
Joined
Mar 16, 2008
Messages
13,770
Why did you leave the main breaker at the top when the feed is at the bottom? That panel can be top fed or bottom fed......
 
To avoid these ads, REGISTER NOW!

MN BIANCHI

Well-known member
Joined
Sep 30, 2009
Messages
174
Location
Moorhead, Minnesota
This is what I did:

Nov25001Medium.jpg


I mounted 2 sheets of 3/4" plywood that I painted white. The plywood was mounted to the horizontal purlions after the wall was insulated. The walls were covered in white metal except where the plywood sheets were. This photo was taken just after the panels and off-peak meter socket were mounted and before most of the condutit was installed. All of the wiring is run in conduits. The sheet to the left which is out of the picture was for mounting the in-floor heat equipment etc.
 

readhead

Well-known member
Joined
Dec 8, 2012
Messages
6,187
Location
Durango, Co.
Is this a breaker box or the service entrance? Most jurisdictions require the service entrance to be outside for ease of disconnect and then you can come out of there into a breaker box inside. The ground rod will need to be outside also. Since you will probably be mounting lights outside by the doors the sheeting should be bonded also.
 

Highbeam

Well-known member
Joined
Feb 15, 2011
Messages
2,292
Location
Mt Rainier foothills, WA
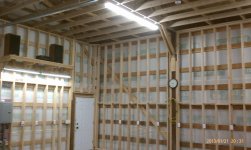
Framed a wall between the posts and the mounted as a normal residential panel. All wires run as you would in a house, no conduit except the feeder to the panel.
 

Attachments

  • IMAG0548.jpg
    IMAG0548.jpg
    95.6 KB · Views: 468

jumpingryan

Well-known member
Joined
Jan 17, 2009
Messages
89
Location
Ontario, Canada
I would just frame it in as if you were adding walls. 16 inch on centre for 2 X 4, and up to 24 inch on centre for 2 X 6 if it was my structure. It won't cost much extra, and will give strong support to the panel which is very important.

I recommend a 3/4 inch plywood backer board, GS1 (good one side) minimum. If it will be a showpiece, choose a nicer grade. Paint is optional, but it is up to you to dress it up, and usually best done beforehand. Make it much larger than the panel so there is lots of room for wiring to be run neatly and stapled correctly on all sides of the panel, and to keep low voltage (phone, cable) a distance away from higher voltage wiring.

Always think of methods to add circuit runs as required months down the road. No setup is perfect and after a few months, you may want to add something here or there.

Behind the plywood, I always recommend either of the following to future-proof your structure:

1) Continuous Vapour barrier that you can tie into with tuck tape if you insulate in the future by sliding insulation behind the panel.

2) Continuous rigid foam (1 inch minimum) overlapping the plywood that can be tied into with vapour barrier and insulated wither either insulation and vapour barrier or other methods (foam or spray foam).

Good luck!

R
 
OP
D

drg5490

Well-known member
Joined
Dec 10, 2012
Messages
120
High beam, loved the pic got a question..I noticed the ceiling rafters under the trusses,I see you connected the ceiling joist to boards off the post going across the width of the garage.how wide is the garage and were you able to clear span the entire width?
 

timewarp

Well-known member
Joined
Feb 24, 2008
Messages
272
Location
Silverdale, WA
High beam, loved the pic got a question..I noticed the ceiling rafters under the trusses,I see you connected the ceiling joist to boards off the post going across the width of the garage.how wide is the garage and were you able to clear span the entire width?

Looks to me like the boards off the post as you call them are the bottom span of the truss.
 
OP
D

drg5490

Well-known member
Joined
Dec 10, 2012
Messages
120
I was thinking that also until I saw the 2 supports attached to the beam supporting what ever is going across
 

Highbeam

Well-known member
Joined
Feb 15, 2011
Messages
2,292
Location
Mt Rainier foothills, WA
Looks to me like the boards off the post as you call them are the bottom span of the truss.

Timewarp, I grew up in Silverdale, graduated from CKHS.

Anyway, yes, those are the bottom chords of the truss. The ceiling joists are attached to the bottom chords with joist hangers. They are 2x6 joists and the trusses are 12' on center.

Those knee braces are there to stiffen the frame. They connect the trusses to the posts. The posts are full dimension 6x8 #1 doug fir. Shop is 30 feet wide by 60' long and 14' tall in a "high wind" area.
 

Attachments

  • shop2.jpg
    shop2.jpg
    78.4 KB · Views: 235
To avoid these ads, REGISTER NOW!
Top Bottom