To avoid these ads, REGISTER NOW!

How to patch drywall

younghandyman

Well-known member
Joined
Dec 18, 2017
Messages
87
What kind of drywall compound and tape is needed to patch up a hole in the drywall?

I have found videos and other forums talking about the procedure. Only question I have is when you use tape and then put drywall compound overtop, isn't it impossible to get it flat as there is now drywall compound plus tape on top of your wall?


Sent from my iPhone using The Garage Journal mobile app
 
To avoid these ads, REGISTER NOW!

zoepop

Well-known member
Joined
Dec 9, 2013
Messages
129
It won't be flush with the wall. The trick is to float the patch big enough that its not noticable
 

Kevin54

MEMBER EMERITUS
Joined
Jan 12, 2005
Messages
29,341
Location
Urbana, Ohio
What kind of drywall compound and tape is needed to patch up a hole in the drywall?

I have found videos and other forums talking about the procedure. Only question I have is when you use tape and then put drywall compound overtop, isn't it impossible to get it flat as there is now drywall compound plus tape on top of your wall?


Sent from my iPhone using The Garage Journal mobile app
How big's the hole?
 

ddawg16

Well-known member
Joined
Jul 11, 2008
Messages
21,005
Location
S. California
The paper tape is pretty thin....

For the tape portion, I get the mud a little wetter than normal

Slap on a layer of mud....run the tap using your knife to push it against the wall

Run another layer using a wider knife....


Tape and mudding is not a one day job unless you are using 30 min mud

Day 1 - Tape and Mud
Day 2 - Sand...then mud
Day 3 - Sand...then mud
Day 4 - Sand.....maybe mud
 

Git

Well-known member
Joined
May 18, 2008
Messages
6,894
Location
S Cal
What kind of drywall compound and tape is needed to patch up a hole in the drywall?

I have found videos and other forums talking about the procedure. Only question I have is when you use tape and then put drywall compound overtop, isn't it impossible to get it flat as there is now drywall compound plus tape on top of your wall?


Sent from my iPhone using The Garage Journal mobile app

Yep, unless you want to skim coat the whole wall...

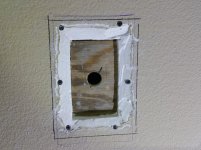
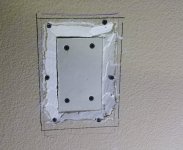
Here is a repair I made where I use a different method. (I cut this hole to fish some electrical wiring)

First I chamfer the edges of the existing drywall using my multitool. Next, I install a 'backer board' - usually a piece of plywood or whatever I have laying around. The hole in the center of the ply is a 'finger hole' so I can pull it tight while I screw it to the existing drywall (first pic)

Most of the drywall in my house is 5/8" thick so I use 1/2" to make repairs. So when I apply the tape (fibatape) it just lays flat on the 1/2". I then mud it in keeping everything flat and flush with the existing wall surface. Lastly is to apply a little bit of texture to try to get things to blend in (the hardest part)

I have used this method (chamfering/cutting the existing edge) for over 10 years and never have had any issues. From minor patches like this to removing walls and trying to fill in where they were.

https://www.amazon.com/dp/B0012MFON8/?tag=atomicindus08-20
 

Attachments

  • GR8-086.jpg
    GR8-086.jpg
    119 KB · Views: 170
  • GR8-087.jpg
    GR8-087.jpg
    134.8 KB · Views: 166
  • GR8-088.jpg
    GR8-088.jpg
    118 KB · Views: 165

The Cobbler

Super Moderator
Staff member
Joined
Oct 24, 2013
Messages
25,962
Location
Niagara Region, Ontario, Canada
yeah, how big is the hole?
smaller holes I often use a flap patch. cut the drywall 2" larger than the hole and make a 1" flap around all edges. take all but the layer of paper and mud it in to your hole with hot patch. let it set, skim over it as necessary to get a nice flat smooth patch.
 

lakelandcat

Well-known member
Joined
Sep 25, 2017
Messages
7,327
cut the paper around your patch and half around the hole, when you put your backer board behind your patch it will leave a "indentation" where your paper goes. If you notice there is a indent along one edge of your 4x8, that also is where your tape goes. I know it sounds strange but it work well. Another tip is if you buy your mud by the box to remove it from the plastic bag and put it into a 5 gal bucket with a lid. When your done for the day add a cup of water to cover the top of the mud, next time you use it just mix the water in, it keeps your mud from drying out and getting to thick, don't use to much or it will get to thin. Git uses a hole to hold his backer I just run a sheetrock screw in to hold it either will work.
 
Last edited:

PWC Repair

Well-known member
Joined
Dec 27, 2012
Messages
3,188
Location
Arkansas
Yep, unless you want to skim coat the whole wall...

Here is a repair I made where I use a different method. (I cut this hole to fish some electrical wiring)

First I chamfer the edges of the existing drywall using my multitool. Next, I install a 'backer board' - usually a piece of plywood or whatever I have laying around. The hole in the center of the ply is a 'finger hole' so I can pull it tight while I screw it to the existing drywall (first pic)

Most of the drywall in my house is 5/8" thick so I use 1/2" to make repairs. So when I apply the tape (fibatape) it just lays flat on the 1/2". I then mud it in keeping everything flat and flush with the existing wall surface. Lastly is to apply a little bit of texture to try to get things to blend in (the hardest part)

I have used this method (chamfering/cutting the existing edge) for over 10 years and never have had any issues. From minor patches like this to removing walls and trying to fill in where they were.

https://www.amazon.com/dp/B0012MFON8/?tag=atomicindus08-20

I've done quite a bit of patching in old houses. This backer method with drywall back in place then mud is the best way to do it. I usually place an old drywall scrap behind.
 
To avoid these ads, REGISTER NOW!

Hobbit

Well-known member
Joined
May 23, 2011
Messages
1,853
Location
Bama
Yep, unless you want to skim coat the whole wall...

Here is a repair I made where I use a different method. (I cut this hole to fish some electrical wiring)

First I chamfer the edges of the existing drywall using my multitool. Next, I install a 'backer board' - usually a piece of plywood or whatever I have laying around. The hole in the center of the ply is a 'finger hole' so I can pull it tight while I screw it to the existing drywall (first pic)

Most of the drywall in my house is 5/8" thick so I use 1/2" to make repairs. So when I apply the tape (fibatape) it just lays flat on the 1/2". I then mud it in keeping everything flat and flush with the existing wall surface. Lastly is to apply a little bit of texture to try to get things to blend in (the hardest part)

I have used this method (chamfering/cutting the existing edge) for over 10 years and never have had any issues. From minor patches like this to removing walls and trying to fill in where they were.

https://www.amazon.com/dp/B0012MFON8/?tag=atomicindus08-20


This method works well for a small patch. Depending on the wall location away from vibration or hand pressure the tape can be deleted.
 

gunguy

Well-known member
Joined
Aug 2, 2007
Messages
730
Location
Currituck Co. NC
Sounds like you're new to drywall patching...In addition to the above tips, add this one.

When you're sanding out any imperfections and feathering the edges, feel the area with your fingers. If you can feel the edges, no matter how slight, you'll see them when painted.

Jim
 

Justind97

Well-known member
Joined
Oct 6, 2014
Messages
691
Location
Ottawa, Canada
another tip, less is more. Don't slather a thick coat in hopes it will cover more.

Spend the time and do a few thin coats. Makes sanding that much easier.
 

CraigStu

Well-known member
Joined
May 22, 2014
Messages
4,051
Location
Blacksburg, Va
And too thick a coat cracks as it dries. I use one of these
https://www.homedepot.com/p/Saint-G...PIPHorizontal2_rr-_-204394527-_-203218522-_-N
Prep consists of carefully removing the paper from the drywall around the edge of the hole. I do that in a rectangle or square shape so there is about an inch around the hole that has no paper on it. Then I cut the aluminum material to fit my paperless area. This gets the aluminum piece slightly below the surrounding surface since it is thinner than the drywall paper. I put a layer of mud in the paperless area, push the patch piece into the mud, and then a thin skim of mud over the entire area. Sanding and a couple more mud layers. I like this technique because you do not end up w/ a raised surface you need to blend forever.
 

fasteddie

Well-known member
Joined
May 25, 2018
Messages
697
Location
NJ
yeah, how big is the hole?
smaller holes I often use a flap patch. cut the drywall 2" larger than the hole and make a 1" flap around all edges. take all but the layer of paper and mud it in to your hole with hot patch. let it set, skim over it as necessary to get a nice flat smooth patch.
This is how I always do it on smaller patches. Score the back paper 1" all around, snap the gypsum and peel it off leaving the facing paper intact and glob the mud on all edges then push the patch in place using a flat board or the edge of your taping knife. No need to add tape.
And sanding? I haven't used sandpaper in ages, scrape high spots and ridges with a stiff sharp putty knife followed by wet sponge then wet sponge wrapped in a silky rag. Finish with a spray bottle and 10" knife will move any high mud into low spots if necessary and gives a nice slick surface. I hate drywall sanding dust. All that only works on the pre-mix bucket mud on the final light top coat.
 

drewski

Well-known member
Joined
Apr 13, 2008
Messages
419
Location
Mid-Tn
yeah, how big is the hole?
smaller holes I often use a flap patch. cut the drywall 2" larger than the hole and make a 1" flap around all edges. take all but the layer of paper and mud it in to your hole with hot patch. let it set, skim over it as necessary to get a nice flat smooth patch.

You must have been a drywall finisher or knew one. We used that method to repair small holes back in the 60's.
 

LS6 Tommy

Well-known member
Joined
Dec 27, 2013
Messages
26,162
Location
Northern NJ
yeah, how big is the hole?
smaller holes I often use a flap patch. cut the drywall 2" larger than the hole and make a 1" flap around all edges. take all but the layer of paper and mud it in to your hole with hot patch. let it set, skim over it as necessary to get a nice flat smooth patch.

This is how I always do it on smaller patches. Score the back paper 1" all around, snap the gypsum and peel it off leaving the facing paper intact and glob the mud on all edges then push the patch in place using a flat board or the edge of your taping knife. No need to add tape.
And sanding? I haven't used sandpaper in ages, scrape high spots and ridges with a stiff sharp putty knife followed by wet sponge then wet sponge wrapped in a silky rag. Finish with a spray bottle and 10" knife will move any high mud into low spots if necessary and gives a nice slick surface. I hate drywall sanding dust. All that only works on the pre-mix bucket mud on the final light top coat.

You must have been a drywall finisher or knew one. We used that method to repair small holes back in the 60's.

That's how my Grandfather taught my Dad and subsequently how he taught me to do it. All the carpenters I've worked with use a similar method. They call them "blowout patches".

Tommy
 

Falcon67

Well-known member
Joined
Jun 11, 2009
Messages
18,371
Location
Merkel, TX
I've done quite a bit of patching in old houses. This backer method with drywall back in place then mud is the best way to do it. I usually place an old drywall scrap behind.


What I do and I hate drywall, patching, etc. I also use a rough sponge and "pop" it in the mud to give the mud some texture - the spray can stuff never seems to work worth a damn.
 

mjeff87

Well-known member
Joined
Jan 22, 2010
Messages
2,748
Location
Richmond, VA
Finish with a spray bottle and 10" knife will move any high mud into low spots if necessary and gives a nice slick surface. I hate drywall sanding dust. All that only works on the pre-mix bucket mud on the final light top coat.

Question: how do you get the finished patch to match the texture of the rest of the wall surface? I'm fairly good (from about 5 feet looking) at blending in drywall mud and tapering it out, but like you mention it ends up being really smooth and slick. When I finally paint it, you can definatly see the repair because of the surface finish. What's the secret to remedy this?
 
OP
Y

younghandyman

Well-known member
Joined
Dec 18, 2017
Messages
87
So the hole is going to be about 4" in diameter and the rest of the holes will have the drywall that was cut out put back in, just need to patch the joints.

Do I use all purpose mud and tape or mesh and something else?


Sent from my iPhone using The Garage Journal mobile app
 
To avoid these ads, REGISTER NOW!
Top Bottom