To avoid these ads, REGISTER NOW!

How to prop open a wall mounted foldable workbench?

Lil'John

Well-known member
Joined
Aug 11, 2013
Messages
73
Location
Placerville, California
Title basically is my question

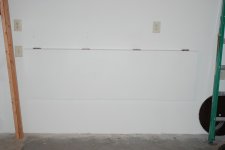
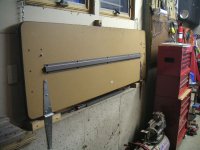
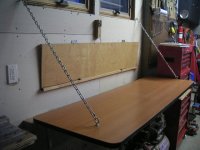
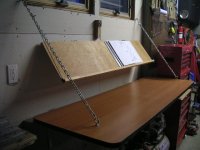
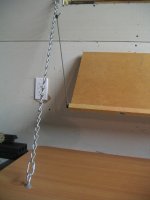
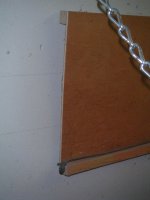
I've attached two pictures showing the workbench. But to describe:
It is a cheap 24"x80" door. I am using four hinges. The hinges screw into the door with ~2" long fully threaded screws. The hinges screw into a 72" long 2x4 with 3" long screws. The 2x4 bolts to the wall with eight 3.5" long 3/8" lag bolts. Behind the drywall is 2x4s nailed to the studs.

I'm currently scratching my head on how to prop it up for working on top of it:dunno:

Anyone have any good ideas?
 

Attachments

  • garage_workbench1_sml.jpg
    garage_workbench1_sml.jpg
    109.3 KB · Views: 309
  • garage_workbench2_sml.jpg
    garage_workbench2_sml.jpg
    72.6 KB · Views: 277
To avoid these ads, REGISTER NOW!

teamextreme

Well-known member
Joined
Aug 10, 2013
Messages
867
Location
Lakewood, CO
Either 2 legs that are hinge mounted to the front and drop down to the floor when you open it, or chain supports coming from the wall above to form a triangular support.
 

7th Kahuna

Well-known member
Joined
Aug 4, 2012
Messages
1,704
Location
Los Angeles, CA
Not sure what you were thinking. Two options come to mind. One would be triangular braces that fold out from the wall to support each end. Another would be to use hardware similar to that used to hinge down and lock the legs on a standard card table. Of the two, I like the first option the best. If you mounted a 2x4 vertically to the wall then mounted the brace to the side of that 2x4 you could fold the whole thing up into the space under your existing structure.

EDIT: Or maybe not. I just looked at your pictures again. Still, some version of a triangular brace is going to be the sturdiest. Maybe you would have to make triangular plywood braces that are removable. You could create a simple ledger system they could drop (lock) onto to hold them in place. Lift up the door, pull them out, hang them flat against the wall and drop the door down again. They would be hidden out of sight. That could work.
 
Last edited:

72Anthony

Well-known member
Joined
May 22, 2010
Messages
294
Location
Houston, TX
I think rockler makes brackets that would replace your hinges: they allow the door to raise up and lock in position.

Another option is a pair of triangular brackets made out of plywood. They would have hinges that mount to the wall in a vertical plane below the table top and swing out from the wall to support the table top. These hinges would be near the ends of the table top.

Kind of hard to describe in words...I'm on my phone and draw you a sketch. This would need some type of latching mechanism to keep the triangular braces attached to the table top to keep things in place.
 
Last edited:

70C-10

Well-known member
Joined
Mar 14, 2013
Messages
201
Location
Mn
something like this? black brackets are hinged & fold against the wall. I've seen it here on GJ before. I don't remember where
 

Attachments

  • work bench pic.jpg
    work bench pic.jpg
    4.4 KB · Views: 228

nehog

Well-known member
Joined
Jan 2, 2010
Messages
7,935
Location
Jaffrey, NH
I think the chain would get in the way.

I was hoping for something that wouldn't look as awkward as a 40" leg off a 24" door.

One way is to angle the legs in to the floor/wall junction. Would require angled cutting and hinges but you can handle that, right? :thumbup:
 

IlliniBone

Well-known member
Joined
May 30, 2013
Messages
176
Location
Denver, CO
2 pipe flanges screwed to the bottom corners of the table.
http://www.homedepot.ca/wcsstore/HomeDepotCanada/images/catalog/10459.511-604HC_4.jpg

2 pieces of threaded pipe, cut to length, to screw into the flanges.
Remove the pipe when not in use.

This is exactly what I was going to say.

Here is an article from The Family Handyman that shows how it can be used on a mobile cart, but the same philosophy is adaptable to a foldable workbench.

http://www.familyhandyman.com/workshop/workbench/folding-workbench/view-all
 

transplant_wi

Well-known member
Joined
Jul 30, 2010
Messages
191
Location
Madison, WI
I used chains on each end up to eye bolts screwed into studs, and have never felt they were in the way.

I also added a small, angled book-rest approx 4' long above the bench nearer eye level to have my manuals open but out of the way as I worked - a worthwhile addition, held-up by paracord on each end with hooks that grab the chain. I can take pics tonight if needed.
 

Falcon67

Well-known member
Joined
Jun 11, 2009
Messages
18,371
Location
Merkel, TX
Here's what I did at the old place
cheapbenchB.jpg

cheapbenchC.jpg
 
OP
L

Lil'John

Well-known member
Joined
Aug 11, 2013
Messages
73
Location
Placerville, California
Thanks for all the good ideas so far.

I used chains on each end up to eye bolts screwed into studs, and have never felt they were in the way.

I also added a small, angled book-rest approx 4' long above the bench nearer eye level to have my manuals open but out of the way as I worked - a worthwhile addition, held-up by paracord on each end with hooks that grab the chain. I can take pics tonight if needed.

I'd love to see a picture. I'm still in the brainstorming mode.
 

transplant_wi

Well-known member
Joined
Jul 30, 2010
Messages
191
Location
Madison, WI
First time posting pics, so here goes. The bench top was a conference room table, approx. 6'x2'x1" thick. It came with a steel reinforcing rib attached to the bottom. I drilled a hole towards each of the front corners and installed eye-bolts, backed-up with washers, at approximately the right spacing so the chains run perpendicular to the front edge to the screw-eyes installed in the wall studs.

A barrel bolt on a block attached to the wall drops into a hole drilled in the front edge to keep it stowed, and there is enough room behind for the folding book shelf.

In the close-ups below I attempted to show the main chains as well as the lighter-weight paracord supports for the book ledge, which is just 1/4" ply with 3/4" cleats, one on the back to attach the hinge and give it some digidity, and one on the front as a lip and a place for the screw-eyes. The other ends just hook onto the chain to give the bookshelf the right angle. Let me know if you need more info.
 

Attachments

  • Closed.JPG
    Closed.JPG
    71.1 KB · Views: 120
  • Open_Table_Only.JPG
    Open_Table_Only.JPG
    70.1 KB · Views: 121
  • Open_Table_Shelf.JPG
    Open_Table_Shelf.JPG
    69.2 KB · Views: 127
  • Hangers.JPG
    Hangers.JPG
    77.8 KB · Views: 115
  • Hanger_Detail.JPG
    Hanger_Detail.JPG
    86.3 KB · Views: 98
OP
L

Lil'John

Well-known member
Joined
Aug 11, 2013
Messages
73
Location
Placerville, California
transplant_wi, thank you for taking the time to snap some pictures.

How much weight do you think your setup would take?

I'm now back to considering the chains.:eyecrazy:
 

transplant_wi

Well-known member
Joined
Jul 30, 2010
Messages
191
Location
Madison, WI
Happy to post the pics.

I would be comfortable putting 100# on it, but not for heavy hammering. The limiting factors are the wall anchors pulling out or the other ends tearing through the MDF top - it would depend on your needs and 'engineering' ;)

The beauty of this (medium duty) solution is its compactness. I am sure I am not alone here wishing I had built a bigger garage:lol_hitti
 
Last edited:
To avoid these ads, REGISTER NOW!

7th Kahuna

Well-known member
Joined
Aug 4, 2012
Messages
1,704
Location
Los Angeles, CA
That is a pretty nice design transplant_wi. It could be strengthened by adding a piece of steel plate or steel angle iron running from the front edge of the door back to the wall. You could then place the eye bolt for the chain through both the door and the steel. Might be a bit springy if you pounded on it, but for general work, the weak spot would become either the door itself at mid-span or the bolts anchoring the chain to the wall. Barring issues there, it could potentially be really strong.
 

transplant_wi

Well-known member
Joined
Jul 30, 2010
Messages
191
Location
Madison, WI
Thanks 7th_Kahuna - I agree with your assessment. Using 1 1/4" angle iron for the ends/chain mount and support rib would really beef it up. I am fine with it as-is for my current uses, as I have a welding table for heavy workpieces, but these are great ideas for Lil' John's consideration
 

gahrajmahal

Well-known member
Joined
Dec 12, 2008
Messages
2,520
Location
Cincinnati, Ohio
LilJohn try a search for "gate leg table"

span-black-gateleg-table_zpse443c9f5.jpg


Ikea's version

Transplant, that is the first time I have seen the book shelf idea. That is so cool!
 
Last edited:

transplant_wi

Well-known member
Joined
Jul 30, 2010
Messages
191
Location
Madison, WI
Thanks gahrajmahal - it was a lifesaver when I had 4 manuals open for my AC tractor rebuild - that way I could refer to the parts diagrams, procedure descriptions (x2), users manual and my notes.
 

sxk122

Well-known member
Joined
Sep 19, 2011
Messages
400
Location
Dallas, TX
my table folds down. when you lift it up, set of H shaped legs drop from either end. Made from 3/4" Plywood framed with 2x4's and attached using carriage bolts. The center of the hinges can be popped out, making the worktable portable.

https://scontent-b-dfw.**.fbcdn.net/hphotos-frc3/576273_790186947305_1537092552_n.jpg


https://scontent-b-dfw.**.fbcdn.net/hphotos-prn1/529148_790181627965_1312480658_n.jpg
 

Chris98006

Well-known member
Joined
Mar 14, 2013
Messages
60
Location
Bellevue WA
my table folds down. when you lift it up, set of H shaped legs drop from either end. Made from 3/4" Plywood framed with 2x4's and attached using carriage bolts. The center of the hinges can be popped out, making the worktable portable.

https://scontent-b-dfw.**.fbcdn.net/hphotos-frc3/576273_790186947305_1537092552_n.jpg


https://scontent-b-dfw.**.fbcdn.net/hphotos-prn1/529148_790181627965_1312480658_n.jpg

Could you post a pic from under it? How it folds?

Thanks! Chris
 

sxk122

Well-known member
Joined
Sep 19, 2011
Messages
400
Location
Dallas, TX
Sure thing. I've actually got a project on it at the moment, gimme a day or two to finish glueing up.
 

Krash Kadillak

Well-known member
Joined
Apr 19, 2011
Messages
4,222
Location
Springfield, Oregon
As I understand it, the door/table folds flat against the wall, so in its present configuration, fold-up brackets attached to the wall behind the door would not work.

What will you be keeping in front of the folded table? I was first thinking of a couple of wheeled tool carts that you roll out of the way, lift up the top, and position them under the bench top.

Alternatively, you change the mounting of the top. Build a 4-sided box same size as the door, mount to wall. Door/top gets hinged to the front of the box. Fold-down legs are hinged to the underside of the door/top and are inside the box when it is closed.
 

DangerousDan55

Well-known member
Joined
Jan 11, 2013
Messages
180
Location
Hockley, TeXas
I had in my "project Pile-O-Stuff", some table folding legs. I made the narrow & taller(I'm 6'3") staggered mounted to fold inside each other. Its differant but I like it. I wanted a table top for when I'm working under the hood & need to set tools or parts. Above is a desk mounted cabinet that I mounted to the wall for my manuals.
My shop is a work in progress....
 

ilovevocs

Well-known member
Joined
Jun 26, 2009
Messages
1,966
Location
Toledo, Ohio
First time posting pics, so here goes. The bench top was a conference room table, approx. 6'x2'x1" thick. It came with a steel reinforcing rib attached to the bottom. I drilled a hole towards each of the front corners and installed eye-bolts, backed-up with washers, at approximately the right spacing so the chains run perpendicular to the front edge to the screw-eyes installed in the wall studs.

A barrel bolt on a block attached to the wall drops into a hole drilled in the front edge to keep it stowed, and there is enough room behind for the folding book shelf.

In the close-ups below I attempted to show the main chains as well as the lighter-weight paracord supports for the book ledge, which is just 1/4" ply with 3/4" cleats, one on the back to attach the hinge and give it some digidity, and one on the front as a lip and a place for the screw-eyes. The other ends just hook onto the chain to give the bookshelf the right angle. Let me know if you need more info.


I really like that shelf or table or table-shelf above your table. Im going to build one to hold service manuals while im assembling at the bench.
 

AndrewDouglasBird

Well-known member
Joined
Oct 15, 2013
Messages
217
Location
Vancouver, WA
Flip it over so the table folds down with the 2x4 on top. Then build a set of legs that hinge toward the center of the table when folded and fold outward to the ends of the table when out. Like this:

w2j1.jpg


The dashed line would be the top of the table when folded up flat, ready to use. When folded down, it would cover the legs.
 
To avoid these ads, REGISTER NOW!
Top Bottom