To avoid these ads, REGISTER NOW!

How to screed concrete floor indoors?

Rileysan

Well-known member
Joined
Sep 11, 2015
Messages
4,298
Location
Milwaukie, Oregon
I have enough concrete experience to be dangerous. Over the years, I have poured (or helped pour) numerous concrete pads, retaining walls, and a couple of driveways. I am more than confident in my ability to pour a nice floor.

What I have not done, however, is pour a new floor inside a building - in this case, my friend's garage.

We will be breaking apart the old floor this weekend (and next) and if all goes well, we will pour the weekend of the 14th.

1) How do I screed a floor with no forms but the garage walls?

2) The floor is 17' x 19'. Should I try screeding a 17' wide floor or should I split the floor down the middle (left/right side) and use expansion joint between the halves?

Brian
 
To avoid these ads, REGISTER NOW!

Evilunclegrimace

Well-known member
Joined
Sep 24, 2015
Messages
868
Location
Erie Pa
Find the center of the floor, drive some pins in the dirt to the height that you want the cement to be at and screed each side to the pins. When you have the cement to the proper height drive the pins below the concrete and continue to screed to the opposite end.
 

Kevin54

MEMBER EMERITUS
Joined
Jan 12, 2005
Messages
29,341
Location
Urbana, Ohio
Set pins every so often, strike lines on the sides, screed to the pins and line(s), then screed to the pin and recently screeded floor. Bullfloat. Finish trowel.
 

404

Well-known member
Joined
Aug 23, 2014
Messages
3,463
Location
Mass
Set straight boards on edge parallel to each other, away from the walls, use those as guides. After screed and before it sets too much pull the boards, fill the slots, trowel in to make it not show.
 

soapii

Well-known member
Joined
Nov 29, 2011
Messages
342
Location
SE Michigan
Find the center of the floor, drive some pins in the dirt to the height that you want the cement to be at and screed each side to the pins. When you have the cement to the proper height drive the pins below the concrete and continue to screed to the opposite end.

I did flatwork for almost 10 years, this is exactly how we did it.

--Joe
 

HELLSUNICORN

Well-known member
Joined
Jul 20, 2008
Messages
66
When I did the inside of my pole barn I hung angle iron from the walls at the height I was going to screed at. Just pulled the angle iron out when I was done.
 

rburke65

Well-known member
Joined
Nov 10, 2007
Messages
12,349
Location
Canfield, Ohio
Pin in center to desired height. Snap chalk lines on perimeter for visual. Start your pour at a wall and come out a foot, use your mag trowel, and eyeball to level. Pour around center pin. This will give you two starting levels. Continue with the other perimeter chalk lines. Try to get the 2 corner that are further away from your egress first. Come out from the chalk lines and fill in to the pin.
 
OP
R

Rileysan

Well-known member
Joined
Sep 11, 2015
Messages
4,298
Location
Milwaukie, Oregon
I hope your friends floor is not a monolithic slab...

I must admit - I had to look up what that meant.

I don't know for certain, but my guess is 'no'. I believe the garage was built with a brick foundation and without a concrete floor. The garage was raised some years ago and a new foundation formed & poured. It is my expectation (and hope) that this separation of foundation and floor means the floor was uniformly poured.

Brian
 

joes169

Well-known member
Joined
Sep 19, 2011
Messages
663
Location
WI
What you're looking to do is called "wet screeding" at the walls. The easiest way for a novice to get the concrete relatively flat at the wall is to use a longer straight edge, parellel to the wall, and "tamp" the concrete up & down a few times at plcement. Concrete is somewhat self leveling, and "tamping" it quickly will help to level it out. Follow up with with a 16" hand mag, run perpendicular to the wall to close the concrete up a little better.

As for the width, I would split it in half with some kind of iron pipe. You can use pins also, but in my professional opinion, a pipe will always leave a flatter floor, especially for novices, and there's no chance of fogetting to drive a pin down below the floor.

These are the yokes we use for our pipes:

http://www.forconstructionpros.com/product/10091134/landre-corp-megascreed-concrete-leveling-system
 

Toolfool

Well-known member
Joined
Aug 22, 2011
Messages
4,983
Location
Tallahassee, FL
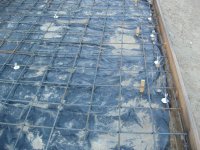
Learned this from my old OCD partner. Set a few rows of wooden stakes 3 or 4 feet apart to the finished height minus the width of a 3/4" galvanized pipe. I tap a couple of finish nails in the stakes to keep the pipe from rolling off. Screeding along the top of the pipes will level you out at the side wall. You can slide the pipe back as you go and toss a few handfuls of concrete into the groove left (this will level out as you bull float). Stakes and nails left in since they are below finished grade. Floor comes out flatter than "eyeballing".
Hope you can see my pics.
 

Attachments

  • groundwork 7-28-2007 001 (2).jpg
    groundwork 7-28-2007 001 (2).jpg
    152.2 KB · Views: 147
  • groundwork 7-28-2007 002.jpg
    groundwork 7-28-2007 002.jpg
    149.7 KB · Views: 143
To avoid these ads, REGISTER NOW!
OP
R

Rileysan

Well-known member
Joined
Sep 11, 2015
Messages
4,298
Location
Milwaukie, Oregon
Learned this from my old OCD partner. Set a few rows of wooden stakes 3 or 4 feet apart to the finished height minus the width of a 3/4" galvanized pipe. I tap a couple of finish nails in the stakes to keep the pipe from rolling off. Screeding along the top of the pipes will level you out at the side wall. You can slide the pipe back as you go and toss a few handfuls of concrete into the groove left (this will level out as you bull float). Stakes and nails left in since they are below finished grade. Floor comes out flatter than "eyeballing".
Hope you can see my pics.

Everyone has been very helpful - thanks!

I'm most excited about the pipe idea along the walls - not that snapping a line and screeding along that line wouldn't work - just that I've never been able to color between the lines, and this eliminates my worry of slopping cement over the top of the lines and losing them.

Cheers!

Brian
 

dfiler2

Well-known member
Joined
Dec 15, 2014
Messages
2,859
Location
NW Minnesota
Learned this from my old OCD partner. Set a few rows of wooden stakes 3 or 4 feet apart to the finished height minus the width of a 3/4" galvanized pipe. I tap a couple of finish nails in the stakes to keep the pipe from rolling off. Screeding along the top of the pipes will level you out at the side wall. You can slide the pipe back as you go and toss a few handfuls of concrete into the groove left (this will level out as you bull float). Stakes and nails left in since they are below finished grade. Floor comes out flatter than "eyeballing".
Hope you can see my pics.

This is how we have done it for years except we always use at least a 1 1/2" pipe. I think a 3/4" pipe would sag with stakes on 4' centers. Get your stakes set then lay the pipe on top and drive an 8p box nail on each side. Make sure your stakes are laid out so each time you pull the pipe back you have a stake at each end.We use a pipe about 12' and you usually need two of them.
 

NUTTSGT

Super Moderator
Staff member
Joined
Sep 14, 2009
Messages
51,119
Location
Northern Central Ohio
When we poured the new floor in my garage, we were fortunate enough to have a laser to use. It allowed us to make a spots along the wall in addition to the expansion joint material as a reference.

The laser is mounted above the wheelbarrows and you can see the seal sill that i used as an expansion material.


Elginz

Well-known member
Joined
Dec 29, 2014
Messages
431
Location
Oconto, WI
This is how we have done it for years except we always use at least a 1 1/2" pipe. I think a 3/4" pipe would sag with stakes on 4' centers. Get your stakes set then lay the pipe on top and drive an 8p box nail on each side. Make sure your stakes are laid out so each time you pull the pipe back you have a stake at each end.We use a pipe about 12' and you usually need two of them.

Me too, make sure the pipe can't roll side to side at all "drive an 8p box nail on each side."
 
OP
R

Rileysan

Well-known member
Joined
Sep 11, 2015
Messages
4,298
Location
Milwaukie, Oregon
After much thought, we ended up changing plans and did not break apart the old floor. Instead, we decided to pour a minimum of 4" thick over the existing floor (some areas were nearly 6" thick due to the uneven surfaces).

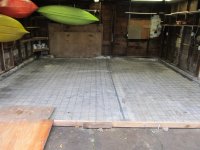
I drilled a few pilot holes and even broke apart a small section of floor to check for voids. Once I determined there were no voids under the floor, we went about drilling holes and setting rebar spikes in the existing floor. The spikes were cut at 18" and we welded 2" pieces of 1/8" steel flat bar - which was bent slightly to create a cradle for the pipe to sit-on.

Using nothing but a 6' level and nylon string, I set the screed height throughout the garage. The floor is sloped with a drop of 1/8" per 6', for a total drop of 3/8" from the back to front - which is almost certainly overkill, but there are drainage problems in this neighborhood, so I decided to play it safe.

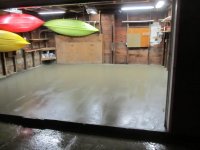
I didn't take into account the weather on Saturday, Nov 14th - ~60 degrees with 90% + humidity & light rain - and ordered my concrete too wet! I had to run the bull float far longer than I wanted and pulled a LOT of water off the surface. I am still irritated at myself for making this mistake but fortunately, it only appears to have cost me a few extra hours of work and did not cause any porosity on the surface of the finished pad.

I'll get more photos the next time I'm at his place - I didn't have my camera when I went back the next day to clean up - but the overall result is quite nice.

One lesson to take home from this: It took 10 hours from the time we started pouring concrete until we closed the door of the garage. Don't ignore the weather forecast!

Brian
 

Attachments

  • Nov 2015 062.jpg
    Nov 2015 062.jpg
    137.8 KB · Views: 100
  • Nov 2015 063.jpg
    Nov 2015 063.jpg
    141.6 KB · Views: 101
  • Nov 2015 066.jpg
    Nov 2015 066.jpg
    134.4 KB · Views: 95
  • Nov 2015 070.jpg
    Nov 2015 070.jpg
    132.7 KB · Views: 95
  • Nov 2015 075.jpg
    Nov 2015 075.jpg
    133.4 KB · Views: 102
Last edited:

NUTTSGT

Super Moderator
Staff member
Joined
Sep 14, 2009
Messages
51,119
Location
Northern Central Ohio
It came out looking nice. Are you planning on raising the height of the door opening ? What's the plan for bridging the gap between the floor and driveway ?
 
OP
R

Rileysan

Well-known member
Joined
Sep 11, 2015
Messages
4,298
Location
Milwaukie, Oregon
It came out looking nice. Are you planning on raising the height of the door opening ? What's the plan for bridging the gap between the floor and driveway ?

Thanks!

Good question on the height.

We are deliberately raising the garage floor and driveway heights to keep the water and mud from the yard next-door from flowing/flooding his driveway. It has been a problem for a number of years and has done serious damage to the left-side of the garage - which will need repair in the very near future.

Phase 2 will be to pour a new driveway sometime next spring. But for now, he can use his garage without fear of damage to anything stored in it.

He bought the house a few months ago with full-knowledge of the work that needed to be done. However, with all the costs associated with buying a home, he couldn't justify spending ~$9k to have a contractor do the job. When all is said and done, he will spend less than $2k to do it ourselves.

Brian
 

NUTTSGT

Super Moderator
Staff member
Joined
Sep 14, 2009
Messages
51,119
Location
Northern Central Ohio
Aside from having old spalled up and uneven concrete, I faced the same issue of having water come in my garage during heavy rains. I also installed new doors after rasing the door openings.
 

dfiler2

Well-known member
Joined
Dec 15, 2014
Messages
2,859
Location
NW Minnesota
Definitely a good decision to go on top the way you did, IMO your floor would have been too low if you had torn the old one out, looks great.
 

red

Well-known member
Joined
Feb 20, 2009
Messages
721
Location
Hudson Valley, NY
Home run on the pour! Looks great

Had weather problems with my pour. Mason ordered a "hot" load and the truck showed up two hours late. By then it was too warm and the concrete was set up too fast. Lots of hills and valleys which I fixed with ceramic tile. Sad part he had a power trowel which he didn't bring but would have fixed the problem.
 
To avoid these ads, REGISTER NOW!
Top Bottom