To avoid these ads, REGISTER NOW!

Howdy all - seeking expertise on setting rivets

neevo

Member
Joined
Jan 29, 2019
Messages
14
Location
Sydney, Australia
Hello everyone :)

I have just joined as I was following a rabbit hole on how to set rivets and found this site and some great info and was hoping to reach out to those in the know about setting hollow rivets.

I am restoring an old piece of audio equipment and am half way through the restoration project (have a thread on another forum but not sure if its appropriate to share the link). The problem I have is that no one can give me any guidance on how to overcome issues I am having with the rivets.

Originally the preamp was rivetted together and I'd like to maintain that look and have purchased a host of rivets and air hammers etc to try and get them set right, but its not working and I end up with split rivets or damaging the test panels they are going in to.

Can anyone help?

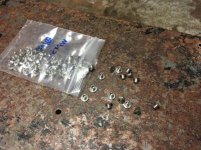
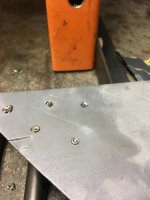
The panels are approximately 1.5mm thick steel and I've purchased 3mm (SS and Zinc Plated) semi tubular rivets. The access is limited as all the parts are already wired in to the amp chassis so I need something that can reach in a little deep.

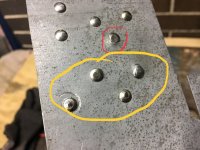
Tried hammering which was ok but marred the surface of the rivets. Bought an air hammer but the tools I have to set the rivets don't appear to be ideal and either damage the rolled over end or mark the good side.

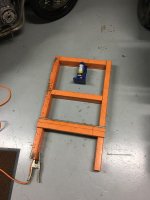
I'd love to find a big press with a long reach to do them properly but its a little expensive to buy it for 1 job.
 
To avoid these ads, REGISTER NOW!

e015475

Well-known member
Joined
Jul 24, 2012
Messages
644
Location
Show Low and Mesa Arizona
You might try finding something called a 'rivet squeeze'

https://aircraft-tool.com/shop/detail.aspx?id=5022-DX&AspxAutoDetectCookieSupport=1

This one is kind of expensive, but mine looks just like it and it cost me about $70 from a used aircraft tool company called 'The Yard'

I have never used hollow rivets but I suspect to get this to work you might have to machine one of the anvils to get it to deform the rivet without splitting it. You might consider using solid aircraft rivets to sidestep the issue.
 

BillK

Well-known member
Joined
Aug 24, 2006
Messages
9,339
Location
Beautiful Southern Maryland
Neevo,
How about a few pictures ? I think you have to make 5 posts before you can post them so maybe just make a few more quick posts and then put up a couple of pictures. That would make it a lot easier to give you suggestions.

I have run into similar issues restoring older Ham radio equipment but I am usually not that concerned about exact originality.
 

theoldwizard1

Well-known member
Joined
Feb 22, 2011
Messages
43,200
Location
SE MI
The most important thing is getting the EXACT size (diameter and length) rivet.

A rivet squeezer is the easiest to use tool for the job.
 

MFolks

Well-known member
Joined
Feb 3, 2013
Messages
1,045
Location
Springfield Mo.
Aerospace,solid rivets are set by using a bucking bar,rivet set, and the correct sized rivet gun for light rivet work a 2X will work,I suspect your rivets were the "Pop" style.
 

engineer2

Well-known member
Joined
Dec 13, 2009
Messages
11,808
Location
Chicago burbs
Semi tubular rivets are pretty common on older equipment and older automobiles. "Restoration" means keeping it as original as possible. Some older amps can be quite valuable.
 

like2wheel

Well-known member
Joined
Oct 29, 2014
Messages
1,693
Location
On an as needed basis
Don't know if this helps, but I use semi tubular rivets when mounting blade holders on hockey skates. I have a rivet press that has a concave die to fit the rivet head & has a "burst die" on the back side. The burst die splits the hollow part of the rivet into 5 segments, & curls them over to cinch the rivet.
Maybe gives you an idea if that's correct for your application...
 

DGersic

Well-known member
Joined
Mar 12, 2017
Messages
6,333
Location
DeKalb, IL
Hanson Rivets have many options for rivets and dies to set them with. If your panels are 1.5mm x 2, you’re going to need longer than 3mm rivets. If you can reach both sides with a C clamp, it can be modified in to a rivet squeezer.


Sent from my iPad using The Garage Journal mobile app
 

guppymech

Active member
Joined
Jul 24, 2018
Messages
25
Location
Chicagoland
With tubular rivets a tool like the Rapco RA825 will work with 5/32 or 3/16 rivets. Trying to drive solid rivets may damage your electronics. The correct length for solid rivets is the material thickness plus one and a half diameters.
Example:
2 .030 sheets riveted with .125 dia rivets. The correct length of rivet will be .247. After bucking the tail should be .5 dia high and 1.5 dia around.
Link to Rapco riveter, made in USA:
https://www.aircraftspruce.com/cata...lzTtI65uJWZQeKcsY1DLn-rZj93fe06RoC6cEQAvD_BwE
 
Last edited:
OP
N

neevo

Member
Joined
Jan 29, 2019
Messages
14
Location
Sydney, Australia
Sorry for the delay, for some reason I didn’t get notifications of replies, will have to check my thread settings.

Pictures are worth a thousand words so let me get a few posts in, then I can share the pics I have that I’m sure will explain things a lot better.
 
OP
N

neevo

Member
Joined
Jan 29, 2019
Messages
14
Location
Sydney, Australia
To clarify a few things.

1. The preamp in question is a Macintosh C20 from the 1960’s
2. It was in terrible condition when I bought it and I’ve slowly been brining it back to life
3. It cost me not much to buy but the restore will be a reasonable cost. Still significantly less than buying one though
4. These amps are valuable and owners like as close to original as possible or at the least true to original restorations. Hence why I’m really keen to get the proper rivets to work. Otherwise I’d just go with something simpler like blind rivets
5. The original rivets are semi hollow (tubular) rivets. Plates steel. The originals had rusted out and I needed to replate the chassis so I removed them all
6. The chassis is approx 1.5mm thick and the holes are approx 3mm. I purchased (all 3mm diameter) 3mm length semi hollow rivets but they don’t set properly with star washers under them. I suspect I might need 4mm maybe. I also purchased 7mm rivets but they didn’t work either.
7. I’ve tried hammering them with a bar (best result so far but flattens the head). Setting with punches (terrible) and setting them in my mill (I’m worried I’ll break the quill so won’t do that again as it takes too much force)
8. There’s added complexity in that I need long reach on whatever solution as I have to set rivets in the middle of the preamp
 
OP
N

neevo

Member
Joined
Jan 29, 2019
Messages
14
Location
Sydney, Australia
I have purchased a load of tools to try and help me:

Air impact gun with corresponding setting attachments
Hammer setters (probably for much lighter rivets as they bent)

With the air gun I have found it splits the back of the rivet and the front is marked by the other part (the but that holds the rounded head). I suspect it’s because the dimensions are not right for the rivets I’m trying to set.

I have a shop full of tools so can easily modify or make parts (have a lathe and a mill).
 
To avoid these ads, REGISTER NOW!

homebuilt burner

Well-known member
Joined
Dec 8, 2014
Messages
1,763
Location
central Wisconsin
It sounds as if the rivets are mainly cosmetic. If this is true and they are only holding a simple panel, you could buy longer rivets than you need and thread them. Then, secure in the amp with a nut on the backside and the part of the rivet showing would be undamaged. That is if the "look" is mainly what you are looking for.
 
OP
N

neevo

Member
Joined
Jan 29, 2019
Messages
14
Location
Sydney, Australia
For anyone interested here is the full rebuild thread: Click Here

Attached are (can’t work out how to embed the images):

1. The amp in its original condition
2. The 3mm diameter semi hollow rivets with 3mm length. These were in stainless, I also bought nickel plated as I thought they’d be easier to set
3. The one I hammered with a socket extension. The best to date
4. My test panel with failed attempts
 

Attachments

  • 4ECE3BF6-C0A5-49E7-8654-38421E96E48F.jpeg
    4ECE3BF6-C0A5-49E7-8654-38421E96E48F.jpeg
    126.2 KB · Views: 67
  • 4A7A60C7-8341-4FDC-9D0F-E6E1E9DD1E9B.jpg
    4A7A60C7-8341-4FDC-9D0F-E6E1E9DD1E9B.jpg
    95.3 KB · Views: 66
  • FAED478F-DF45-4DF8-BBE0-4B177370CBC4.jpeg
    FAED478F-DF45-4DF8-BBE0-4B177370CBC4.jpeg
    81.1 KB · Views: 65
  • 0D4EB640-1BC6-46A2-A1CC-59642697124F.jpeg
    0D4EB640-1BC6-46A2-A1CC-59642697124F.jpeg
    59.3 KB · Views: 62
  • D1929919-1C43-4389-AC25-87D752E7A633.jpeg
    D1929919-1C43-4389-AC25-87D752E7A633.jpeg
    56.9 KB · Views: 64
  • E6B4D86B-8487-4C7C-B9D2-F61F1A253E74.jpeg
    E6B4D86B-8487-4C7C-B9D2-F61F1A253E74.jpeg
    113.2 KB · Views: 85
Last edited:
OP
N

neevo

Member
Joined
Jan 29, 2019
Messages
14
Location
Sydney, Australia
It sounds as if the rivets are mainly cosmetic. If this is true and they are only holding a simple panel, you could buy longer rivets than you need and thread them. Then, secure in the amp with a nut on the backside and the part of the rivet showing would be undamaged. That is if the "look" is mainly what you are looking for.

Not cosmetic. They’re integral for the structure. Bolt mounts are riveted on to panels as well as tube sockets and RCA connectors are riveted on too. Probably 100 odd rivets required.
 

DGersic

Well-known member
Joined
Mar 12, 2017
Messages
6,333
Location
DeKalb, IL
I bought some of those but I suspect I need to better size them for the exact rivets. I struggled to find some readily available, certainly in Australia has been a challenge.


I’ve done many tubular rivets with a set of these and a hammer. If you can reach both sides, that’s the easiest and cheapest way.


Sent from my iPad using The Garage Journal mobile app
 

FSrepair&fabrication

Well-known member
Joined
Jul 28, 2017
Messages
908
Location
maryland
I cant tell from the pics if they will work in every spot you need, but. i would look into HUCK rivets. You can pull them with a pneumatic rivet gun with very consistent results, and regulate the air pressure for different sizes and materials so you dont damage the piece. We use them all the time on peterbilts and aluminum trailers. Thats how they are assembled from the factory, mainly for speed, but also very strong.
 
OP
N

neevo

Member
Joined
Jan 29, 2019
Messages
14
Location
Sydney, Australia
Thanks all for the tips. I have a few ideas and keen to get people’s thoughts.

I’ve tried the hitting with a hammer method but really can’t get it to work. So I’m thinking I might get a shop press instead. Then I can modify some of the parts I have (setter and dies) to attach to that.

Likely overkill but would give me the pressure to set the rivets properly and would be stable so I can press them neatly.

Really only keen to use the semi hollow rivets to maintain the original look of the amp. Plus they are relatively flat on the back side which is required. Wouldn’t have the space for bolts for blind rivet bodies.

With that in mind, if I modify the dies and setters I have now (on the lathe). What sort of dimensions should I be aiming for in order to hold and set them properly?
 
Last edited:
OP
N

neevo

Member
Joined
Jan 29, 2019
Messages
14
Location
Sydney, Australia
OP
N

neevo

Member
Joined
Jan 29, 2019
Messages
14
Location
Sydney, Australia
So I went to my local scrap yard and bought some pallet racking shelving.

A few more bits to complete before I try setting a rivet. But I’m 60% of the way there I reckon.
 

Attachments

  • 1A00BF4C-84E1-4A0B-919D-3F709EC9D5E8.jpg
    1A00BF4C-84E1-4A0B-919D-3F709EC9D5E8.jpg
    151.3 KB · Views: 23
  • E9E1F342-DA67-4DAA-AFA8-8F8B5F19167A.jpg
    E9E1F342-DA67-4DAA-AFA8-8F8B5F19167A.jpg
    130.2 KB · Views: 19
  • 0A8CD3D8-BDE5-49B1-AF63-5B865F3F3247.jpg
    0A8CD3D8-BDE5-49B1-AF63-5B865F3F3247.jpg
    70.6 KB · Views: 17
  • CE0EA151-DEC5-4BE0-ABCA-FBFD656B091F.jpg
    CE0EA151-DEC5-4BE0-ABCA-FBFD656B091F.jpg
    154.6 KB · Views: 17
  • 19E64BD1-6FCB-4DED-AFA7-66026594F64D.jpg
    19E64BD1-6FCB-4DED-AFA7-66026594F64D.jpg
    136 KB · Views: 17
OP
N

neevo

Member
Joined
Jan 29, 2019
Messages
14
Location
Sydney, Australia
Nice looking press, but overkill for some little tube rivets?


Sent from my iPad using The Garage Journal mobile app

Oh yeah, overkill for sure. But I’ve had such issues making something work I thought I’d go over the top in the hope it would work. Plus I then have a shop press to use after too.

It’s still not perfect. The rivets set perfectly but the back sides are not neatly mushroom’d out. I’m going to create a piece to hole the rivet head and then a setter that is very slightly pointed in the hope it will spread out the back of the rivet.

This is what I getting at the moment.
 

Attachments

  • B2A656C6-0FC5-4D34-B9B3-73C02605F9DD.jpg
    B2A656C6-0FC5-4D34-B9B3-73C02605F9DD.jpg
    73 KB · Views: 21

dogdog

Well-known member
Joined
Nov 15, 2011
Messages
12,711
There is a pretty good thread here on solid rivets....

https://www.garagejournal.com/forum/showthread.php?t=172474&highlight=rivet+101

as far as any thing more...
the thickness of the material being riveted , the selection of the anvil head, selecting the right length rivet... matters... Just remember in school, we had to calculate it out before going out to the shop floor...

as far as hitting it, we are told to hit it directly 90 deg ... not swirling around... that is when you get the smiley faces....
 
To avoid these ads, REGISTER NOW!
Top Bottom