To avoid these ads, REGISTER NOW!

Hudson’s Hudson Project & Random Other Projects

hbabler

Well-known member
Joined
Jun 17, 2014
Messages
149
Location
North Texas
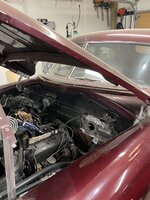
Okay I need some advice. I have a 48 Hudson coupe that was partially converted to new style power brakes before I got it. I’m swapping the 4.3 that’s in it for a 5.3 5 speed and I’m finishing the brakes.

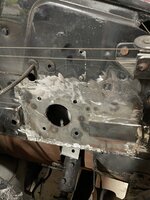
It looks like they attempted to strengthen the firewall, which I can see why as it’s 20 ga and kinda floppy with a brake pedal. The new piece in the picture looks like 16ga.

First I am doing some measuring but it looks like I need to move the master cylinder up to work with the kugel through the firewall clutch and brake pedal assembly I purchased. So I need to fill the holes in, redrill the holes and move it up. What’s the best way to fix this mess and move the mount up? Any ideas? Thanks for the help.
 

Attachments

  • A4670262-9CDB-4854-AB7E-58B8C9E2F6A9.jpeg
    A4670262-9CDB-4854-AB7E-58B8C9E2F6A9.jpeg
    366.7 KB · Views: 212
  • 973A6D4A-D1F7-4108-9442-7C55F7321DBB.jpeg
    973A6D4A-D1F7-4108-9442-7C55F7321DBB.jpeg
    355.5 KB · Views: 210
  • 99F73F37-EA53-45EF-AA91-1B55C90EAF5E.jpeg
    99F73F37-EA53-45EF-AA91-1B55C90EAF5E.jpeg
    397.5 KB · Views: 215
To avoid these ads, REGISTER NOW!
OP
H

hbabler

Well-known member
Joined
Jun 17, 2014
Messages
149
Location
North Texas
I need to do some exact measurements but the pushrod should be centered at the top of the current hole.
 

Highland

Well-known member
Joined
Feb 14, 2020
Messages
55
Location
Oklahoma
With firewalls, "when in doubt, cut it out!" since about anything you do will look better than factory.

If it was me, I'd use a plasma cutter to remove as much as possible from where they interupted that horizontal rectangular brace right to over under the fender and from the top of the toe angle up to the drip rail above the hood release cable/pully gizmo. Use poster board to make a template and TIG in one large replacement patch out of 20 ga. If you need to reinforce the area to brace the pedal/cylinder, use flat metal on the inside of the firewall where it can't be seen.

Now about that horizontal rectangular brace...
 
OP
H

hbabler

Well-known member
Joined
Jun 17, 2014
Messages
149
Location
North Texas
Those are all super helpful thanks. @Highland I am not sure what to do with that horizontal brace. The piece they cut out is long gone and the piece they welded on doesn’t match at all.
 
To avoid these ads, REGISTER NOW!

Highland

Well-known member
Joined
Feb 14, 2020
Messages
55
Location
Oklahoma
The way they lopped it off square just draws your eyes right to it! After you figure out where the new cylinder has to be you can figure out what to do with that square end.

Looks like they may have moved the cylinder location to the left from where it originally was too.
 

Ohmthis

Well-known member
Joined
Jan 20, 2013
Messages
3,014
Location
Outside of Louisville KY
I agree cut that out and make a new piece to weld in. Brace the inside if it needs it. I’m not sure what kind of metal working tools you have, but a piece of flat bar, some clamps and chisels will work to make a unique raised shape (doesn’t have to be heavier steel, 3D shapes have an exponentially stronger ability against moving/flexing) to add. The ends of the rectangle pieces can be cut on an angle and the face filled to make it look like the factory might have made it that way on purpose. Like the picture I sent edited below
 

Attachments

  • A769496C-E9D9-4F8A-A8FE-01031243A9DC.png
    A769496C-E9D9-4F8A-A8FE-01031243A9DC.png
    1.7 MB · Views: 131
OP
H

hbabler

Well-known member
Joined
Jun 17, 2014
Messages
149
Location
North Texas
Thanks for the ideas. The project just got a bit more involved as I pulled the engine tonight. Man the motor mounts and steering on this car are downright scary. So I’m going to be doing a lot of fab work. I’ve done a lot of work on cars over the years but this is the biggest fab project I will have done. Wish me luck….

2225A021-6D8F-405D-A40C-6FCC7AAED70D.jpeg
 

Attachments

  • 9E601756-2D60-4E64-9116-D9244A0FC2B6.jpeg
    9E601756-2D60-4E64-9116-D9244A0FC2B6.jpeg
    319.8 KB · Views: 60
  • 6B7743DE-CF69-481F-AC44-11A030A7F85E.jpeg
    6B7743DE-CF69-481F-AC44-11A030A7F85E.jpeg
    391.1 KB · Views: 64
OP
H

hbabler

Well-known member
Joined
Jun 17, 2014
Messages
149
Location
North Texas
Okay so here is an update, I have had a bit of project creep. To replace the sketchy steering setup I’ve decided to go with a Jag XJ6 subframe. It’s a common mod for Hudson’s as the track width is perfect.
686E47E8-6D5A-481A-BA27-5B962B3B1CAA.jpeg
I obtained a Jag Parts car and pulled the subframe out of it.

So I leveled the car, marked the old WMS on the floor and started cutting.

D4915009-75BA-4BC4-87EC-F9AA3D9EEA0A.jpeg

So I’m not the greatest fabricator but I’m learning a lot on this project.

I cut the frame and started splicing a piece of boxed tubing in. The drivers side was first and I didn’t get it fit in as well as I should have.
86F00ED0-5A75-4D3F-9507-7C0D87818CAB.jpeg

The passenger side I got to fit in much better.
062CC313-5505-455B-B067-8D2DFDAC7322.jpeg

I am going to finish welding this side in and start fabbing up some mounts for the subframe.

I’m leaning towards either welding it directly to the frame or bolting to the frame. I’m probably not going to do the factory soft mounts

Thanks for reading and for all the help on this thread previously. I’m going to get back to the firewall after I finish the subframe. I’ve learned more in this forum from you guys than any where else
 
OP
H

hbabler

Well-known member
Joined
Jun 17, 2014
Messages
149
Location
North Texas
I finally got some free time to work on projects yesterday. I started by swapping a new starter into the 1978 firebird parts car to see if it would start. No luck on that front unfortunately.

Then I applied weed and feed to the yard and opened up my new tool that Amazon so kindly delivered two days late.
E3AD2413-0F7B-411D-8B8F-90524F150EB6.jpeg

I then proceeded to mark out where the gusset plates are going to support my frame splice. I ordered the fish plates from Barnes4wd and I have to say I was impressed by the quality


A52AB804-C690-4870-A93D-914B49088202.jpeg

I wanted to mount the plates to the inside of the frame pieces. Since the new piece is boxed and I can’t get to the back side very easily. I figured the easiest way would be to mark the fish plate, drill holes and then plug weld them in.

FEBA1E4F-D3D7-4682-B6C9-1F5FF2B28A7A.jpeg

Luckily I had a hole on the frame I could reuse to start with. Then I drilled matching holes on each end and smaller holes at a couple of other points.

I loved the the rotobroach. Thanks for the recommendation. It took about 30-35 seconds to drill a hole with a drill bit and 10-15 with the rotobroach.


E7F1271C-7ECA-4575-B857-14C1062139C7.jpeg65D201C8-D482-4E53-B521-C746000C353D.jpeg

The finished product, I ran out time to get them welded. Hopefully I can get back out there later this week and weld them up.
 
OP
H

hbabler

Well-known member
Joined
Jun 17, 2014
Messages
149
Location
North Texas
Finally back on the fun project. My 2500 suburban needed some attention to prepare for camping season. I installed a new hitch, fixed the AC and replaced a CV axle.

I was able to weld up all the plugs yesterday. Please excuse the mess.
80E428D4-2A8B-45C0-BAEB-08812BA1F93D.jpeg


I’m going to clean them up a bit and grind them smooth.

After that it’s on to mounting the subframe. I’m a little nervous about getting that part right.
 
OP
H

hbabler

Well-known member
Joined
Jun 17, 2014
Messages
149
Location
North Texas
So I had a little trouble getting the gusset plates lined up on the back side due to access.

I tried a couple of different things until I settled on this.
6DD5DE8A-7036-4188-AEF4-4D3DA2662403.jpeg

I glued neodymium button magnets on a paint stick and then trimmed it into smaller pieces. I was able to use these in the holes I drilled to hold the gusset in place while I tack welded it.

13BD804A-03BE-4351-90DF-811E78E819F5.jpeg


Thanks for reading.
 
To avoid these ads, REGISTER NOW!
Top Bottom