To avoid these ads, REGISTER NOW!

Hydronic tube spacing to avoid 'striping'

JC-Ohio

Member
Joined
Aug 23, 2022
Messages
5
Hi all,

I'm getting close to finishing the design of the hydronic heating for my new home workshop. The floor will be 4-inch concrete with 2 inches of XPS below and around the perimeter of the slab. I'm using 1/2" tubing and planning to put it 2 inches below the surface of the slab. I've seen a variety of opinions for tube spacing. It seems most people use 12-inch spacing, a few use 9-inch spacing, and one person recommends 6-inch spacing. Because I will be building and repairing cars and who knows what else, I will be spending a lot of time sitting/laying directly on the floor and I want to avoid warm-cold-warm-cold temperatures across the slab. Can any of you with heated slabs tell me what you've experienced with various tube spacings?
 
To avoid these ads, REGISTER NOW!

fitter30

Well-known member
Joined
Jun 23, 2019
Messages
2,973
Location
Peace Valley,mo
1/2" pex 300' max loops, 32 btu's ft @ 20° temp drop, use ecm pumps cost a little more but energy efficient, use only boiler glycol 30% minimum for Inhibitors, use a micro bubbler air removal device lot of different brands and a thermostat that has a slab probe. Set back temperature and it might take a few hours to catch up.
 

ipgenie

Well-known member
Joined
Jan 29, 2020
Messages
561
Location
Idaho
I had a company design the floor heating system for my house. The basement concrete is 4" thick and the upstairs is 2". They specd the tubes at 6" spacing in the thinner floor and 6" for the thicker floor. He explained that the larger the thermal mass and the further the tubes are from the surface, the further apart the tubes can be spaced.

When we did the garage floor, we did 12" spacing. That floor was also 4" thick but because we heat at a lower floor and room temp the wider spacing has worked fine.

All of it has worked well. On the 2" floor you can feel cooler and warmer spots in the tile depending on which zones are circulating, but that's to be expected with tubes so close to the surface and less mass to heat up. I don't notice this in the tiled areas of the basement or in the garage. There are temp differences though, a thermal camera shows the warmer tubes easily.
 

peter94

Member
Joined
Aug 25, 2012
Messages
13
We did around 8" spacing. I ran a perimeter loop as close to the edge of our block as possible, and spaced that about 2-4" apart from each other. You may want to have it run as close as you can to underneath your overhead and entry doors. It helps keep ice from forming. The first hydronic project I did we found it was pretty cold next to the wall and next to the doors. So that is why I decided to run a perimeter loop around the exterior walls. I also spaced the loops closer to 6" where my wife parks with the kids. It is next to our entry door into our house so I wanted it to be warmer and have water evaporate faster.

There is no reason to not run more loops closer together. You can absolutely feel it in the concrete if your loops are too far apart. All the extra cost is just more pex, staples, and maybe an extra port or two in your manifold. I would highly recommend doing a perimeter loop too. It has been really nice not having cold spots in my floor. I attached a pic so you can see what I am talking about with the perimeter loop. Look next to the garage doors.
 

Attachments

  • 20220817_201756.jpg
    20220817_201756.jpg
    932.9 KB · Views: 102
To avoid these ads, REGISTER NOW!
OP
J

JC-Ohio

Member
Joined
Aug 23, 2022
Messages
5
Thanks, everyone, for your input. It is just what I was looking for.

Special thanks for @peter94 for the picture. It is very helpful to show the tube layout and also got me to thinking about how to do my floor drain. I was planning a single, round drain in the middle of the floor mainly because that's what I had in a previous garage (already there when I bought the house). Looking at your picture and doing some more research, I now realize a trench drain will work much better for what I have in mind.
 

peter94

Member
Joined
Aug 25, 2012
Messages
13
JC-Ohio,

The floor drains were the hardest part of this endeavor. I had our concrete guys come in, and pack/level the class 5 (or whatever they used) so I had a baseline for height. My mistake was I underestimated how hard they could pack the floor. I had to rent a mini excavator to dig in the trenches for the drains because you could barely dig a shovel into it.

I am very particular with my drains as with my old garage, the floor had settled a little bit, so all of the water from snow melting off of a vehicle, or a wet vehicle from a rainstorm would run towards the house. So wanted all of the water/ice/snow to melt off, and run under the vehicle. That way if you had to walk in the garage, you wouldn't have puddles of water accumulating in walking paths. I am really happy with them. The floor is sloped 1" from the wall to the drains, and 1" from the middle of the garage to the drains. Some might call it excessive, but walking in puddles really pisses me off, so I vowed it would never happen again.

It might be worth mentioning that both drains are tied into the pits in the back bay (my "shop" area) for the FM9SL. There is a drain the center of each pit, and another floor drain by the very back door. This all exits to daylight.

Do your floor drains right. You won't be disappointed. If you want any more pics of how I did my install let me know.
 

Attachments

  • 20220818_160025.jpg
    20220818_160025.jpg
    606.5 KB · Views: 89
OP
J

JC-Ohio

Member
Joined
Aug 23, 2022
Messages
5
Thanks for the info. At this point, I don't know what I don't know so I would definitely appreciate a picture or two of how you did the install.
 

86turbodsl

Well-known member
Joined
Jul 1, 2005
Messages
6,556
Location
Michigan
I did 12" spacing in the shop, 4" floor. I can't tell at all. That equates to 1' per square foot and is easy to calculate. 20F drop per 300' line. Keep them all same length and you won't have any problems. My floor runs right at 20F delta T.
 

Steve R

Active member
Joined
Nov 19, 2018
Messages
31
Location
South Dakota
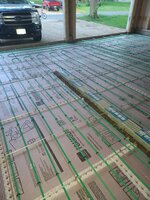
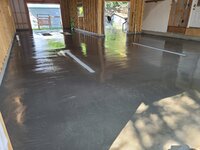
I have a 40x64x16 garage that I done heated floor. I have 6 inch cement for the floor. I tied the 1/2" pex tubing to the bottom of the rebar (request from my cement guy who had to make the saw cuts in the floor. He said they done one with pex on top and it floated up a bit and the saw it it. It was not a 6" floor but I see the logic in it. I did not want pex on the insulation, I wanted it up in the cement. There is 2 different thoughts on this. One is if it is at the bottom it has a wider V temp going up to cover more of the surface area. The other is in the middle of the cement you pull more heat from the line as it is totally covered in cement and doesn't take as much heat to reach the surface. I like the second and I have used my thermal scope and when I first turned it on you could see where the lines were. After a day my foor was all white with heat and pretty even. In our new shop and work they done it at the bottom on insulation it had a 8" thick floor. When it was on for a while all you seen was lines too. After a day it was all even. After seen this I don't believe having it on the bottom gives more even heat in the floor. My rebar is on 24 inch center and done the pex on 12 inch center. See pictures. Here are some of the tips that I was told. Run two heated loops (coming from the heat source) along the outside and the return up through more toward the middle of the floor back to the heat source. Another wards don't run the cooler water return right along the heated water along the outside lines (supply, supply, return return, not supply return, supply, return. Do NOT make sharp turns, you kink the pex, it is not good. I was told not to use it if it kinks. I cut my pex to 300 ft for each of the 8 loops. Started the close to where the manifold was going to be and left 4 ft of pex going up the wall where manifold was going to be. I didn't plan on manifolds being that high but wanted to have some extra for the Oh, didn't think of that. Had my daughter help me with this part of running under rebar. I started tying the heated loop (supply) from manifold area along the outside of the wall and she was feeding it under the rebar from that area. I pulled it along tying with plastic zip ties along the outside until return was about the same height as the supply on the was. Then took another heated and tied 12" from the first one I had done. You dont want all your return lines running next to each other. I used 3/4" electrical conduit 90' sweeps to put over the pex to where it comes of the floor. I used the sweeps with the belled end and had the belled end sticking up. I cut 3/4 conduit in 18" pieces and stuck them in the belled end of the sweeps (did not glue, didn't want any of the glue on the pex) and used couple 2x4 boards and conduit clamps to the clamp the conduit to the boards. Had one board down lower and one at the top of the conduit with the conduit spaced the same as the manifolds. This gives the pex protection coming out of the floor and from kinking. I have seen several installation that used electrical conduit sweeps and other commercial guides in the floor and but never extended up like I did. You can imagine the things I seen fall down in there and lay along pex. I have seen rocks, pieces of cement, screws, nails, and pieces of tin. I didn't have and won't have that issue. Also pressurize your pex BEFORE you pour the cement (40 psi was I seen for recommended psi) and have it where you can add air pressure again if needed. I used 1/4" water line and ran it over to a door with a valve stem like for a tire. Had a psi gauge mounted there too. And have a couple splices on hand so if the pex gets hit, poked or broken while pouring, that it can be fixed immediately. Also have a roll of good electrical tape so if you have to use the splice(s) that you cover it with several raps of electrical tape. Start wrapping about 1 1/2 before the splice and go to about the same distance past. You don't want cement to touch the splice or clamps. I lucked out and didn't have an issue but Murphy' law kicks in when least expected. Better have and not need then to need and not have. I also used some 5/8" heater hose cut to about 2" long and split to put around one of the pex lines if they had to cross each other to just to prevent them from touching each other. This happens when you are close to your manifold area. One thing I wish I had done different is had my manifolds switched around. With how my panels is mounted, the supply comes off the left side and the right manifold is supply. The lines coming off the panel is crossed, doesn't hurt anything, just would have looked a little neater.
 

Attachments

  • Heat Panel.jpg
    Heat Panel.jpg
    635.7 KB · Views: 60
  • Floor Pipe 2.jpg
    Floor Pipe 2.jpg
    418.5 KB · Views: 62
  • Floor pipe.jpg
    Floor pipe.jpg
    663.6 KB · Views: 63
To avoid these ads, REGISTER NOW!
Top Bottom