To avoid these ads, REGISTER NOW!

In-floor Scissor Lift Install

Jack Olsen

Super Moderator
Staff member
Joined
Mar 22, 2009
Messages
6,678
Location
Los Angeles
This car damn better be competitive and with over 600 rwhp and 2300 lbs. and gobs of downforce it will be. The driver I hope is. I will be disappointed with times worse than the front third of the Speed World Challenge grid. I will be pleased if I am faster than the SWC pole times.

Speaking as a guy whose car rolled out of the factory at 2350 pounds (with a dry sump oil system, to boot), but also speaking as a guy who only has a third of your horsepower, I'll offer the opinion that suspension is probably the most important factor for lap times.

Not that low weight, high power and downforce are going to hurt you. ;)

Cool lift.
________
 
Last edited by a moderator:
To avoid these ads, REGISTER NOW!

Shocker

Well-known member
Joined
Nov 23, 2008
Messages
2,030
Location
Olympia, WA
Ahhh, ok, for some reason I thought that you rammed it through the concrete. What a dunce I am.

Thanks for the info.
 

jhn9840

Well-known member
Joined
Mar 11, 2007
Messages
1,189
Location
Northern Panhandle of WV
Paul,

I just spent two days reading the car build thread. All I can say it is the best single thread I've may have ever come across. Fantastic car, hope that it more than meets all your expectations.

Great job installing your lift, should make all that CF work a lot easier.

jhn9840
John
 
OP
P

Paul Bird

Active member
Joined
Jun 1, 2006
Messages
40
I'll offer the opinion that suspension is probably the most important factor for lap times.
"Any suspension can be made to work if you don't let it," Colin Chapman

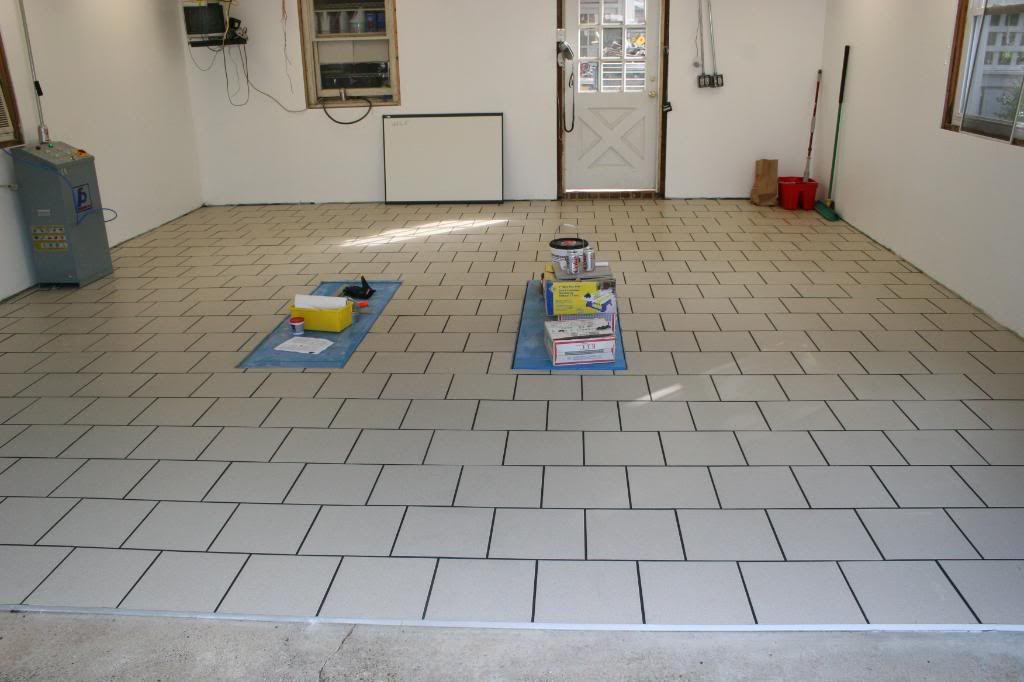
For the past two weeks I have been a)cleaning up the garage after the lift install, b) finishing the drywall and painting (two coats of Behr Ultra Pure White is BRIGHT) and c) putting down the industrial porcelain tile floor I mentioned earlier in the thread. I had done a few small DIY tile jobs in the past but this was a major effort. Basically took the whole holiday weekend plus four more nights of work. This was the first and likely only time I have been glad that my garage wasn't bigger. I sure am glad to get it done as my hands, knees and back are killing me.

FYI, I know that this may be more appropriate in the 'flooring' forum but don't really want to start a new thread.

FinishedFloorFromBigDoor.jpg


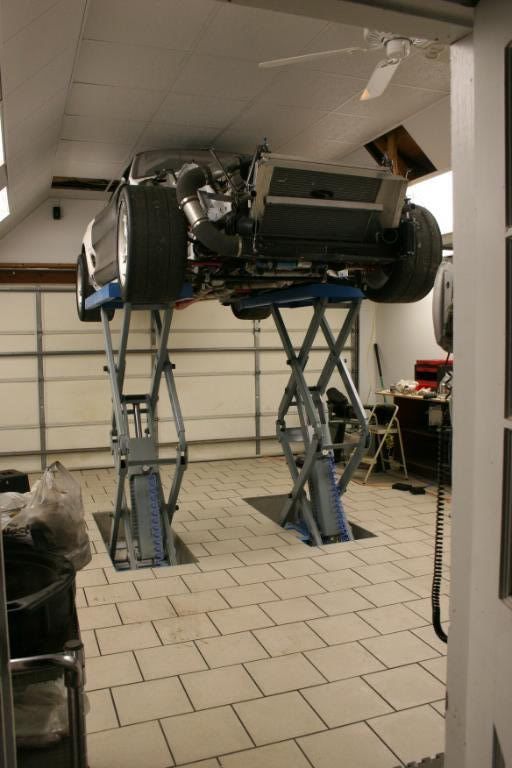
FloorFinishedLiftClose.jpg

I got several pm's about my ceiling which you can kind of see in the shot. Several years ago I arched it by redoing the trusses. I now have 10'5" of height which is enough to lift the 47" tall Mustang to the full height of the lift.
FloorFinishedPaint.jpg


BTW, I am going to repaint the lifts and am open to suggestions. Right now I am leaning toward either painting them to match the tile (perhaps even with painted grout lines) or going with red to match the welders and cabinets I will eventually build. I just don't like Carolina blue. Kentucky Blue whould be a lot better...
 

JakeD

Well-known member
Joined
Sep 29, 2008
Messages
153
Location
Houston, TX
This is the coolest garage lift install I've seen. Really nice and clean. I think that the idea of painting it like the tiles with grout lines is clever, too. Kudos.
 

sirswank

Well-known member
Joined
Dec 23, 2008
Messages
58
Location
the littlest state
get a picture without the materials stacked on them and then we can photochop a few suggestions and you can decide from those. altho, i have to second the colormatched with grout lines.... very stealth.
 
OP
P

Paul Bird

Active member
Joined
Jun 1, 2006
Messages
40
I have decided to repaint the lift tops red and put in some anti-split sand. Then on top of that I have a 3/4" thick rubber mat that I am going to cover the entire top of each section with. This mat is originally used for horse stalls, is made from tires and will be perfect for this. I'll post pictures when complete.

Here are some updated shots with the lifts loaded: (a new benefit of this lift that I discovered last night is that when the car is on it at full height - 74", I gain a lot of floor space for working on other stuff)
Mustangonlift.jpg


IMG_4161.jpg


Expeditiononlift.jpg
 

Jack Olsen

Super Moderator
Staff member
Joined
Mar 22, 2009
Messages
6,678
Location
Los Angeles
Something eye-catching around the edge of the surface is a good idea, unless you can be 100% certain that it will always be completely flush with the adjacent tiles. You'll always know the potential for tripping is there, but guests in the garage might not.

If it hasn't been said already, I'll say it: Somebody needs to start thinking about a group buy for these.
 

brockstar

Well-known member
Joined
Jul 14, 2008
Messages
244
Location
Cincinnati
Paul, the lift looks great, not to mention the build!

The EE website looks almost shady, but that is a design/translation issue. Its the product and service after the fact. How was dealing with EE/Alibaba? Was there a reason for it being shipped to Memphis vs. elsewhere? I'm in Cincinnati, so it wouldnt be too far if that is a central shipping point..

Eric
 

revlover

Well-known member
Joined
Mar 27, 2008
Messages
264
Paul, really like the setup. Very clean and professional looking. Also, great idea to raise the trusses for the clearance... huge benefit. What if you put a cloth from the bottom of the ramps to the base of the lift to hide the scissors? Would make it even cleaner, but not sure if it'll get in the way of anything.

Earlier you mentioned that you were first thinking of getting a BendPak lift... were you looking at these?

http://www.bendpak.com/products/automotive-lifts/specialty-lifts/p-6f.php

I'm curious because I'd also be worried about the after sales service of a company located overseas.
 
Last edited:
OP
P

Paul Bird

Active member
Joined
Jun 1, 2006
Messages
40
Jack,

Stepping off into the holes is an issue. I have been brainstorming ideas but they all have downsides - like having to move a panel into the hole when the lift is up. Something automatic would be nice but I am sure that I will quickly get used to it. It is not an issue in the front or the middle as you would have to step sideways under the mechanism to step in the holes.

The EE website looks almost shady, but that is a design/translation issue. Its the product and service after the fact. How was dealing with EE/Alibaba? Was there a reason for it being shipped to Memphis vs. elsewhere? I'm in Cincinnati, so it wouldnt be too far if that is a central shipping point.
From everything I saw, all of the China sites look shady. There is certainly a lot lost in translation. With that, I can tell you that my experience with them was 100% first rate and I never for one second thought that I was getting the scammed or even a run around. Their communication, while half a day delayed, was unreal. I literally have over 100 emails exchanged and when they said it was going to be made, it was made. When they said it was going to ship, it was shipped.

The reason for shipping to Memphis was that I used Averitt International for my shipping and freight forwarding and their hub is in Memphis. Getting the two lifts (3800 lbs) shipped from Shanghai to Memphis was $695. To ship from Memphis to Evansville, IN would have been an additional $550. So we went and got it for $100 in gas instead. FYI - Find an international shipper in your area to handle the shipping and freight forwarding.

Did you make any provisions for drains in the two lift sumps?
As mentioned above, no. I could have, but didn't see the need for my application.

Earlier you mentioned that you were first thinking of getting a BendPak lift... were you looking at these?
I was looking at the SP-7X. With that, I greatly [prefer the lift I have over that one as the 7x has a section that extends past the lifting surface. The fact that the price was 40% of the BendPak's made it a no brainer.

I'm curious because I'd also be worried about the after sales service of a company located overseas.
My thought going into this is and will continue to be that service is a roll of the dice. If something breaks, then I'll do everything I can to fix it myself. If I can't fix it, then I'll go from there. Based on my experience with the sale from Ever Eternal, I think that it would not be an issue to get replacement parts. Getting them here would be a pain if they had to go freight.

BTW, I got a price for a nearly identical lift from Greg Smith. The only real difference was that it was marked up to $3200. I took it from this that their markup was roughly 100%. I am sure if there was demand that they would carry this style of lift in their normal inventory. This style of lift is VERY popular in Asia and Germany.
 

v7guy

Well-known member
Joined
Jun 7, 2009
Messages
557
Location
Hudson valley, NY
paul, looks like a great work environment... a few questions about the tile...

where did you pick up those tiles?

did you use standard grout and seal it?

how easy are they to wipe up after they're dirty? I noticed there were tracks from the mustang in one of the pics.


It may be a dumb question, but where does the garage door go when you raise it?


BTW a ceiling fan in the garage... I love it
 
OP
P

Paul Bird

Active member
Joined
Jun 1, 2006
Messages
40
where did you pick up those tiles?
The tile is from Daltile and is from the Porcealto. It is 100% thru-color and has no glazing. l'll post a close up picture of it next week when I get back from vacation.

did you use standard grout and seal it?
I used StarQuartz polyurethane grout and it doesn't need sealing. This grout is really nice and is JET black. 90% as good as epoxy and 90% easier to install which was important as I did the install myself.

how easy are they to wipe up after they're dirty? I noticed there were tracks from the mustang in one of the pics.
The are very, very easy to clean. The porcelain tiles don't absorb anything so it is just a matter of wiping them off. The tire marks you see are from my Mom's car which had been on the lift earlier. It just tracked through a bunch of filth I blew off and swept up from the underside of my race car.

It may be a dumb question, but where does the garage door go when you raise it?
It goes up and follows the track. Yes, the door can't go up when a vehicle is on the lift and up high enough to block it. Likewise, a vehicle can go up and hit the door. I am considering putting a couple more optical sensors in place to keep either of these from happening. But, as this is really a race car garage it isn't that big of an issue.


As a sidebar, I really can't understand why more people don't put down porcelain tile in the garages. It has all of the benefits of epoxy - easy cleanup, impervious to fluids, durable, etc. Plus it has a bunch of advantages - it is 3/8" thick vs. .02", it won't peel or lift, covers concrete problems (stains, chips), impervious to welding slag, is non-slip, etc. And, if you break one you can air chisle it out and put down a new one.

In advance of future questions, my cost for the tile was $1.90 ft2. The grout was expensive - $220. All told with tile, grout, thinset, aluinum trim, etc. the cost was $1,300 for 440 ft2 and I have roughly 40 extra tiles for the future.
 

Iron-Iceberg

Well-known member
Joined
Feb 14, 2006
Messages
887
Location
A-town
I would paint the lift tops to match the tile with grout lines. That would be so cool. Then I would paint the sides of the lift pads red and the inside of the lift hole red so that when it is lifted up even a little you would see the red for safety.
 

metal1313

Well-known member
Joined
Apr 28, 2009
Messages
3,416
Location
clinton NJ
while it's to late for this now... what if you had a 2x4 cast into the slab, then used several euro hinges and a peice of 3/4 ply wood to cover the hole when the lift is down. with proper planning and measurements the lift would largely support the ply when closed and you could tile the top of it. so when you raise the lift it opens the door, and if a spring was attached the door would serve as a pit guard. the spring would also pull the door shut if you could figure it out right
 

akdiesel

Well-known member
Joined
Aug 8, 2008
Messages
2,617
Location
Wasilla, AK
Paul,
Great job on the installation of the lift and the tile. Very well thought out.
That is a very interesting lift option that includes the hight I like I just wish it could support 9000# for a pickup. The only ones I have seen in this price range are 6000# rated. This one from the site says 3000kg and with the conversion makes it approx 6600#, if I am correct.
 
Joined
Apr 5, 2009
Messages
10
Paul: Hello. I'm planning to build a small garage this summer and fell in love with your lift, keep coming back to it. How is it proving out so far, great I hope. I'm up here in New Brunswick, Canada and lift suppliers locally "ditto" the same lack of trust in China manufactured equipment as many of your American peers have expressed here. Isn't it funny I just read tonight that the U.S. Army boots are made in China.

Paul, do you know of others who have purchased the same lift as yours and their experiences? A local lift company owner told me that equipment from Korea and also Taiwan is generally better made. From your photos, yours appears rugged. He also said that lifts which go up more than 48" are unsteady. He claims that the base should be larger to cover a bigger footprint on the floor while supporting the large mass of an automobile up in the air. I thought that if this was an issue one could place large metal bars or plates under the concrete which could even be welded to the base of the scissors lift (in floor) if deemed necessary for more stability.

Was also wondering how much warranty is included with your lift?

Paul, now that you have the unit, is there anything you would do differently about purchase, installation, even choice of the lift itself. Don't get me wrong, I haven't seen anything yet as desirable in an automotive lift.

I do appreciate your remarks which will help me greatly with my project.

brittlediabetic
(Harold Gladstone)
 
OP
P

Paul Bird

Active member
Joined
Jun 1, 2006
Messages
40
Paul, do you know of others who have purchased the same lift as yours and their experiences?
My friend Gene Young bought the same lift and had his shipped with mine to reduce the cost of shipping. He has been very happy with his so far. Here is a link to his thread on his install: http://www.garagejournal.com/forum/showthread.php?t=37192

He also said that lifts which go up more than 48" are unsteady.
From my experience so far, I would say that this lift is remarkably stable. Even when the lift is maxed out (74" high), the bases of the scissor sections are a good two feet from each other. I have hung from the front and rear bumper bars when the car was at max height and I have no issues with stability whatsoever. Keep in mind that this is with a 2300 lb. race car. I have not had the Expedition up that high because I am limited by my 10.5' ceiling.

Was also wondering how much warranty is included with your lift?
I never asked. See post 53 above.

Paul, now that you have the unit, is there anything you would do differently about purchase, installation, even choice of the lift itself.
So far the only thing I would change would be that I moved the lift sections our to 33.5" and I would have left them at 31". 31" is more than wide enough to get to everything and I have found that some vehicles (like my Expedition and my Mom's Lexus LS430) have frame rails that are just over 30" wide. Keep in mind that I also can and do lift from the rocker panel but on my Expedition the frame hangs considerably lower than the rockers so I have to block up to pick it up there. If the lift was a little close together I could simply push the up button and lift from the frame.

If you are building a new garage I would make sure that the concrete around the lift has little to no slope to it. My garage sloped just enough that the lift does not sit perfectly flat. My concrete (and tile) slopes about 1/2" over the 62" of the lift sections. This keeps the lift from sitting perfectly flush with the surrounding surface. I split the difference and with a little play in the lift get it within 1/8" of level at the front and back.

On the earlier topic of how to finish off the lift tops, I ended up getting a rubber mat (made from recycled tires and used for covering horse stall floors) that is 1" thick that I then trimmed out rectangles to perfectly fit the lift holes. Since I allowed for extra height I am able to lower the lift stops down and still get the top of the mat flush with the ground. The great thing about this setup is that I now can just simply push the up button and my race car WILL be on a rubber pad. I'll post some pictures when I get around to taking them.
 
To avoid these ads, REGISTER NOW!

1badmach1

Member
Joined
Jan 25, 2009
Messages
23
paul, where did you get the tile at and how much a sq ft? The cheapest iv'e found is around 2.71 sq ft.
 
OP
P

Paul Bird

Active member
Joined
Jun 1, 2006
Messages
40
I got the tile from my the Daltile shop for $1.90/ft.2. They said that they normally don't sell directly to customers but that it was very slow so they would in my case. This may be the price difference you are finding.
 

Tex Arcana

Member
Joined
Mar 23, 2007
Messages
21
Holy Effing Arsecrackers, this is one of the coolest projects I've ever seen!! Good job, man! :thumbup:

A couple questions, tho:

1) I noticed your vaulted ceiling, did you do that yourself, have it done in the house, or did you buy the place with the ceiling like that?

2) Where did you locate the pumps/controls/etc? Also, how big is the garage overall?

tia.. and nice car. ;)
 

joecole23

Well-known member
Joined
Oct 31, 2008
Messages
50
Location
Dallas, TX
Well I'll be damned! I was all set to buy an SP-7X for my recessed lift in my new garage that's going up this summer and then I found this post! I NEVER liked the fact that the SP-7X has that torsion bar that runs between the 2 lift pads. Your lift allows for a WAY cleaner install and looks to me to be "heavier duty" than the SP-7X anyway!

I would love to see some more pics with the rubber mats installed. :thumbup:
 

joecole23

Well-known member
Joined
Oct 31, 2008
Messages
50
Location
Dallas, TX
Ok, one question though. And I think I know the answer, but just to make sure...

Your buddy says on his post that each lift pad has four 5/8" anchor bolts. I'm assuming this is their width and not their length? How long are they?

The SP-7X uses 4" anchor bolts - just want to make sure that this lift is anchored as well as its competitor...

Thanks in advance for the clarification!
 
OP
P

Paul Bird

Active member
Joined
Jun 1, 2006
Messages
40
1) I noticed your vaulted ceiling, did you do that yourself, have it done in the house, or did you buy the place with the ceiling like that? 2) Where did you locate the pumps/controls/etc? Also, how big is the garage overall?
I did it myself several years ago in anticipation of a lift. My walls are concrete block with brick and are very sturdy. The roof trusses were simple and made from 100% 2x8s so I simply made a new horizontal 30" above the original cross member and then added some diagonal supports. The garage is 21.5' x 20.5'. The pump and control unit is sitting 6 feet from the lift holes on the side wall of the garage

Your buddy says on his post that each lift pad has four 5/8" anchor bolts. I'm assuming this is their width and not their length? How long are they?
The anchor bolts are 5/8" and 4 inches long. With that, you can easily use whatever anchor length you want. Diameter too if you want to enlarge the mounting holes (which would take 2 minutes).

BTW, I had the same problem with the SP-7X as you. The torsion bar mandated the width of the lift and the extra non-lifting surface area made it a bulkier install in my opinion.
 

malodin

Well-known member
Joined
Mar 15, 2008
Messages
279
Love the install, for the borders around the lift pads i would suggest just getting some red saftey floor tape, grainger carries a ton of different floor tape, its normally a little thicker than say duct tape and a little more rubberized. It lasts forever even with forklifts turning on it. You can get it in solid red or red/white striped, if you are painting your pads red then that floor tape might be perfect for it.

6JT37.JPG

http://www.grainger.com/Grainger/items/6JT37

6JT39.JPG

http://www.grainger.com/Grainger/items/6JT39
 

joecole23

Well-known member
Joined
Oct 31, 2008
Messages
50
Location
Dallas, TX
Thanks for the verification. For my benefit and also for the benefit of others who plan to duplicate your efforts, would you mind publishing the dimensions of your concrete forms (depth, width, length). From your earlier comments, it sounds like you allowed for a deeper recess than the lift's 270mm collapsed height requires, which was good thinking since it allowed you to top the lift pads off with a 1" rubber pad.

Also, could you let us know how you determined where to place the lift pads in your garage bay? What relative percentage of the total bay length did you decide to put in front of versus behind the center line of the lift pads?

Again, thanks in advance! Hopefully you still have those napkin-pad scribblings around somewhere!
 

hoarder1212

Active member
Joined
Nov 30, 2006
Messages
40
Location
Celina Ohio
Paul Awesome set up! I have a question regarding the tiles, how well do they hold up to metal casters on floor jacks and trans jacks and such? I would think that if the grout is lower than the tile you might risk chipping the edge of the tile when you roll something across it.
 

Tex Arcana

Member
Joined
Mar 23, 2007
Messages
21
I did it myself several years ago in anticipation of a lift. My walls are concrete block with brick and are very sturdy. The roof trusses were simple and made from 100% 2x8s so I simply made a new horizontal 30" above the original cross member and then added some diagonal supports. The garage is 21.5' x 20.5'. The pump and control unit is sitting 6 feet from the lift holes on the side wall of the garage

Good job on the ceiling lift. To clear some more space (for that pesky SUV, of course!), you could use a jackshaft garage door opener. I got a pair from Liftmaster, that are excellent units, and were able to lift 16'x8' doors very easily, and had a number of nice features.
jackshaftgaragew.jpg

This way, you'll clear that space above the lift for good, and get a nice system with battery backup and a solenoid door lock, not to mention a motion-sensored control pad that turns on the overhead light. :cool:

Anyway, great project, you might see me doing that to my pint-sized garage in the near future. :beer:
 

lortech

Active member
Joined
Jun 28, 2009
Messages
36
nice thread. Make me jealous:) I stopped by one of the largest BMW dealerships in Vancouver and therefloods are all tile brick. It was very nice.

My issue is cost of a house here in the lower mainland. Houses now are 300-600K in my area. Much to high to buy and right now, I would not care if I moved anywhere to buy a house and have my own shop.
 
Last edited:

Tex Arcana

Member
Joined
Mar 23, 2007
Messages
21
By the way, Paul: do you have pics or drawings of how you've laid your garage out?? Sicne you've got the same problem I have, I assume you've got to put both cars in as well, and that means any workbench space is nil, not to mention storage, and i'd love to see how you work around it.

Again, thanks.
 

ArthurPE

Banned
Joined
Jun 14, 2009
Messages
423
8 teeth total at 1/2" x 1" ~ 4 in^2 of engagement
steel is good for 30,000 psi minimum, this grade is closer to 60 kpsi
even at 30 kpsi that's 120,000 lb (4 sq in x 30,000 lb/sq in), using a safety factor of 0.5 for shear and another 0.5 for the angle cut, that's 30,000 lb of strength...considering the lift may be used for 6,000 max, I'ld say he's good to go...
 
OP
P

Paul Bird

Active member
Joined
Jun 1, 2006
Messages
40
Also, could you let us know how you determined where to place the lift pads in your garage bay? What relative percentage of the total bay length did you decide to put in front of versus behind the center line of the lift pads?
My lift section forms were 62 x 23.25 x 11.25. The tile and thinset added another 1/2".

The lift is perfectly centered in the the garage side to side. On the front to back I wanted the race car to be pretty close to the garage door leaving me just enough room to walk between the car and the door. Prior to cutting up the floor I marked everything out even pulling in the Expedition (backwards) to see how it would work out. Once I verified that it would work this way, I cut the floor. One thing you need to keep in mind is that this setup allows for a LOT of variance on where the car is both left to right and front to back.

I have a question regarding the tiles, how well do they hold up to metal casters on floor jacks and trans jacks and such? I would think that if the grout is lower than the tile you might risk chipping the edge of the tile when you roll something across it.
So far nothing has scratched or chipped them. Of course any longevity report after a month of use is VERY premature.

Good job on the ceiling lift. To clear some more space (for that pesky SUV, of course!), you could use a jackshaft garage door opener. I got a pair from Liftmaster, that are excellent units, and were able to lift 16'x8' doors very easily, and had a number of nice features.
I am considering the 3800 but I am concerned that it might not work with my door as the door is low lift and gets pushed down by the current opener. More research to take place on this front.
 

Tex Arcana

Member
Joined
Mar 23, 2007
Messages
21
I am considering the 3800 but I am concerned that it might not work with my door as the door is low lift and gets pushed down by the current opener. More research to take place on this front.

It should be fine, the countersprings should be adjusted to balance the doors, not allow them to lift versus hold in place or fall.

I'm givin' a pair of :thumbup: for them, excellent units.
 

joecole23

Well-known member
Joined
Oct 31, 2008
Messages
50
Location
Dallas, TX
Dave928 - here's what Paul said about the dimensions:

My lift section forms were 62 x 23.25 x 11.25. The tile and thinset added another 1/2".

Paul - Ever-Eternal says the lift pads are ~10.6" deep. If I went 11.5" with the forms, can I make them flush by simply not lowering them ALL the way? Or do they bleed down to minimum height over time? I'm just trying to figure out if I can design in some flexibility, or if that's going to bite me in the *** and I'll have lift pads that are always sitting 1/2" below the slab...
 

ilateapex

Active member
Joined
Dec 2, 2006
Messages
31
Location
Eastern, KY
Paul,

Nice install. I wonder if you are the person I talked to some time back asking me about shipping in the unit. Anyway, I ordered two units similar to this one over two years ago and used averit and was very happy with the purchase and shipping experience. I have yet to install my unit as it was to go into remote garage that is temporary. I am now getting ready to build my new garage and will recess in in the floor the same. I purchased the EE-6501 which is made to go ontop of the floor and is not as thick as the unit you have. Mine is only 4.5" thick when down. I still plan to recess it and it works the same. It does have the diamond plate on the surface.

Anyway, just wanted to give everyone another point that EE is a ligitamate company and does what they say.

Michael
 
OP
P

Paul Bird

Active member
Joined
Jun 1, 2006
Messages
40
It should be fine, the countersprings should be adjusted to balance the doors, not allow them to lift versus hold in place or fall.
For the 3800 to work for me I will have to rig up some form of load (via spring likely) that will put just enough weight on the door to allow the wire to support the door. Right now, that is not the case as I can disconnect the counterspring wires and the existing opener and the door will just sit there. It has to be rolled closed a good foot before gravity takes over and allows it to fall on its own.

If I went 11.5" with the forms, can I make them flush by simply not lowering them ALL the way? Or do they bleed down to minimum height over time?
Don't forget about the leveling stops in each corner of the lift. THIS is what the lift sits on when down. You simply raise the stops (bolts) until they contact the underside of the lift at the height you want. While I have noticed no bleed down through the pump, this is not the way to support the lift.

Keep in mind that the deeper your hole, the more maximum height you give up. I would definitely recommend making the hole a little deeper (say 1") than you need to as you can very easily shim up the lift from underneath.

Nice install. I wonder if you are the person I talked to some time back asking me about shipping in the unit.
Michael, I think you are correct in that we did talk back in February about the lift and shippers. I certainly thank you for your sage advice and hope you get yours in and going soon. You will wonder how you existed before you had the lift.
 
To avoid these ads, REGISTER NOW!
Top Bottom