TwoToque
Active member
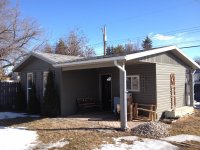
Well I made you look at this thread at least thank you. I am new here and rebuilt my garage a few years ago. It is not complete yet however, I hope to get the inside done this summer so that I can finally start to use it. I thought then that Garage Journal would be the place to share my experience and at the very least convince someone else from ever trying this at home lol! The pics in my album are from then so this thread is not a real time posting.
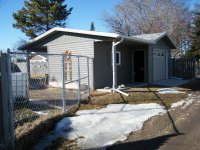
The story starts with the Mr. T shape and a low 7 foot door on one wall. When I was house shopping I thought the whole area was concrete but too many houses later I did not remember the missing piece of concrete on the yard side indent. The shop had a roof of 24x26 but the floor was not . There was one section containing the OHD that was 14 foot wide by 24 foot deep. The door was a standard 7x9. The other half of the shop had a roof of 12 x 24 feet but one wall was indented by 8 feet and the other wall was in 4 feet. This made for a rather usuless 12 x 12 foot area not accessible by an OHD. One day a 9 x 14 OHD was for sale in the local classifieds for $300.00 never saw the light of day. It was used as an access door for a motorcycle dyno bay inside a much larger shop. Well this is where the insanity starts I guess. Lets jack the shop up 2 feet, move the indented walls out to the edge and since the tools are out add 4 feet to the end. Ooops!
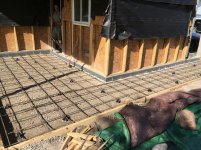
After lots of planning and a washout weather summer I got the new L shaped concrete added in place and conduit buried for electrical and a gas line buried. Next year the real fun began and I ripped apart the walls and roof shingles. This revealed rotton wood on the walls and roof. Had I known this I would have saved the trusses and knocked the whole shop down. Next I framed for jacking the building and bought a lightly used air compressor. I built a killer 4 valve manifold to control the 4 air jacks individually as needed. Due to the complexity of the Mr. T shape 4 jacks were not enough so one more air jack and a floor jack came to the rescue after the first lift attempt failed. My unqualified helpers failed to advise me one jack crapped out and did not lift at all which resulted in major building twist. The next day on round two things went well enough. I also had a much more qualified helper show up to help lead the way. It took 3.5 hours to lift 4 times. The max each lift was limited to 10 inches by the jacks. This requires blocking each lift and takes time. Once up high enough we stood up the pre fabbed full height walls and the 2 foot knee walls and lowered the building down on them. This took 1.5 hours to do. Not too bad at 4.5 hours up and down.
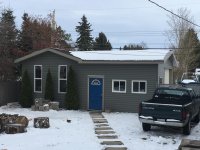
It took a long time to square the building again due to the mishaps of the lift. Once square we were able to sheath the building. First I had to install straps over my knee wall joints on the outside edge and then layed the 4x8 treated plywood over the joint 2 feet on each side overlap. The rest of the rebuild was just normal building techniques. I was convinced to use the double wall technique with offset spacing on the studs such that no piece of wood passes from the outside of the building to the inside wall except for corners, around the windows and doors. The double wall allows for twice as thick insulation R24 total in the walls. I went with a metal roof 24 gauge since a local company precuts the pieces for you and then you can install them yourself. All of this took forever as non of it is my normal skill set. Winter hit and I had to hire a local pro to put new siding on as I ran out of time and work got busy in November. I had to replace the existing lane side 7 x 9 garage door with a new 9 x 9 OHD which was pre planned to be done professionally. He also installed my used door. Having OHD's on adjacent walls causes issues with fitting lights and heaters inside the building and the interior will be this years fight so long as the money flows with this virus shutdown. The whole project is cash out the back pocket, all helpers were paid help (no jealousy of free help allowed). Doing it this way takes longer but is more piece of mind to me. Thanks for reading! Pictures are in my album.
The story starts with the Mr. T shape and a low 7 foot door on one wall. When I was house shopping I thought the whole area was concrete but too many houses later I did not remember the missing piece of concrete on the yard side indent. The shop had a roof of 24x26 but the floor was not
. There was one section containing the OHD that was 14 foot wide by 24 foot deep. The door was a standard 7x9. The other half of the shop had a roof of 12 x 24 feet but one wall was indented by 8 feet and the other wall was in 4 feet. This made for a rather usuless 12 x 12 foot area not accessible by an OHD. One day a 9 x 14 OHD was for sale in the local classifieds for $300.00 never saw the light of day. It was used as an access door for a motorcycle dyno bay inside a much larger shop. Well this is where the insanity starts I guess. Lets jack the shop up 2 feet, move the indented walls out to the edge and since the tools are out add 4 feet to the end. Ooops!After lots of planning and a washout weather summer I got the new L shaped concrete added in place and conduit buried for electrical and a gas line buried. Next year the real fun began and I ripped apart the walls and roof shingles. This revealed rotton wood on the walls and roof. Had I known this I would have saved the trusses and knocked the whole shop down. Next I framed for jacking the building and bought a lightly used air compressor. I built a killer 4 valve manifold to control the 4 air jacks individually as needed. Due to the complexity of the Mr. T shape 4 jacks were not enough so one more air jack and a floor jack came to the rescue after the first lift attempt failed. My unqualified helpers failed to advise me one jack crapped out and did not lift at all which resulted in major building twist. The next day on round two things went well enough. I also had a much more qualified helper show up to help lead the way. It took 3.5 hours to lift 4 times. The max each lift was limited to 10 inches by the jacks. This requires blocking each lift and takes time. Once up high enough we stood up the pre fabbed full height walls and the 2 foot knee walls and lowered the building down on them. This took 1.5 hours to do. Not too bad at 4.5 hours up and down.
It took a long time to square the building again due to the mishaps of the lift. Once square we were able to sheath the building. First I had to install straps over my knee wall joints on the outside edge and then layed the 4x8 treated plywood over the joint 2 feet on each side overlap. The rest of the rebuild was just normal building techniques. I was convinced to use the double wall technique with offset spacing on the studs such that no piece of wood passes from the outside of the building to the inside wall except for corners, around the windows and doors. The double wall allows for twice as thick insulation R24 total in the walls. I went with a metal roof 24 gauge since a local company precuts the pieces for you and then you can install them yourself. All of this took forever as non of it is my normal skill set. Winter hit and I had to hire a local pro to put new siding on as I ran out of time and work got busy in November. I had to replace the existing lane side 7 x 9 garage door with a new 9 x 9 OHD which was pre planned to be done professionally. He also installed my used door. Having OHD's on adjacent walls causes issues with fitting lights and heaters inside the building and the interior will be this years fight so long as the money flows with this virus shutdown. The whole project is cash out the back pocket, all helpers were paid help (no jealousy of free help allowed). Doing it this way takes longer but is more piece of mind to me. Thanks for reading! Pictures are in my album.
Last edited: