To avoid these ads, REGISTER NOW!

Installation of mini splits, tools techniques

mbunimog

Well-known member
Joined
Feb 27, 2013
Messages
124
Location
Frederick, Maryland
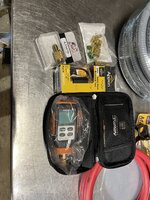
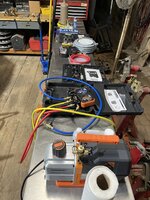
I am in the process of collecting tools to install a 12000 btu Pioner minisplit. Plan to install 3 more in various locations so would want to get the right tools and not make shortcuts. First up is to go out the double brick wall with a 2 1/2 inch hole and there is a choice of penetrating left or right side. If I penetrate on the right side like most people do then I will rotate the tubing 90 degree to go through the wall from the evaporator unit. However with 8 to 9 inch thickness of the wall it will put the flare fittings very close to the outside wall and not allow a smooth 90 degree bend to go down the wall to the condenser unit. So may make more sense to use a left wall penetration and bend the tubing from the outside 90 degrees just inside the wall to connect with the tubing on the evaporator unit. That way it leaves tubing outside the wall clean for bending without the flare fittings in the way. Making a bend close to the wall apparently requires a reverse bender. The lever action bender that I have will not make 90 degree bends close enough to the wall to allow the use of covers. Comments appreciated as I go along. Next I will cover tubing flares, Vacuum pump, valve core removal tool, micron gauge, nitrogen leak testing and more. Is the Hilmor reverse bending tool the best or are there other better ones?
 
To avoid these ads, REGISTER NOW!

jjrbus

Well-known member
Joined
Dec 8, 2018
Messages
619
Location
Florida
Wish I would have thought to run the line across, instead of making the joints at the hole! What a pain that was. I bought the Daikin mini split install kit off Ebay for reasonable price. Now 3 years later and I am low on refrigerant on 1 of 3 units.

Flair gauge, go/no go, no guesswork, it is either right or it isn't. 1658010305234.png1658010305234.png
 
OP
M

mbunimog

Well-known member
Joined
Feb 27, 2013
Messages
124
Location
Frederick, Maryland
Starting to collect tools to install, so far:
Vacuum pump NAVAC NP7DP2 Dual Stage 7CFM Vacuum Pump - A2L Compatible
NAVAV NMV1 micron vacuum gauge
Appion 5/16 inch valve core removal tool
Appion 1/4 inch valve core removal tool
NAVAV gauge set with hoses with ball valves
5/16 inch vacuum hose
Nitrogen cylinder and regulator
Hilmor tubing tri bender
Hilmor tubing flare kit
Torque wrench with crow feet
 
OP
M

mbunimog

Well-known member
Joined
Feb 27, 2013
Messages
124
Location
Frederick, Maryland
The vacuum hose is actually 3/8 inch hose with 5/16 and 1/4 inch ends to connect to the end of the valve core removal tool and the 5/16 inch connection on the vacuum pump
 
OP
M

mbunimog

Well-known member
Joined
Feb 27, 2013
Messages
124
Location
Frederick, Maryland
Collected the tools for the install and getting ready to get it installed.
The critical items that I focussed on were:
1) Being able to do the correct tubing flares
2) Pressure testing for leaks using nitrogen
3) Using micron gauge to get as low as possible below 500 microns
4) Using a vacuum pump able to pull down to 20 microns
5) Using valve core removal tool to hook up to test port on the condenser unit (5/16 inch)
6) using another valve core removal tool to hook up the micron gauge to the side port on the first one (1/4 inch)
 

Raisedonadeere

Well-known member
Joined
Jul 31, 2017
Messages
436
Location
Central KY
Wish I would have thought to run the line across, instead of making the joints at the hole! What a pain that was. I bought the Daikin mini split install kit off Ebay for reasonable price. Now 3 years later and I am low on refrigerant on 1 of 3 units.

Flair gauge, go/no go, no guesswork, it is either right or it isn't. 1658010305234.png1658010305234.png
Did a quick search on Amazon, Ebay, even Googled and can't come up with a hit on a gage like that. I don't do enough flares to have a "flair" for it so it would be very stress relieving as I go through installs to know it passed the gage. Hate having to work out the dimensions and then finding the calipers, always fear I may have made a math mistake, as I tighten down with the torque wrench and it feels like it is going to strip or whatever. Guys that flare regularly just laugh at me but thats OK. Got any search terms or sources to share?

I would be just as happy to have a way to have a gauge on my flare tool that controls how far up to extent the tube into the tool.
 

428PI

Well-known member
Joined
Jul 14, 2018
Messages
1,976
Location
Peabody, KS
Only tool I bought was a 1/2 tubing bender for an in wall line install on my 18k unit and the 5/16 to 1/4 adapter. My brother had the nitrogen and vacuum pump (I just had a vacuum pump you plug into an air line). I used my Harbor Freight 134a gauges (which threw me off because one gauge wasn't zeroed out when I used it). No need to remove core valves and didn't have to shorten up lines.
 
OP
M

mbunimog

Well-known member
Joined
Feb 27, 2013
Messages
124
Location
Frederick, Maryland
My aim is to install the mini split using accepted procedures by the AC professionals and not making shortcuts to save money. Will be installing 3 or 4 systems so the cost per systems will be not be that much.
 

jjrbus

Well-known member
Joined
Dec 8, 2018
Messages
619
Location
Florida
My aim is to install the mini split using accepted procedures by the AC professionals and not making shortcuts to save money. Will be installing 3 or 4 systems so the cost per systems will be not be that much.
Good attitude, AC company quoted me ball park figure of $10-$12,000. Material cost me maybe $3600 and another $600 for needed tools. I can still spend a few more thousand and be money way ahead. Plus more than likely you will do a better job than the average smash and grab artists that show up.
 
To avoid these ads, REGISTER NOW!

russ.stevenson

New member
Joined
Mar 7, 2014
Messages
1
Hello mbunimog and also hello to all others.

I haven't done much posting on this site, but I do a lot of looking.

I just installed a 3 zone Fujitsu 24k mini split. Mine has a 3/8" suction lines and a 1/4" liquid lines. I bought the same tools but different brands and I rented the nitrogen tank. The tube bender, in my case, was unnecessary as I was able to do all of the bending by hand. I filled my lines with nitrogen up to 460 psi and found no leaks. Now I am attempting to pull the vacuum and that is where I am stuck.

I get the vacuum down below 300 microns , but as soon as I close the 1/4 turn blank-off valve, the microns leap. Even when I install the valve core removal tool directly to the pump and hook the micron gauge directly to the VCRT the micron surge. Not sure what I'm doing wrong.

I don't want to hijack your thread, so I think I will start a new thread on here and hopefully someone will be able to help me figure it out.

Good luck with your install(s).
 

Wiz02

Well-known member
Joined
Jul 13, 2007
Messages
2,399
Location
Southeastern PA
@mbunimog, thanks so much for this thread. I am going to assemble the same set of tools when I get my mini split at some time in the future. (at least that's the plan) Installation costs more than justify the tools even if I don't use them again. But once you have them, I find that you use them.
 
OP
M

mbunimog

Well-known member
Joined
Feb 27, 2013
Messages
124
Location
Frederick, Maryland
Hello mbunimog and also hello to all others.

I haven't done much posting on this site, but I do a lot of looking.

I just installed a 3 zone Fujitsu 24k mini split. Mine has a 3/8" suction lines and a 1/4" liquid lines. I bought the same tools but different brands and I rented the nitrogen tank. The tube bender, in my case, was unnecessary as I was able to do all of the bending by hand. I filled my lines with nitrogen up to 460 psi and found no leaks. Now I am attempting to pull the vacuum and that is where I am stuck.

I get the vacuum down below 300 microns , but as soon as I close the 1/4 turn blank-off valve, the microns leap. Even when I install the valve core removal tool directly to the pump and hook the micron gauge directly to the VCRT the micron surge. Not sure what I'm doing wrong.

I don't want to hijack your thread, so I think I will start a new thread on here and hopefully someone will be able to help me figure it out.

Good luck with your install(s).
It could be that the valve core tool has a leaking ball valve. Do you have a second VCRT to try it out?
 

fitter30

Well-known member
Joined
Jun 23, 2019
Messages
2,987
Location
Peace Valley,mo
I wouldn't pull the cores there is so little volume in a mini system it really won't make a difference in time. All minis use 5/16" schrader they make a adaptor to 1/4" flare. Scale is needed to weigh refrigerant in if line lenght is longer than the factory charge is needed.
 

motterpaul

Well-known member
Joined
Aug 25, 2020
Messages
99
Location
CA
I would be just as happy to have a way to have a gauge on my flare tool that controls how far up to extent the tube into the tool.

I am also a DIY, but I have also been thinking about making flares. Watched tons of YouTubes and read the comments. Here is what I am thinking.

In general, you want to make a flare that fills the nut that holds it in place. Of course, it is clean, round, and has been deburred.

A flare that is too small is a real problem - so you want to figure out the amount to go beyond the flare block to make the right size (big as possible to use) flare. For me, for a 1/2" nut it is about 3/32 (less than 1/8" but more than 1/16") past the flare block. I go a little less on the smaller pipe.

Make the flare and pull the nut down on it. It should go through but not have much wiggle room. You should not have to wind the nut on but it should be close. (if you have to wind it down try it a couple of times to make sure you are not just off the track, it might get looser the next time you try it). The real test is when you put the flare onto the other pipe and tighten the nut. If you can hand tighten it all the way, it is not too big. Only use the Nylog on the flare head & face - not on the threads - using it on the threads will make it torque down deeper. Also, if you are thinking Nylog on the threads helps to hold in the R410a then your flare is too small.

I know you have a good torque wrench so obviously that is crucial.

Those are my acquired thoughts, If the pros want to comment on anything I just said I am open to learning all I can.
 
OP
M

mbunimog

Well-known member
Joined
Feb 27, 2013
Messages
124
Location
Frederick, Maryland
Using the flare tool that has a built in stop for the copper tube resulted in nice flare that was bigger than the test hole in the flare gauge but it fits well inside the flare fitting. As long as it fits should be fine. I think the gauge is more of a minimum diameter for the flare.
 

motterpaul

Well-known member
Joined
Aug 25, 2020
Messages
99
Location
CA
Yeah, even the cheapest flare block I could find on Amazon came with a clutch & eccentric flarer. I think they are all made by the same company because they all look the same. They cost anywhere from $25 to $50.
 

jjrbus

Well-known member
Joined
Dec 8, 2018
Messages
619
Location
Florida
I made about 50 flairs in the garage and gauged them before I attempted to do the real ones. Think of it as making a washer. None of my flairs leak, but the evaporator coil on one Daikin has one and possibly 2 leaks after only 3 years!
 
To avoid these ads, REGISTER NOW!
Top Bottom