To avoid these ads, REGISTER NOW!

Installing 4' light fixtures?

bullnerd

Well-known member
Joined
Sep 17, 2012
Messages
5,690
Location
Jersey
I finally purchased some lights for my shop.(Thank PS!)

I received the housings and then it hit me, I never installed 24 light fixtures before! :dunno:

Anyone have a thread that shows how to mount and wire them? Tips, tricks?

10' metal ceiling, exposed conduit for wiring.

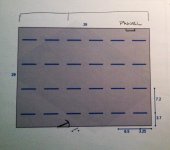
I did the layout using the software PS posted.

Can conduit be added after the lights are screwed up?

lightstoo.jpg

lights.jpg
 
To avoid these ads, REGISTER NOW!

moserjj

Well-known member
Joined
Oct 17, 2010
Messages
155
Location
WI, USA
I'd mount the first fixture, then connect pipe, then next fixture, etc and build as you go. You could use compression fittings and add pipe later but that would be more work then just doing it as you go along. I used conduit standoff straps to hold the pipe between fixtures, helps during the install to hold the pipe where you need it

Sent from my ONEPLUS A3000 using Tapatalk
 

AP514

Well-known member
Joined
Jan 23, 2014
Messages
768
Location
Pearland, Tx
MC cable 12-2 100Ft all the way...for the win.(100Ft should be long enough ?)
Example: https://www.homedepot.com/p/AFC-Cab...-ft-Solid-MC-Lite-Cable-2104S30-AFC/205015269

and a few connectors...
I am also getting ready to Wire my Lites on 2, 3-way switches.
I figure the 1st switch will only have a small amount of lites spread out thru garage for the fast in and out stuff then the other will have the bulk of the lites on it for the real work. :)
 
Last edited:
OP
B

bullnerd

Well-known member
Joined
Sep 17, 2012
Messages
5,690
Location
Jersey
Ok, thanks guys, sounds good so far.

I like the MC for flexibility , but I'm a machinist and have some OCD issues sometimes. If the MC doesn't look straight, it will bug me. (even though I will probably never look at the ceiling again once the lights are up)

BTW, can that MC be surface mounted? Or is that what you meant by "all the way"? (AP514)
 
Last edited:

Bert_

Well-known member
Joined
Dec 24, 2016
Messages
9,699
Location
NW Iowa
Figure out the distance between lights then precut all your pipe, at least the straight pieces.

Sometimes it helps to cut the pipes an 1/8 to a 1/4" short so that you have some wiggle room.

MC on a finished surface, while totaly legal, looks like ****. If you did take the time to make the MC look straight, it would probably take longer than pipe.
 
Last edited:

ben5243

Active member
Joined
Jul 7, 2017
Messages
36
Location
Everett, WA
Do you have a plan for the wiring? Like all on one switch or split between switches? Three-way switches?
What is the approximate distance between each fixture?
 
OP
B

bullnerd

Well-known member
Joined
Sep 17, 2012
Messages
5,690
Location
Jersey
I hear ya Bert, that sounds good.

No drawn plan yet.

2 switches in one box, nothing fancy. Two left end rows (in pic above) on one switch, rest on the other. Both next to man door.

Aprox. between fixtures , 2-1/2 feet.
 

cybrdyke

Well-known member
Joined
Sep 9, 2014
Messages
3,442
Location
USA
Are your fixtures dimmable? Will you be running dimming control wires?
CD
 

ben5243

Active member
Joined
Jul 7, 2017
Messages
36
Location
Everett, WA
The more information you share about your setup, the better. There are a LOT of rules for sizing and determining conduit and conductors. As long as you follow them all, it gets pretty easy from there.

My (unlicensed) suggestion would be to learn the types of conduit available.
https://en.wikipedia.org/wiki/Electrical_conduit#Types

EMT is probably the most available and easiest to work with and make look good.

If I understand your layout correctly you want half the shop on one switch and the other half on another so that's pretty easy. Are both switches fed from the same circuit? What is the circuit breaker size and is there anything else on the circuit? You'll want to make sure you're not overloading your circuit.

Do you have link to the lights you ordered?
 
OP
B

bullnerd

Well-known member
Joined
Sep 17, 2012
Messages
5,690
Location
Jersey
Not dimmable.

About 1/3 on one switch, the rest on the other.

I'm not too worried about the actual wiring.

I'm mostly looking for advice on laying out the lights on the ceiling following the plan above.

Just snap a line and screw them down? Add conduit between as I go? Start in the middle and work out, so they are centered?

200 amp panel, I can make them separate and dedicated if I have too.

Oh, fixture is the BEES one that PS posted.
 

ben5243

Active member
Joined
Jul 7, 2017
Messages
36
Location
Everett, WA
You could use a laser level with a vertical beam. Worked for me but I only had 2 to get straight
24532723418_b370d4c6cb_c.jpg
 
Last edited:
OP
B

bullnerd

Well-known member
Joined
Sep 17, 2012
Messages
5,690
Location
Jersey
ASP, I'm not familiar with that , and don't know if it would work.

I saw the laser post, that looks cool.
 

asp125

Member
Joined
Oct 29, 2017
Messages
7
ASP, I'm not familiar with that , and don't know if it would work.

Wiremold is a flat surface conduit used to run wires on top of drywall. You can find it at most any home improvement store.
raceways-layout.jpg


Pros: OCD types will appreciate their straights, elbows, tees and wide assortment of boxes.
Cons: not ideal for large cable runs of heavy guage wire; you only get them in 1" widths at most, IIRC.
 

AP514

Well-known member
Joined
Jan 23, 2014
Messages
768
Location
Pearland, Tx
Figure out the distance between lights then precut all your pipe, at least the straight pieces.

Sometimes it helps to cut the pipes an 1/8 to a 1/4" short so that you have some wiggle room.

MC on a finished surface, while totaly legal, looks like ****. If you did take the time to make the MC look straight, it would probably take longer than pipe.

OH yup my bad I was thinking his ceiling was not finished when I suggested the MC cable...
 

smalltown

Well-known member
Joined
Jul 9, 2015
Messages
985
Location
Western Maine
bulnerd I agree with others I would not use MC to wire these up.

I am going to do a similar install. I intend on cutting 6" pieces of EMT, and installing them as I go between the fixtures. My fixtures will be flush with the ceiling. I'm using THHN wire in rolls that I bought at home depot. I have already installed my light switches. They are in a row of four rockers with 3 switches in the first 3 gangs (9 total switches), and a three way switch in the last gang.

I will be able to turn on/off sections of my garage as needed. The light over my work bench will be controlled by the 3 way switch. One switch at the door, and the second at the workbench. That way if I forget the workbench light as I leave I can turn it off at the door.

Overkill maybe, but it's what I want.
 

Attachments

  • DSCF1850a.jpg
    DSCF1850a.jpg
    33.9 KB · Views: 65
Last edited:

Falcon67

Well-known member
Joined
Jun 11, 2009
Messages
18,371
Location
Merkel, TX
That was my plan - 4'ers. Then I thought about having to wire all those bastages and went with 8'. 50x easier install.

As above, the best way if you insist on the 4' would be to build banks of fixtures 3 or 4 long, connected with solid conduit into a unit, then installed as a unit.

I can tell you from the old shop having 14 4' units that it's still a total PITA and when I changed from T12 to T8 I bought fixtures with pull switches which made it a lot easier and less pain to control light use.
 
Last edited:

Radix2

Well-known member
Joined
May 28, 2014
Messages
1,853
Location
the thumb!, MI
Do you still have access to the attic? Why take on all the work for emt when you could make it clean and just drop down from above....?
 

Falcon67

Well-known member
Joined
Jun 11, 2009
Messages
18,371
Location
Merkel, TX
That's a lot of holes and wires. What I did was run to the first fixture, then daisy chain from that to the other fixtures on the circuit using MC cable. That offered me the flexibility to move fixtures around and not have the ceiling look like Woody Woodpecker got trapped in the shop.
 
OP
B

bullnerd

Well-known member
Joined
Sep 17, 2012
Messages
5,690
Location
Jersey
Yeah, MC is out, the rest of the shop will be conduit so might as well make it match.

I do have access to the attic now, until the blown in is installed. But like mentioned, I don't know if I want 24 holes in the metal ceiling.
 
To avoid these ads, REGISTER NOW!

moserjj

Well-known member
Joined
Oct 17, 2010
Messages
155
Location
WI, USA
Emt is easy. Precut them and go to town. Mine are 4' apart so required the hanger1790c537e27c9c7a0874e7769fa49c12.jpg

Sent from my ONEPLUS A3000 using Tapatalk
 

Attachments

  • 1790c537e27c9c7a0874e7769fa49c12.jpg
    1790c537e27c9c7a0874e7769fa49c12.jpg
    33.2 KB · Views: 0

Platonic Solid

Well-known member
Joined
Nov 29, 2014
Messages
3,587
Location
CT-USA
If you really want to make this interesting, you could wire the 2 lamps in each fixture on a separate circuit = White/Black to one lamp, White/Red to the other lamp in each fixture. This gives you even distribution throughout the space and acts as a simple method of 50% dimming.

To further complicate the wiring, if you wire 16 bulbs to one circuit (in some logical evenly spaced pattern) and the remaining 32 bulbs to to the second circuit, you could achieve 3-step dimming = 33% (circuit 1), 66% (circuit 2), 100% (circuit 1+2)
 
OP
B

bullnerd

Well-known member
Joined
Sep 17, 2012
Messages
5,690
Location
Jersey
Doh!

Easy...my head already hurts!

That looks good Moser, probably what I will do.

How did you line them up on the ceiling? Laser? Chalk? Eye of ball?
 

Falcon67

Well-known member
Joined
Jun 11, 2009
Messages
18,371
Location
Merkel, TX
I used my Craftsman laser level. It throws either a horizontal or vertical line. I used some tape on each end of the space to line up the laser line, then went from there.
 

colomboj

Active member
Joined
Sep 11, 2017
Messages
25
Location
Cornpatch USA
I've done numerous installations of lights in the exact style you are looking at doing. Personally I would do a full layout using a lazorbeam from the floor up to the ceiling. Precut all my conduits and then hang each light fixture one at a time, installing the conduit and hangers as I went across. The ends where you will need to jump from row to row I would do after it was all up so you can get a good accurate measurement for the back to back 90's. Or better yet use MC to jump rows up above the ceiling and keep the look just a little cleaner.

A few things in addition. I wouldn't run anything larger than 1/2 emt because lets be honest at most your going to have 5 wires in there from what your currently talking.

Also between each light you have to install a hanger. I would probably bend my conduits because I have little kickers and the like then use a 2 hole, but a mini would be more than enough. The hanger needs to be within 3ft of the fixture, so if your lights are spaced 6ft apart you can put one in the middle and it covers that requirment, if they are more than 6ft you have to install two, and can go no further than 10 ft between hangers.
 
OP
B

bullnerd

Well-known member
Joined
Sep 17, 2012
Messages
5,690
Location
Jersey
Thanks guys, great tips.

I was going to ask about conduit size next.

My lights will be about 2-1/2 feet apart.

Ive never messed with a laser, time to buy one I guess.

I like the idea of jumping rows through the ceiling too.
 
OP
B

bullnerd

Well-known member
Joined
Sep 17, 2012
Messages
5,690
Location
Jersey
Panel will be on opposite side of building, switch will be next to man door.

How would you guys recommend wiring this?

Lights grouped into two sections, outlined at top of pic.
 

Attachments

  • IMG_5771.jpg
    IMG_5771.jpg
    141.9 KB · Views: 58
Last edited:
OP
B

bullnerd

Well-known member
Joined
Sep 17, 2012
Messages
5,690
Location
Jersey
Do I have to run the feed all the way to the switch, then up to the lights? Or is there a fancier way where I can run from the panel into the closest light? Out of the closest light to the switch? Or is it not worth keeping all the wires straight?

I think I'll use the attic to get to the switch, and between rows.
 

ben5243

Active member
Joined
Jul 7, 2017
Messages
36
Location
Everett, WA
You can run power to the string of lights first and then a 2 conductor to a single switch. Just like this then splice into the wires attached to the light and run it to the next light.
power-into-light-wiring.gif


You'll have 6 current carrying conductors going into that box though so make sure you do box size calcs to make sure it's not overfilled. If you run power from that box to other boxes it will be even more conductors.

69155d1365984065-multiple-lights-wiring-control-multiple-lites.jpg
 

pointer80

Well-known member
Joined
Jul 8, 2015
Messages
112
Location
North Central Michigan
bullnerd, Sounds like we have a couple things in common, It took me a little to get going on my install because it looked like a big job but easier than it looked. I started by snapping chalk lines but you want to use blue because it is non staining and wipes off easier. like I mentioned in another post I used my drywall lift to lift the fixtures and snug them up in place right where I wanted them then screwed them up. I ran my wires through my attic and brought them in from the back side of the fixture so the ceiling is nice and clean. I have osb on my ceiling but should be the same. I drilled my holes after fixtures were installed so no unnecessary holes or mistakes. I will try to take more detailed pictures today with my digital camera so they will post correctly and not sideways. One things for sure, YOU WILL LOVE THEM!! once they are installed. It has been hovering close to zero here in northern Michigan and they are instant on and bright when I flip the switch. Still have eight to go hopefully tomorrow I will get them installed.
 
OP
B

bullnerd

Well-known member
Joined
Sep 17, 2012
Messages
5,690
Location
Jersey
Thanks Ben, I'll have to think about that one.

Pointer, I will probably try the lift too. Its a little sketchy holding the light up against the slippery metal ceiling with one hand and I done want to scratch it any more than I have to. Really looking forward to having lights! But I never wired this many together before.

Thanks, guys.
 
OP
B

bullnerd

Well-known member
Joined
Sep 17, 2012
Messages
5,690
Location
Jersey
So, I still haven't gotten this done, but getting close!

Does anyone have any objections to this comment that was made earlier? About to buy EMT and don't want to under size.

"I wouldn't run anything larger than 1/2 emt because lets be honest at most your going to have 5 wires in there from what your currently talking."

Thanks for all the suggestions guys.
 

Sevenhills1952

Well-known member
Joined
Aug 30, 2018
Messages
1,750
Location
Virginia
When I wired my garage in the ceilings I wired in outlets that go to switches. Then used 4ft. fluorescents that hang by chains and plug in. Not the prettiest but $9 each, lamps are $25-30 a case. I have to replace a lamp or two maybe once a year.
Upstairs I used 8ft. fluorescents. I haven't had to replace one in 30 years. Those are on maybe 3 hours/week.
 

Stuart in MN

Well-known member
Joined
Sep 8, 2005
Messages
23,011
Location
Minneapolis
Does anyone have any objections to this comment that was made earlier? About to buy EMT and don't want to under size.

"I wouldn't run anything larger than 1/2 emt because lets be honest at most your going to have 5 wires in there from what your currently talking."


I haven't gone back to review exactly how many wires you will need, but if as suggested the maximum is five, 1/2" conduit will be okay even for 12 gauge wire. There are a number of conduit fill calculators online you can use to play around with conduit size requirements, I usually use this one: http://www.electrician2.com/rveltrain05/rf_calculator.html
 

Bert_

Well-known member
Joined
Dec 24, 2016
Messages
9,699
Location
NW Iowa
Not sure where the number 5 is coming from, you are allowed up to (9) #12 THHN or (12) #14 THHN wires in a 1/2" conduit.

I run quite a few lighting circuits in #14. Sometimes it means an extra circuit but it makes wiring fixtures faster and easier. There is no worry of overloading like with receptacles. Not always the way to go but it's just something to think about.

That's no longer acceptable.
Neutral wires are required to run to switch boxes.
(You'd need to run 3 wires)

Not in conduit as long as there is the possibility to add the neutral later.
 
Last edited:

nsula_country

Well-known member
Joined
May 23, 2013
Messages
1,534
Location
Northwestern Louisiana
Not sure where the number 5 is coming from, you are allowed up to (9) #12 THHN or (12) #14 THHN wires in a 1/2" conduit.

:thumbup: Thats the number I use also... And will admit that I have stuffed more than that before!

I run quite a few lighting circuits in #14. Sometimes it means an extra circuit but it makes wiring fixtures faster and easier. There is no worry of overloading like with receptacles. Not always the way to go but it's just something to think about.

:thumbup: I personally ran 4, 15A circuits in our shop. 3 zones of lighting (8, 4 lamp T8 1.18 fixtures) and the other for 4 commercial ceiling fans, 2 motion lights and 2 exit signs with backup lights.

Not in conduit as long as there is the possibility to add the neutral later.

:thumbup: Thats what the book say!

CT
 
OP
B

bullnerd

Well-known member
Joined
Sep 17, 2012
Messages
5,690
Location
Jersey
Thanks Bert.

Years ago I worked with a guy from Paraguay, looked just like your avatar.

Guess what his nickname was...Bert.
 

Bert_

Well-known member
Joined
Dec 24, 2016
Messages
9,699
Location
NW Iowa
Something else to keep in mind is if you have too many current carrying wires you start running into problems with derating. 9 is the magic number for THHN of this size and if you go over that then you can no longer put a #12 on a 20A breaker due to excessive heat in the conduit.

For this part you only count current carrying wires and not grounds, neutrals that are part of a multiwire circuit or more than one traveler in a 3 way.
 
To avoid these ads, REGISTER NOW!
Top Bottom