To avoid these ads, REGISTER NOW!

Installing a compressor pump oil seal

b-body-bob

Well-known member
Joined
Oct 10, 2011
Messages
1,621
Location
Almost Heaven
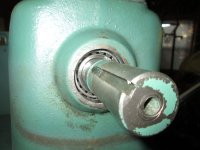
I wondered if anyone could give me a tip on what I'm doing wrong while trying to install a new oil seal in a Champion compressor pump. I've gone through four seals now and every time there's one edge that will not go in. I've tried driving it fast, and I've tried tapping it around and around and around the edge. I've tried tipping the tool so the force concentrates on the edge that sticks out. No matter what I do the thing ***** in the bore and gets bent.

The seal is going in over the shaft. It's accessible from the flywheel side of the motor. The flywheel is off of course. I've oiled the shaft and the seal before starting. I'm using a piece of black iron pipe smaller than the seal and longer than the shaft to drive it. There is no "back side lip" to stop the seal, so if it goes in too far it'll go all the way back to the bearing behind it, which is too deep.

I've been using automotive seals, based on an interchange number I found for the manufacturer's part number. I've cross-checked the seal sizes back to the manufacturer's description and the dimensions are the same. There's no obvious reason the thing won't go in. I managed to get one fully in, but by the time I got the reluctant side in, the other side was far too deep. I was just glad to get that one back out, honestly.

I sure hope I don't have to take the pump apart and rig up a bolt and spacers to press it in. Any installation tips to avoid that are appreciated. :thumbup:
 
To avoid these ads, REGISTER NOW!

zkling

Well-known member
Joined
Jan 23, 2007
Messages
16,939
Can you post a picture by chance? How about using a socket to drive the new seal in? Any burrs or other issues on the bore edges? I'm having a hard time picturing what you are experiencing. Can you at least show a parts diagram for your pump?
 
OP
B

b-body-bob

Well-known member
Joined
Oct 10, 2011
Messages
1,621
Location
Almost Heaven
The shaft extends 3-1/2" past the end of the motor block, so it's too long to use a socket. No burrs that I can find. It needs to go here:
 

Attachments

  • IMG_0582.jpg
    IMG_0582.jpg
    74.1 KB · Views: 51

mmouse

Well-known member
Joined
Sep 4, 2010
Messages
92
I'll be doing one some time this week. Please post your results if you get it to work.
 
OP
B

b-body-bob

Well-known member
Joined
Oct 10, 2011
Messages
1,621
Location
Almost Heaven
This morning I'm thinking about rigging up a press to install it with the crank in, using some square tube and all-thread. Set it up so the square tube cross the front of the crankcase and makes contact all sides of the seal, and run all thread back to more square tube on the other end of the crank case. Then I could tighten the bolts on the allthread to squeeze the thing in.

I have to wait on more parts though ... this town's supply has dried up.
 
OP
B

b-body-bob

Well-known member
Joined
Oct 10, 2011
Messages
1,621
Location
Almost Heaven
I'm always ashamed to post photos of my welding, but here's what I just made

All thread to the other end of the crankcase with more square tubing across the back will let me squeeze the seal in. I'm out of raw materials for now though.

About the time I was finished I realized I could've made the same thing with less material using 2x4s and a hole saw. Oh well, you give a man a welder and the first idea is always to make some sparks.
 

Attachments

  • IMG_0586.jpg
    IMG_0586.jpg
    82.1 KB · Views: 65

zkling

Well-known member
Joined
Jan 23, 2007
Messages
16,939
So I take it you got it finished and non leaking? Good job, and good idea on the press. I'd save that jig you built, never know what it may come in handy down the road. :thumbup:
 
OP
B

b-body-bob

Well-known member
Joined
Oct 10, 2011
Messages
1,621
Location
Almost Heaven
No not fixed yet, I'm still waiting on parts and hoping they get here before the long holiday weekend.

I've got a milk crate with other odds and ends in it like that jig. I never throw anything away (or recycle it in this case)
 
To avoid these ads, REGISTER NOW!

EDGAR

Well-known member
Joined
Aug 21, 2010
Messages
437
If you got a big washer with an inside diameter slightly bigger that the shaft diameter, put it between the seal and the jig so you have more surface area pushing in the seal instead of having just four contact points.
 

mmouse

Well-known member
Joined
Sep 4, 2010
Messages
92
Bob, I'm assuming its an r15. Would you post the replacement auto part source number? In case i screw up the new one, maybe I can find one local.
 

rlitman

Well-known member
Joined
Oct 18, 2010
Messages
24,591
Location
Long Island
If it is catching on the OD, you could put the seal in the freezer to shrink it some. That has helped me quite a bit in the past.

Also, not all seal manufacturers make seals to the exact same dimensions. I screwed up two Timken seals in my Subaru before I tried a National seal that fit perfectly.
 
OP
B

b-body-bob

Well-known member
Joined
Oct 10, 2011
Messages
1,621
Location
Almost Heaven
The pump is an R15b. The auto part cross over numbers are 13649 (Chicago Rawhide) and 471192 (National).

^ good idea on freezing the seal, I'll do that too before I try the next one.
 
OP
B

b-body-bob

Well-known member
Joined
Oct 10, 2011
Messages
1,621
Location
Almost Heaven
Success at last.

No need to freeze the seal out there today.

I used the jig with an old pinion bearing race (found in the crate I mentioned earlier) between it and the seal so it pressed all the way around it.
 

mmouse

Well-known member
Joined
Sep 4, 2010
Messages
92
Good to hear! I got mine back together today. Ran a few cycles and no leaks yet from the 40 year old crank seal.
 
OP
B

b-body-bob

Well-known member
Joined
Oct 10, 2011
Messages
1,621
Location
Almost Heaven
Mine's still a couple days from startup. I checked the motor with new caps and it doesn't pop the breaker (that's why I got it - free).
 
To avoid these ads, REGISTER NOW!
Top Bottom