To avoid these ads, REGISTER NOW!

Installing pex tubing this weekend. Newbie

svtrichie

Well-known member
Joined
Apr 1, 2008
Messages
108
Location
Troutman NC
So I am planning on installing some pex tubing this weekend. Goi g from a copper stub on the wall in my garage to a sprinkler valve outside. Probably 75 ft of tubing. Any advice on installing. Basically going up a 12 ft block wall over 30-40 ft then down a block wall on the outside. Seams pretty basic but I am sure I can mess things up
 
To avoid these ads, REGISTER NOW!
OP
S

svtrichie

Well-known member
Joined
Apr 1, 2008
Messages
108
Location
Troutman NC
No in separate garage with open trusses. All of the line will be exposed mostly inside the garage except for maybe 12 ft
 

moparfreak

Well-known member
Joined
Jan 24, 2005
Messages
853
Location
Milwaukee, WI
Having just plumbed about half my house with the kitchen / garage remodel, a couple thoughts:

1) Buy the PEX crimper, not the sharkbite fittings. Best one I found was at Lowe's, Apollo brand, about $45 and worth it. The sharkbites are easy to install but prone to leaking when side loaded. The PEX is "flexible" but really very stiff and tends to want to go its own way. I went for the SS "cinch" type clamps over the copper ring "crimp" type camps. Found it was easier and cheaper and just as good. The crimp type pliers are super big to get enough leverage so harder to handle in tight spaces.

2) Also buy a good hose cutter. Those go for $10 or so.

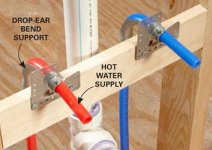
3) You'll need hold downs to fix it in place every 48" (code around here in WI). I suggest screw in type, not nail or snap. I bought nail in type but replaced the nails w/ polebarn screws and made life a lot easier installing and also making adjustments.

4) Install yourself an extra shutoff valve right where you Tee, just so in case you have issues downstream later on you can easily shut it off.

5) If you have a hard time finding a fitting you need, I did get a lot of my stuff at Pexsupply.com

6) Running 75 ft of PEX w/o any joints will be a bear to manage, especially if it's just yourself. Feel free to make life a little bit easier by breaking it up into sections and adding a few 90s and 180s so you don't have to manage a 75 ft reel through the hole route, you can break it into a few 25 ft runs or so. Aside from the extra few bucks with a couple more fittings, the extra joints won't hurt any.

Thanks,
Adam
 

mires

Well-known member
Joined
Jan 12, 2014
Messages
600
Location
Columbia, MO
Use as few fittings as possible. I know you will be tempted to make it look pretty but you're better off making long sweeping turns with the fairly rigid tubing than cutting and adding fittings.
 

theoldwizard1

Well-known member
Joined
Feb 22, 2011
Messages
43,173
Location
SE MI
3) You'll need hold downs to fix it in place every 48" (code around here in WI).

If there is not something supporting the tube underneath (hanging from a joist or tacked to wall studs) you will hold downs more like every 24" ! It will droop once filled with water and left overnight, especially 3/4". Also, PEX you buy in a roll has a long memory. Extra hold downs may be required to make a neat straight run.

Tight corner will require fittings. They do make corner guides/supports that ypu clip on to the tubing so that you don't kink it (If you do kink it, it is likeky to leak there in the future).

attachment.php


While you can stub out of a wall with PEX ...

attachment.php


... I think it looks more professional if you use a copper stub out. This also saves an elbow for each pipe. The end of the tube is sealed so you can pressure test the system (PEX stubs have to be capped and ringed for pressure testing). Use a tubing cutter and then a compression style fitting for your connection.

attachment.php
 

Attachments

  • Capture.JPG
    Capture.JPG
    15.8 KB · Views: 134
  • Capture1.JPG
    Capture1.JPG
    48.1 KB · Views: 76
  • Capture2.JPG
    Capture2.JPG
    43.4 KB · Views: 75
Last edited:

theoldwizard1

Well-known member
Joined
Feb 22, 2011
Messages
43,173
Location
SE MI
Use as few fittings as possible. I know you will be tempted to make it look pretty but you're better off making long sweeping turns with the fairly rigid tubing than cutting and adding fittings.

In tight areas (small laundry room) extra fittings are almost unavoidable.

I also recommend buying 10' straight pieces if you are working in tight areas so you aren't fighting the tubing's memory.
 

b-body-bob

Well-known member
Joined
Oct 10, 2011
Messages
1,621
Location
Almost Heaven
I re-plumbed an entire reno property with rolled 3/4" Pex with 1/2" in the walls and found it's a lot easier to deal with if you figure out a way to hang it so you can just unspool it. Also, at tees, on either side I ran the curve of the Pex in opposite directions so it doesn't try to pop off the fitting. If you have to do those you'll see what I mean.

I also planned some of the tees off the trunk line so I could put it together and then just clamp it in at the ends. For example I had a hot water tank and bathroom all in one small area. I'd have gone nuts trying to clamp all that up in the floor joists (basement) standing on a ladder. Instead I put it all together on the bench, then just clamped it in at either end.
 
Last edited:
To avoid these ads, REGISTER NOW!

SteveCh

Well-known member
Joined
Dec 21, 2012
Messages
1,053
I've had decent luck unrolling a long length of the tubing and securing it down with some cinder blocks for a few days. It does not completely remove the tendency for the tubing to want to roll back up, but it takes some of it away. Makes it far easier to use if you are working solo. Works best in warm temperatures.

For securing the tubing, I use metal conduit clips. Inexpensive and easy to screw into place.

And, another happy customer of Pex Supply....
 
OP
S

svtrichie

Well-known member
Joined
Apr 1, 2008
Messages
108
Location
Troutman NC
Not the best pictures but basically running the tube up the wall just left of where the fairmont wagon is. Thinking on mounting it above the wood on the ceiling to give it better support. It will be coming down on the right of the garage door on the outside of the wall. Plan on making a small hole at the top where it is wood instead of block. So I can either run it along the walls but will have a 90 at the corner or run it on a diag across the ceiling which wont look as neat.

The second picture shows more of the open ceiling.
 

Attachments

  • fairmont.jpg
    fairmont.jpg
    74.5 KB · Views: 63
  • garage marauder.jpg
    garage marauder.jpg
    121.7 KB · Views: 68
Last edited:

CT2012

Well-known member
Joined
Oct 11, 2012
Messages
354
Location
Northeast
For a 75' run, that's a very long way. Use as big a Pex as you can to allow for good flow. I put in 35' of 1/2" and the flow rate *****, my hose pressure is barely enough to clear the driveway of dust. Big mistake. Should've used at least 3/4" or more like 1". My system is at ~55psi by the way.
 
OP
S

svtrichie

Well-known member
Joined
Apr 1, 2008
Messages
108
Location
Troutman NC
The line that I am running is just to go to a drip irrigation system for plants and a small garden. But will probably use a bigger line.
 

CT2012

Well-known member
Joined
Oct 11, 2012
Messages
354
Location
Northeast
the cost differential is nominal, go for the biggest diameter you can that way in future if you ever have need, an appropriately sized supply line will be there.

that's my $0.02 anyway.

i spent an extraordinary amount of time and sweat equity, as well as paying a crew to assist, in digging trenches and going under sidewalk to get the 35' of 1/2" line in. plus all the copper work inside and various crimped pex connections where appropriate. and i could kick myself now for doing 1/2". i didn't think it all the way through regarding flow rate.
 

moparfreak

Well-known member
Joined
Jan 24, 2005
Messages
853
Location
Milwaukee, WI
For a 75' run, that's a very long way. Use as big a Pex as you can to allow for good flow. I put in 35' of 1/2" and the flow rate *****, my hose pressure is barely enough to clear the driveway of dust. Big mistake. Should've used at least 3/4" or more like 1". My system is at ~55psi by the way.

In preparation for my remodel, I did a lot of research on the plumbing forums and although it's not really written down anywhere, a lot of those guys do subscribe to the theory that PEX should be upsized due to the wall thickness. B/c of the way it's rated, 1/2" PEX is actually closer to 3/8" ID, whereas 1/2" copper is rated by its ID, so it's got better flow.

That being said, I ran 1" PEX for my main lines into the manifold, 3/4" PEX for those appliances or fixtures that were going to need a lot of water (washing machine, exterior hose bibb), and 1/2" PEX for all the other more seldom used lower flow fixtures (dishwashers, sinks, fridges, etc.). Certainly line length factors into it as well, but I find my 3/4" PEX line to be perfectly adequate for the exterior hose bibb.

You don't want to run 1" PEX any more than you have to, cause that stuff is extremely stiff, and very difficult to manage. Short radius 90 deg turns are impossible, fittings are more expensive and harder to find in sufficient variety. When I tried to "uncoil" the stuff I had, it was a project in and of itself.

Thanks,
Adam
 

CT2012

Well-known member
Joined
Oct 11, 2012
Messages
354
Location
Northeast
moparfreak, indeed--you have to let pex sit outside all day in teh sun, uncoiled and held down. helps immensely. i did that with the 1/2" and it made things far easier (i had some tight turns while underground, but not enough that required creating a joint--we heated pvc with a torch and made tight curves, then sleeved the pex through it). yes on tight bends you'll need to use brass pex joints w/crimps.
 
To avoid these ads, REGISTER NOW!
Top Bottom