To avoid these ads, REGISTER NOW!

Insulating My Garage

LarryWP

Member
Joined
Oct 6, 2016
Messages
16
Location
Grand Rapids, MI
I've been meaning to post a little about the work I'm doing in my garage for a while. Ends up, between my regular job, my family, and - oh yah, the actual work I've been doing on the garage, I've had zero time to blog.

Anyhow, here is what I've been up to.

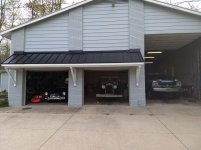
I have a fantastic building behind my house: 38' x 42' cement block building with 14' walls and attic space above. As I live in Michigan, it is pretty much impossible to warm up this large space in a block of cement (AKA - a block of ice) during the winter. Don't get me wrong, in the summer it is great! Who needs AC?

The worst part is the dampness and moisture. Every time the temp outside rises above the temp inside my building, the moisture in the air drops out onto all of my stuff. My tools are even getting rusty while sitting inside my building.

It was time to do something about it. So I decided it was time to insulate and install a working furnace.

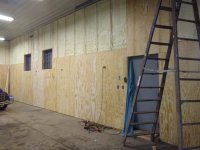
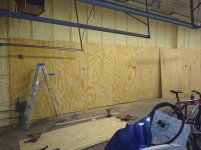
I studded out the walls and had foam insulation sprayed in. I still have to panel over the studs and install my new furnace. I also intend to install a car lift as soon as all this other work is done.

I will say, I got some help from comments on this site, but it was hard to find exactly what I was looking for. So, I made a number of judgment calls. I'll share with this community what the issues were and how I came to the decisions I chose. Keep in mind, I'm not a carpenter. I'm not an electrician. In fact, I'm actually a lawyer! (but, a lawyer who paid his way through college working as a mechanic).

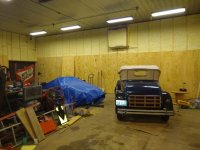
I will post more to come, but just wanted to get this conversation started. Here are a couple pics of my building. One from the outside, and one "before" picture on the inside.
 

Attachments

  • IMG_20190506_190610064.jpg
    IMG_20190506_190610064.jpg
    149.5 KB · Views: 187
  • IMG_20190609_145719927.jpg
    IMG_20190609_145719927.jpg
    149.9 KB · Views: 217
To avoid these ads, REGISTER NOW!
OP
L

LarryWP

Member
Joined
Oct 6, 2016
Messages
16
Location
Grand Rapids, MI
OK, so here are some of the key questions I had to answer:

Question 1. What type of insulation? Spray foam? Foam Panels? Fiberglass batting? Insulated metal panels (IMP)?

I went with spray foam insulation, because it provides pretty good insulation value (about 21 R value for 3"), makes a nice sound absorption (I live in a residential neighborhood), and it would get into all the hard to get to nooks and crannies. Oh, and I have no experience doing this work (plus the shear size), so I would have no choice but to hire someone else to do the work rather than feeling I must do it myself:).

This building is over 50 years old and has settled a bit, so there are some cracks in a few places (nothing major that requires structural repair). And, the floor is uneven, as 1/2 of it was poured as a parking slab prior to the building being built over the pad (and the remaining areas of the floor then poured). On top of that, there were a number of holes drilled into the walls over the year that needed to be filled in. Spray foam filled all those cracks and holes in, and does not require me to cut the insulation to fit all the odd shapes, angles, etc. .

The foam panels and fiberglass batting would first require some type of moisture barrier. Spray foam itself is a barrier.

IMP was interesting, and though expensive, not quite as expensive as I thought it would be. But lots of work cutting it to fit odd angles, and is way overkill for an existing building (would be great for walls on new construction though!)

NOTE though - Keep an eye on the guys applying the foam. Some places they were far from giving me the full 3" of foam (see Picture)

BTW - Total cost for 3" closed cell spray foam insulation was 5,200.

Question 2: OK, more than just one question here, but all relate to the studs. First thing is, do I use 14' studs, or do I build essentially a wall-on-a-wall, one 8' wall and another 6' wall on top. I decided to go with 14' studs, because it seemed like less work. In the end, I think it was less work, but damn, trying to keep a 14' long 2X4 stud square is difficult. There is so much flexibility over that length.

For the baseplate I used treated 2X4 lumber, and attached it to the cement floor with Ramset nails.

Next question is whether attaching the stud wall to the rafters and the floor alone was enough, or did I need to attach the studs to the cement block walls in various places as well. I was told the foam itself would secure the studs to the wall, but I was worried that once I hang shelves, etc. onto the studs, it might have a tendency to pull away. Also, was worried that the hydraulic pressure of expanding foam might push the studs out a bit. So, I used L-brackets to attach to the cement block wall and the studs.

I'm glad I used the L-brackets, but having watched some of the foam spraying tells me that the hydraulic pressure of the expanding foam probably was not enough to push the studs out from the wall (the foam will always push out where there is the least pressure - which is between the studs, not behind the studs).
 

Attachments

  • IMG_20191230_191728990.jpg
    IMG_20191230_191728990.jpg
    12.5 KB · Views: 114
  • IMG_20191230_165830699.jpg
    IMG_20191230_165830699.jpg
    146.5 KB · Views: 106
  • IMG_20191230_165754560.jpg
    IMG_20191230_165754560.jpg
    111.7 KB · Views: 109
  • IMG_20191230_153228600.jpg
    IMG_20191230_153228600.jpg
    149.8 KB · Views: 125
  • IMG_20191229_180548026.jpg
    IMG_20191229_180548026.jpg
    148.1 KB · Views: 108
  • IMG_20191020_194156452.jpg
    IMG_20191020_194156452.jpg
    148.5 KB · Views: 112
Last edited:
OP
L

LarryWP

Member
Joined
Oct 6, 2016
Messages
16
Location
Grand Rapids, MI
Cool cars!

Thanks. My cars are all drivers - scratches and dings - just the way I like them. I drive them everywhere. To work, take the kids to school, grocery store, you name it. And I never worry about scratches. I have a picture of the Model A with about a dozen kids sitting in and on it.

Oh, the cars are:

1931 Model A Ford, Rumble Seat Roadster Deluxe
1957 MGA
1990 Dodge W150 4x4 Truck (just an old truck to me, but some folks think of it as an antique - which I guess it technically is).
 
To avoid these ads, REGISTER NOW!
OP
L

LarryWP

Member
Joined
Oct 6, 2016
Messages
16
Location
Grand Rapids, MI
Hey, a MAJOR issue that I did not discuss yet is the electrical. Ugh, what a headache!

There were 38 outlets, switches and junction boxes on the walls. All of them would be burried behind the foam if I didn't bring them out a bit. Rather than remove all the conduit and outlets, I decided I would go with outlet box extenders.

So, as I built the walls, I notched out the 2X4s to fit over the conduit. It was a fair bit of work, but looked pretty good when I was done. I then proceeded to install the outlet box extenders. That is when I realized I had a problem. The electrical outlet boxes were only 1 1/2 inch deep. The deepest extenders I could find were 1 1/2 inches. That gets me to 3 inches. The 2X 4s of course are 3 1/2 inches deep.

So I ended up removing every outlet box, and then bending the conduit to bring the box out further, and attaching a wooden box behind the outlet box and the wall. What a pain! Especially where the box was close to a stud. Nearly impossible in some cases, so I simply removed the conduit in those areas and relocated the box.

Oh, and I had to keep the conduit, because the wiring was not Romex, but was instead individual wires (which are fine, but really need to stay in the conduit housing).

What I would have one different? I would have torn all of the conduit and wiring out from the start and installed romex after the studs were up. No conduit, a lot easier to work with, and I could have put all of the outlets where I wanted them to be, not being tied to where they were for the past 50 years.
 
OP
L

LarryWP

Member
Joined
Oct 6, 2016
Messages
16
Location
Grand Rapids, MI
OK, last one for the night. in the midst of all of this, we decide to install a hot tub behind our house as well. With everything I was doing in the building, I had an electrician come in to run the 220V wiring for the hot tub. He pointed out a small little item that I had overlooked. My service panel in the garage was out of slots for additional breakers.

In addition to needing 2 slots for the hot tub's 220 service, I would need 2 for the car hoist I some day soon plan to put in there. So, I hired the electrician to install a new, larger service panel.

Of course, I had already built the studded wall around the existing smaller panel, so that had to be torn out to make room for the larger panel, and reconfigured the studs in this area. Just more work.
 

tonyciambrone

Well-known member
Joined
Nov 4, 2015
Messages
1,152
Location
Northern Illinois
well, you could've ordered 3.5 inch deep 4x4 j boxes from Platt electrical or another supply house. typically there's enough give in conduit to sneak an old box out. no spacers or extensions that way. I will always think exposed work is best for a garage of workshop, so I would be pulled the electrical and reinstalled after covering the walls.

But in general your shop is a beauty, plenty tall, now well insulated, studded etc. you're doing preeety frickin well
 
OP
L

LarryWP

Member
Joined
Oct 6, 2016
Messages
16
Location
Grand Rapids, MI
well, you could've ordered 3.5 inch deep 4x4 j boxes from Platt electrical or another supply house. typically there's enough give in conduit to sneak an old box out. no spacers or extensions that way. I will always think exposed work is best for a garage of workshop, so I would be pulled the electrical and reinstalled after covering the walls.

But in general your shop is a beauty, plenty tall, now well insulated, studded etc. you're doing preeety frickin well

I wish I knew of these boxes a month ago. Good to know! And thanks for comment on the building. I love it.
 
OP
L

LarryWP

Member
Joined
Oct 6, 2016
Messages
16
Location
Grand Rapids, MI
Insulating My Garage - and now a Crane?

So, as I mentioned earlier, I plan to install a car hoist in my garage when I'm finished with my insulation project.

Given the reasonable prices of new lifts, I will probably buy a new unit rather than a used one. That said, I am keeping my eyes out for a used lift.

So one day I search Facebook Marketplace for car hoist. One of the items that come up in the search was an overhead crane. Hmm....

The price was right, so I ended up buying it! Thankfully I have a friend with a 34' trailer (the beams are 38' long).

I still plan to install a car lift, but is nice to have an overhead crane to move engines or whatever.

The pictures of the crane assembled are of the crane when assembled in the sellers building. Since getting it home, it's been sitting on the edge of my driveway waiting for its moment of resurrection!
 

Attachments

  • IMG_20191207_115916736.jpg
    IMG_20191207_115916736.jpg
    147.7 KB · Views: 53
  • IMG_20191207_094957561.jpg
    IMG_20191207_094957561.jpg
    128.5 KB · Views: 61
  • IMG_20191129_1502298081.jpg
    IMG_20191129_1502298081.jpg
    86.7 KB · Views: 67
  • IMG_20191129_1501475791.jpg
    IMG_20191129_1501475791.jpg
    88.8 KB · Views: 70
  • IMG_20191129_1500477741.jpg
    IMG_20191129_1500477741.jpg
    116.2 KB · Views: 77
OP
L

LarryWP

Member
Joined
Oct 6, 2016
Messages
16
Location
Grand Rapids, MI
It's been a while since I've posted.

Next question I had to deal with is what type of paneling to put over the insulation?

My original plan was to install white fiberglass reinforced plastic (FRP) panels, similar to what would be in an enclosed car trailer (bright white, dimpled texture). Positives would be a nice bright space (white). Could easily wash or wipe down the walls when they get dirty.

But I need about 60 4X8 panels. FRP panels run from about $25 for a 1/16 thick sheet, to nearly $200 for a 3/4" panel. I thought I would go the cheapest route. But after looking at the panels and seeing they are as rigid as a piece of paper, I decided to just go with simply ply-wood.

Then the question was 3/4" or 1/2". Decided 1/2" because 3/4" seemed to be overkill, and dang, 3/4" panels are so heavy. In the end, I think the 1/2" panels was the right way to go. It is heavy enough to hang small things on, and anything heavy (shelving) will go directly into studs rather than the paneling.

Here are a few pics. I still need to do the top 6' all the way around, but have finished the bottom 8' all the way.
 

Attachments

  • IMG_20200125_184909821.jpg
    IMG_20200125_184909821.jpg
    117.2 KB · Views: 41
  • IMG_20200125_184916611.jpg
    IMG_20200125_184916611.jpg
    136.4 KB · Views: 37
  • IMG_20200126_140051237.jpg
    IMG_20200126_140051237.jpg
    148.5 KB · Views: 38
To avoid these ads, REGISTER NOW!
Top Bottom