To avoid these ads, REGISTER NOW!

Insulation for top floor

FNM

Active member
Joined
Mar 20, 2020
Messages
33
Location
CT
Hey all

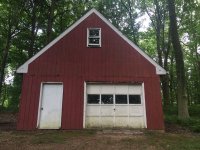
In zone 5 (CT) and in the start of finishing my new garage. I’m a bit stumped about what to do upstairs and would appreciate any advice on an approach.

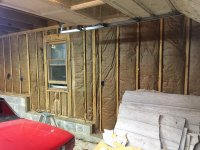
To set the scene, my garage is detached 24x26. Bottom floor has 13ft ceilings and TJI beams. I’m using a 7000watt electric heater on the bottom floor just while working out there on toys / cars which is working nicely even partially finished. I’ve been using Rockwool R14 in the walls / TJI and the plan is to drywall the lot. Ceiling will be 5/8 fire x, walls 1/2”.

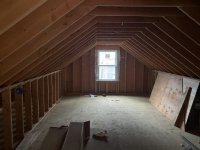
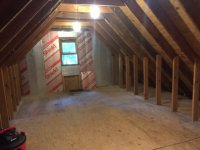
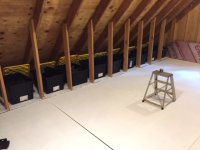
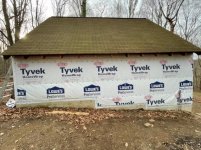
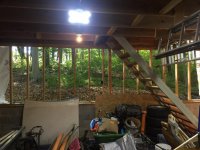
The top floor is separate meaning no stairs, it has a rear entrance. It has a knee wall and zero vents currently. I ‘rain and iced’ the entire roof as an FYI. The intention is i’m going to make doors for the knee wall and it’s going to be used to house many large and hidden plastic storage boxes/tubs. The main section of the floor will be as a small shop / other occasional stuff. I’m putting in a heat storm electric heater as heating, again while working in there for short periods. Neither floor will be heated other than when in use.

I’m thinking I need to add a ridge vent, some soffit vents and put a heavier duty insulation in the ceiling? - R38 or so. The roof pitch meets to the floor, is it worth any kind of insulation there? I don’t want to fill the storage space however if I don’t need to as it’ll be used.

This is just based on what I’ve read on other threads, intention being lessening wild temp swings and being able to use the heater.

Am barking up the right tree? Hoping I am, every contractor seems to give different answers :)

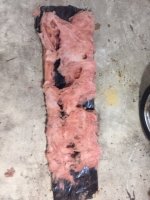
Appreciate any help, picture shows the top floor.
 

Attachments

  • D12FC7DA-C83F-43CD-8A2B-C77CCB9C0CBF.jpg
    D12FC7DA-C83F-43CD-8A2B-C77CCB9C0CBF.jpg
    139.7 KB · Views: 34
To avoid these ads, REGISTER NOW!

mepstein

Well-known member
Joined
Sep 17, 2010
Messages
1,286
Mine is similar but I took down some old attic pull down stairs and installed a stair kit. I'm using the first floor to work on cars and the 2nd floor to work on bikes. I'm not insulating the ceiling of the first floor so I have to insulate the roof rafters to the edge of the second floor/soffit area. I'm using a mini split on the first floor and a ceiling fan over the stairs to circulate the air. It's still in progress but I'm getting there. The first floor is filled with rock wool and the second floor is next. Mine is 24x22 but unfortunately, it only has 8.5 ceilings.

I already has ridge and soffit vents so it does make the insulation on the edges of the 2nd floor a bit tricky but I also want the knee wall to remain open so I can use it for storage space. I have 22 of the 27 quart storage containers that fit into each knee wall bay.
 

Attachments

  • ws1.jpeg
    ws1.jpeg
    94.1 KB · Views: 17
  • ws2.jpeg
    ws2.jpeg
    83.1 KB · Views: 16
  • ws3.jpeg
    ws3.jpeg
    124.7 KB · Views: 19
Last edited:
OP
F

FNM

Active member
Joined
Mar 20, 2020
Messages
33
Location
CT
It’s a lot of work, good news is we got time! :)

Yours is similar, looks great! Do you have any venting or plan to? You going for an R38 or similar for insulation?

Mine is plywooded to the roof edge into the knee wall over the TJI...more or less ready to go when or if I need to vent. I decided to go with a 5x8 deck and stairs leading up to the rear entry door as I wanted total floor space. I like your setup with the stairs! What’s the biggest thing you’ll be taking up those?

Planning on elevated cabinets etc too so just about the only things on the floor will be an air compressor and the lift.

The high ceilings were my major requirement, always wanted a lift. Was going to go two post but like the idea of the IMOBILE 1 post now. Don’t really want to drill anything despite paying to thicken the slab and can move it out the way. You going to go lift? Should be able to get a max Jack or scissor in? :)

thanks for sharing!
 

mepstein

Well-known member
Joined
Sep 17, 2010
Messages
1,286
This is a 30 year old building that came with my house. It was sheathed in T1-11 but most of the sheathing was rotting along the edges and other spots. Mice had taken up residence behind the fiberglass and the pressboard interior paneling had warped from the humidity. The doors and windows were never flashed and all had rotted out.

So while the structure was mostly fine, I decided all the interior and exterior had to come down. I'm in SE PA and our wooded lot holds in humidity like crazy. So I'm putting in a mini split to not only keep the temps moderate but keep the humidity lower than 50%. I also read up a lot on insulation and air sealing. Mice don't like rock wool so that's a big positive for me over fiberglass.

I already purchased the Maxjax lift but now I decided I want to put down porcelain tile first so my project just got a bit bigger. I'm not a big diy guy so this stuff takes my 5x as long as most people but I'm making progress. The exterior sheathing took me quite a bit of time since all the walls are stepped and I had to cut almost every piece of osb. There was also a lot of rot repair and the builder used a lot of nails to hold up the original t1-11. I blew the budget a bit and purchased a metal roll up door. This means I have no ceiling tracks for my garage door and should help with my 8.5' ceiling clearance.

I would have loved to start with a new building but this one had become a bit of an eyesore so it either needed to be rebuild or be taken down. Luckily, there's no permit police needed in our township to do what I'm doing.

Sorry for the thread hijack.
 

Attachments

  • ws16.jpeg
    ws16.jpeg
    90.2 KB · Views: 18
  • ws15.jpg
    ws15.jpg
    64.6 KB · Views: 16
  • ws14.jpeg
    ws14.jpeg
    136.7 KB · Views: 19
  • ws13.jpg
    ws13.jpg
    123.1 KB · Views: 18
  • ws12.jpeg
    ws12.jpeg
    122.8 KB · Views: 17
  • ws11.jpg
    ws11.jpg
    105.2 KB · Views: 18
  • ws10.jpg
    ws10.jpg
    110.4 KB · Views: 18
Last edited:

mepstein

Well-known member
Joined
Sep 17, 2010
Messages
1,286
more
 

Attachments

  • ws22.jpg
    ws22.jpg
    49.1 KB · Views: 23
  • ws21.jpg
    ws21.jpg
    71.2 KB · Views: 16
  • ws20.jpeg
    ws20.jpeg
    100.2 KB · Views: 12
  • ws19.jpeg
    ws19.jpeg
    120.4 KB · Views: 15
  • ws18.jpg
    ws18.jpg
    116 KB · Views: 15
  • ws17.jpg
    ws17.jpg
    61.7 KB · Views: 15
OP
F

FNM

Active member
Joined
Mar 20, 2020
Messages
33
Location
CT
Not hijacking at all, similar project, whereas mine is new it’s a lot of the same journey I’ve been on! Similar climate too! I’m planning on heading to your neck of the woods as you have a lot of ATV parks over there (another toy of mine)

I even see you have a similar exposed foundation wall as have I which I was trying to work out the best way to finish. Think for that I’m going to cap with Azek and dry lock the rest of the wall. I’m going to Racedeck the slab to protect and make it look pretty (in my eyes).

I pretty much live butted onto the woods and mice given a food supply would love this place. Thankfully they’ve stayed out so far but great to know they’ll hate the Rockwool.

Max Jack looks cool that was my second choice, I wanted a higher lift as I’m over 6ft and was done rolling on the floor but love its mobility. I see you can put multiple anchors on it for different sized cars/trucks too which is pretty neat!

Couple more of mine, excuse all the **** in there it will all go! Have pro lighting LEDs going up and the exterior lights are done now :)
 

Attachments

  • 7470B9F6-4ABD-4E5B-B104-B6C6EED0C641.jpg
    7470B9F6-4ABD-4E5B-B104-B6C6EED0C641.jpg
    154.3 KB · Views: 15
  • 7F7E5E7B-EF23-42E2-835A-AF6793FE3870.jpg
    7F7E5E7B-EF23-42E2-835A-AF6793FE3870.jpg
    133.3 KB · Views: 15
Last edited:

mepstein

Well-known member
Joined
Sep 17, 2010
Messages
1,286
Yours is much nicer looking than mine. I never liked the exposed foundation so purchased a faux stone vinyl panel product that will go on once the snow melts. I don't have any grand plan for interior layout so I will just put everything on wheels.
In our area, ridge and soffit venting is the norm. I purchased the cheap foam channels that fit between the rafters and provide airflow from the soffit to the ridge vent. Then I'll stuff as much rock wool between the 2x8's roof rafters as I can. The bins are all full of car parts and I don't want to store them in the "working" space so the insulation will extend to the eves. Then I can build a hinged "wall" to hide the bins.
I used to run a bike shop and always wanted to set up a nice home shop. So the stairs are to let me easily carry a bike up and down.
I'm going to build a shed behind the shop for the yard equipment so it doesn't take up floor space inside.
 

Attachments

  • IMG_4783.jpg
    IMG_4783.jpg
    136.2 KB · Views: 14
Last edited:
To avoid these ads, REGISTER NOW!
OP
F

FNM

Active member
Joined
Mar 20, 2020
Messages
33
Location
CT
Yeah I’m with you. Currently I have just the front done but I’m going to do the sides too with flat stone. Want to get thinner than that the front though as my guy used thick block. That stuff you can put on with a nail gun looks amazing.. going to do that on my basement stairs.

Glad you said about the norm, I think I’m going that way. Considered even the smart vents but they $100 each!! I’ll look into the channels.. thanks for sharing! Will you use the same R Rockwool or up it?

That garage is going to be amazing when you’re done. Despite not being into DIY looks like you’re highly capable. I got rid of many contractors that aren’t half as capable!
 

mepstein

Well-known member
Joined
Sep 17, 2010
Messages
1,286
I hired a general contractor to take the roof off my house, build back with a steeper pitch, dormers, windows and side the house. He hired the cheapest subs and then never paid most of them, leaving me holding the bag to pay a second time and fix all the mistakes. Since then, I figured it's better for me to do my thing, make mistakes, learn something and get mostly what I want vs hiring out. If I need extra help, I call my 85 year old father and he'll work all day until the job is done.

I did similar on my house attic to 3rd floor conversion. Fiberglass insulation (now I like rock wool much better) down to the eves, 8 custom built doors on the 5 foot knee walls (cost around $100 each interior pre hung door) and I have lots of storage space in conditioned space.

Cedar shake siding is vinyl panels that look real until you are pretty close.
 

Attachments

  • house 1.jpeg
    house 1.jpeg
    145.1 KB · Views: 13
  • house 2.jpg
    house 2.jpg
    135 KB · Views: 14
OP
F

FNM

Active member
Joined
Mar 20, 2020
Messages
33
Location
CT
Totally agree, my contractor built the wrong sized doors, couldn’t hang entry doors, forgot wall bracing, missed most nails with a nail gun, took 3+ months to come back and fix said wrong sized doors and made a complete mess.. the list goes on. I arrived at the same conclusion.. if I’m paying someone to learn on the job.. it’ll be me :)

House looks fantastic! What a great job :)
 

mepstein

Well-known member
Joined
Sep 17, 2010
Messages
1,286
I'll be interested to see how you finish off the stepped foundation area along the wall. I don't have a solution for it yet but I still have other things to do first.
The Racedeck tiles will look great. I helped a friend put some down and it's very satisfying to have a completed floor in a couple hours. I'm actually planning to do a racedeck style floor on the second story bike shop.
 
OP
F

FNM

Active member
Joined
Mar 20, 2020
Messages
33
Location
CT
Yeah do it, I think they look amazing especially with the lift. The water / see through ones can be a little clacky when walking on so I’m going solid tiles. I wrote to them and asked if they were fine with the IMOBILE lift on top and they hold told me yes and they hold 80,000+ lbs!

I’m planning on mitering / ripping the Azek probably flush as I don’t want to be tempted to turn that into a messy shelf. Might put LED strips on it too if I have any spare cash, don’t need any more lighting just for cosmetics.

Still trying to find a good solution to secure them to the wall tops. I’ve used Tapcon in other places so I might go with the flat head version and put a bit of filler to smooth on top. I read another idea to drill into the wall then put a wood dowel in said hole with a bit of epoxy. Then you use Azek finishing nails which come with a plug you bang in. Love that idea but seems like a boat load more work :)

I would also plan to run a smooth bead of concrete filler to fill any side facing / below gaps where it meets the wall. Gotta sand the walls first with a diamond cup, so that job is still a few months away.

How is your wood stuck on there and did they do a moisture barrier? Look like they did
 

mepstein

Well-known member
Joined
Sep 17, 2010
Messages
1,286
"How is your wood stuck on there and did they do a moisture barrier? Look like they did."

If you mean the sill plate, there is thin foam between the plate and studs. They parged the outer concrete with tar near the bottom but I wouldn't call it waterproof. There are some cracks in the block that I will fill but water only seeps in if I let the leaves pile up around the foundation. The sill plate is 2x8 but the walls are 2x4. The prior owner built this as a hobby wood shop but only ran 60 amp service so I have to be careful about electric usage. It's just for myself so if I have to turn off the mini split to use a welder, so be it.

Plans are to use light exterior metal siding for the interior walls and ceiling. Along with porcelain flooring, I think that will fulfill my plan to hose it down and mop it out the door when it gets dirty.
 
To avoid these ads, REGISTER NOW!
Top Bottom