To avoid these ads, REGISTER NOW!

Interesting vise stand concept

royce

Well-known member
Joined
Jun 22, 2014
Messages
3,103
Location
fairbanks ak
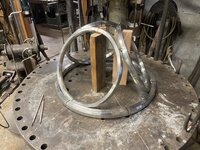
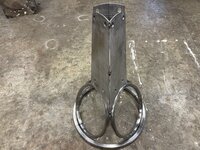
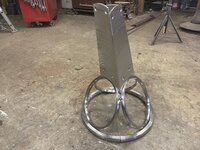
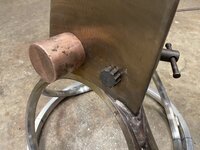
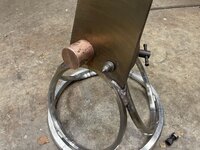
Pulled some SS ring gaskets out of my buddy's bone pile.
24", 16" and 5-1/2"
The 16" ones nested nicely in the 24" and the column will be made up of the 5-1/2"rings stacked on each other in a gentle arch.
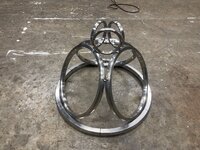
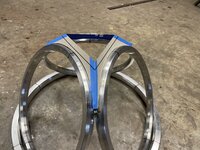
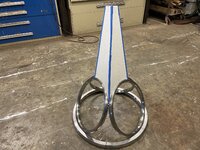
 

Attachments

  • IMG_6007.jpeg
    IMG_6007.jpeg
    1.1 MB · Views: 642
  • IMG_6053.jpeg
    IMG_6053.jpeg
    1,022.4 KB · Views: 485
  • IMG_6059.jpeg
    IMG_6059.jpeg
    1.1 MB · Views: 418
To avoid these ads, REGISTER NOW!
OP
R

royce

Well-known member
Joined
Jun 22, 2014
Messages
3,103
Location
fairbanks ak
Tacked up a few 5-1/2" rings and stacked them up in a number of configurations.
Not sure if the rings will work aesthetically or structurally.
Now exploring the idea of a 3 sided tapered column
 

Attachments

  • IMG_6063.jpeg
    IMG_6063.jpeg
    1.3 MB · Views: 350
  • IMG_6064.jpeg
    IMG_6064.jpeg
    1.1 MB · Views: 312
  • IMG_6068.jpeg
    IMG_6068.jpeg
    1.1 MB · Views: 310
  • IMG_6070.jpeg
    IMG_6070.jpeg
    1.1 MB · Views: 308
  • IMG_6072.jpeg
    IMG_6072.jpeg
    788.7 KB · Views: 352
Last edited:

stinkity stoink

Well-known member
Joined
Apr 8, 2007
Messages
731
Location
New Jersey
That looks more like an art piece. Although from a lot of things I see you do I’m sure the vice will be just as nice. Keep at it it looks great !!
 

larry_g

Well-known member
Joined
Apr 28, 2007
Messages
16,874
Location
oregon
Have you considered sectioning a 16" ring to make three "flying buttresses" That come from the connection joint of the lower 16" rings and land on the stack of 5" rings?

As always you have created something magical.

lg
no neat sig line
 

LXCam

ALLIANCE MEMBER
Joined
Apr 23, 2013
Messages
19,102
Location
AZ
I always look forward to your projects Royce. I have no doubt this will be another exceptional piece of functional art.
 
OP
R

royce

Well-known member
Joined
Jun 22, 2014
Messages
3,103
Location
fairbanks ak
Have you considered sectioning a 16" ring to make three "flying buttresses" That come from the connection joint of the lower 16" rings and land on the stack of 5" rings?

As always you have created something magical.

lg
no neat sig line
Larry, I really tried to like the ring column, but it seems, at least to my eye, to be too busy.
Here is what I'm exploring now, 3 sided tapered column.
I'm thinking around 10 degrees of cant.
Entertaining the idea of perforating the 3 panels, but kind of like it solid at this point
Thanks for the kind words

Royce
 

Attachments

  • IMG_6079.jpeg
    IMG_6079.jpeg
    1.1 MB · Views: 261
  • IMG_6084.jpeg
    IMG_6084.jpeg
    1.1 MB · Views: 289
OP
R

royce

Well-known member
Joined
Jun 22, 2014
Messages
3,103
Location
fairbanks ak
Pulled some 1/4" 304L knife gates out of the bone pile.
They are off of coal fired powerhouse job I worked 20 odd years ago.
These gates were part of the ash handling system for the baghouse that were not used.
Anyhow, refined the pattern for the column and got rid of the round to triangle transition pieces.
Probably need to make top a touch bigger


Royce
 

Attachments

  • IMG_6090.jpeg
    IMG_6090.jpeg
    1.1 MB · Views: 233
  • IMG_6088.jpeg
    IMG_6088.jpeg
    1.1 MB · Views: 225
  • IMG_6086.jpeg
    IMG_6086.jpeg
    1.1 MB · Views: 255
OP
R

royce

Well-known member
Joined
Jun 22, 2014
Messages
3,103
Location
fairbanks ak
Beautiful visually, but I like to be able to get my body close to the vise when needed. It looks as though the large base will prevent you from being able to get your feet very close to the vise itself.
Thanks Spencer,
It must be the camera angle, the column is around 10-15 degrees out of plumb, providing plenty of toe space without moving the center of gravity to far forward.
 

RMERR

Well-known member
Joined
Mar 22, 2017
Messages
429
Location
Northern CA
Cool project, I do the same design-as-you-go thing myself. Sometimes you just have to see it, you'll know when it's "right". I like where this is going, but I find myself looking for more mass at the base for stability.
 
OP
R

royce

Well-known member
Joined
Jun 22, 2014
Messages
3,103
Location
fairbanks ak
Cool project, I do the same design-as-you-go thing myself. Sometimes you just have to see it, you'll know when it's "right". I like where this is going, but I find myself looking for more mass at the base for stability.
Thanks RMERR,
The 4 rings of the 24" diameter base weigh around 50 lbs, a bit light in my eyes also.
This stand is not geared for busting bolts or other high torque applications.
More for sawing and shaping with portaband and side grinder.

Royce
 

Monza Harry

Well-known member
Joined
Dec 29, 2018
Messages
1,433
Location
Windsor ON
Thanks RMERR,
The 4 rings of the 24" diameter base weigh around 50 lbs, a bit light in my eyes also.
This stand is not geared for busting bolts or other high torque applications.
More for sawing and shaping with portaband and side grinder.

Royce
Royce, that is why God made lead, or with less imagination steel plates! They could be hidden under a spun reverse (vortex) funnel pointing up from the bottom. Should fit (+/-) the circular theme pretty well. Just some of my spare imagination. [Not that you seem to it, at all!] Harry
 
OP
R

royce

Well-known member
Joined
Jun 22, 2014
Messages
3,103
Location
fairbanks ak
While those are fine ideas Harry,
For this stand, it is intentionally light for ease of moving.

Royce
Royce, that is why God made lead, or with less imagination steel plates! They could be hidden under a spun reverse (vortex) funnel pointing up from the bottom. Should fit (+/-) the circular theme pretty well. Just some of my spare imagination. [Not that you seem to it, at all!] Harry
 

LXCam

ALLIANCE MEMBER
Joined
Apr 23, 2013
Messages
19,102
Location
AZ
/me whispers in Royce’s ear


Fish tank


With a baby hammer head shark 👊
 
To avoid these ads, REGISTER NOW!
OP
R

royce

Well-known member
Joined
Jun 22, 2014
Messages
3,103
Location
fairbanks ak
Got the column welded with some not so fresh 1/8" 316 stick rod, today.
Also got it grained and lastly weighed the components.
24" ring 32lbs
3ea 16" rings 32 lbs
1/4" column 32lbs
These weights are rough, but still odd that they were so close to equal.

Royce
 

Attachments

  • IMG_6132.jpeg
    IMG_6132.jpeg
    1 MB · Views: 222
  • IMG_6121.jpeg
    IMG_6121.jpeg
    892.1 KB · Views: 206
  • IMG_6112.jpeg
    IMG_6112.jpeg
    1.1 MB · Views: 193
  • IMG_6118.jpeg
    IMG_6118.jpeg
    943 KB · Views: 227

RMERR

Well-known member
Joined
Mar 22, 2017
Messages
429
Location
Northern CA
Thanks RMERR,
The 4 rings of the 24" diameter base weigh around 50 lbs, a bit light in my eyes also.
This stand is not geared for busting bolts or other high torque applications.
More for sawing and shaping with portaband and side grinder.

Royce
I underestimated the weight, now that you're pushing 100 lbs, I agree you'll be fine given your planned use. I like that beefy welding/fab table. Was it some kind of giant flange for a sign or huge pipe?
 
Last edited:
OP
R

royce

Well-known member
Joined
Jun 22, 2014
Messages
3,103
Location
fairbanks ak
Boy howdy, not too proud of the welding on this.
Fought porosity all the way, the more I welded, the uglier it got.
Put some post heat on it to dull the ugly welds some, not sure it helped much.
Anyhow, it'll hang.

Royce
 

Attachments

  • IMG_6163.jpeg
    IMG_6163.jpeg
    1,007.5 KB · Views: 321

budget76

Well-known member
Joined
Jan 19, 2016
Messages
502
looks like you'll have to start over. I'll PM you my address, let me know how much shipping is to CT :p


very cool concept, which isn't surprising coming from you. Probably missed it in the past - what do/did you do for I assume work that gives you access to all this cool scrap?
 
OP
R

royce

Well-known member
Joined
Jun 22, 2014
Messages
3,103
Location
fairbanks ak
Never ever sell yourself short again! I've seen where people have called you an artist in other threads and you always downplay the statements.
You are an ARTIST, no doubt about it! It takes vision to be an artist and vision you have!

Rod
Nice of you to say Rod
This project is taking an abstract turn and I look forward to seeing it's final form, whatever that may be.
Thanks
Royce
 
OP
R

royce

Well-known member
Joined
Jun 22, 2014
Messages
3,103
Location
fairbanks ak
Did not care for the big cupped washers backing the copper cylinders, so replaced them with some 7/8"bridge washers.
Looks more streamlined now but I need to get rid of the hex nuts to clean it up just a bit more.

Used a vise swivel lock nut for the bolt on the front, looks fitting to my eye.

Started thinking about the vise mounting plate and tray.
I may have idea that may work!

I have a line on the perfect vise for this stand, I'll know in a few days if it available.

Royce
 

Attachments

  • IMG_6217.jpeg
    IMG_6217.jpeg
    711.8 KB · Views: 205
  • IMG_6218.jpeg
    IMG_6218.jpeg
    688.7 KB · Views: 187
  • IMG_6214.jpeg
    IMG_6214.jpeg
    1 MB · Views: 204

GaryM909

Well-known member
Joined
Apr 11, 2016
Messages
1,520
Location
Calgary, Alberta, Canada
Boy howdy, not too proud of the welding on this.
Fought porosity all the way, the more I welded, the uglier it got.
Put some post heat on it to dull the ugly welds some, not sure it helped much.
Anyhow, it'll hang.

Royce
Looks good from here. I know as being a welder myself it will bother you more than anyone else.
My son is a welding inspector and calls me out on stuff I weld at home.
 
OP
R

royce

Well-known member
Joined
Jun 22, 2014
Messages
3,103
Location
fairbanks ak
Removed the nuts from the copper chunks and still are not convinced it looks right.
I think I will try bolting them directly to the column.
Also got the top tray rough cut to a tapered trapezoidal shape with a radius on on the back end
Now need to commit to a vise, so the final fit can be made and then bend the edges.
 

Attachments

  • IMG_6228.jpeg
    IMG_6228.jpeg
    975.2 KB · Views: 151
  • IMG_6223.jpeg
    IMG_6223.jpeg
    887.7 KB · Views: 147
OP
R

royce

Well-known member
Joined
Jun 22, 2014
Messages
3,103
Location
fairbanks ak
Bolted the copper directly to the column and feel this looks better, still not sure.
Got a few choices of what to plug the last couple holes with, any thoughts?
Also got the tray radius segmented for bending the arc
 

Attachments

  • IMG_6235.jpeg
    IMG_6235.jpeg
    771.3 KB · Views: 130
  • IMG_6237.jpeg
    IMG_6237.jpeg
    1.1 MB · Views: 112
  • IMG_6239.jpeg
    IMG_6239.jpeg
    780.6 KB · Views: 105
  • IMG_6243.jpeg
    IMG_6243.jpeg
    747.6 KB · Views: 103
  • IMG_6245.jpeg
    IMG_6245.jpeg
    819.2 KB · Views: 104
  • IMG_6247.jpeg
    IMG_6247.jpeg
    913.8 KB · Views: 98
  • IMG_6267.jpeg
    IMG_6267.jpeg
    1,022.9 KB · Views: 128

LXCam

ALLIANCE MEMBER
Joined
Apr 23, 2013
Messages
19,102
Location
AZ
Those look better that way. I got a suggestion for that hole. Maybe use it as a threaded bung. Use a copper bolt or maybe even make one like a thumb screw. Take some plate stainless and create an upwards forward facing sickle. Maybe to explain it would be a eyebrow for the copper Frankenstein bolts 😉
 
OP
R

royce

Well-known member
Joined
Jun 22, 2014
Messages
3,103
Location
fairbanks ak
Those look better that way. I got a suggestion for that hole. Maybe use it as a threaded bung. Use a copper bolt or maybe even make one like a thumb screw. Take some plate stainless and create an upwards forward facing sickle. Maybe to explain it would be a eyebrow for the copper Frankenstein bolts 😉
Thanks Cam,
But you can only choose from the pics!
 

senlow

Well-known member
Joined
Apr 26, 2008
Messages
2,229
Location
Wheat Ridge, Colorado
It's my opinion that geegaws hanging off the side of the column detract from the overall design. I'm thinking that something subtle would work best. I like the star shaped thing. I assume that it's a piece from a grinding wheel dresser. You may want to consider attaching it with a button head screw. I'm sure that whatever you decide, it will turn out great. Your functional art is amazing. I enjoy watching your projects progress.
 
To avoid these ads, REGISTER NOW!
Top Bottom