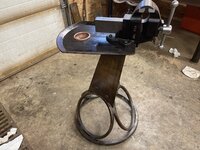
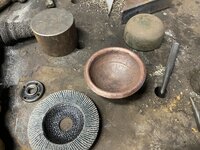
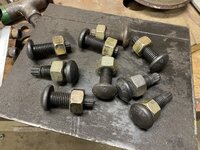
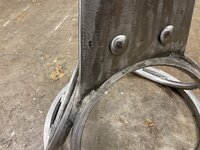
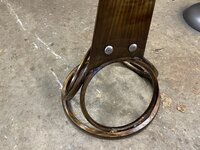
To avoid these ads, REGISTER NOW!

Interesting vise stand concept

OP
R

royce

Well-known member
Joined
Jun 22, 2014
Messages
3,103
Location
fairbanks ak
It's my opinion that geegaws hanging off the side of the column detract from the overall design. I'm thinking that something subtle would work best. I like the star shaped thing. I assume that it's a piece from a grinding wheel dresser. You may want to consider attaching it with a button head screw. I'm sure that whatever you decide, it will turn out great. Your functional art is amazing. I enjoy watching your projects progress.
I'm getting the same feeling Senlow.
Nothing permanent so far.
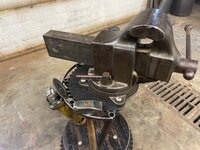
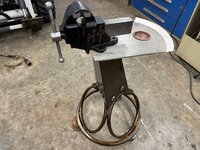
Once the top tray and vise are mounted, a final assessment can be made.
Thanks
Royce
 
To avoid these ads, REGISTER NOW!
OP
R

royce

Well-known member
Joined
Jun 22, 2014
Messages
3,103
Location
fairbanks ak
I'm partial to the simple rounded head in the first photo, has a riveted almost functional look. In fact, I could see this without the copper cylinders and the same rounded head filling those holes too.
I think I like the round heads too. I also kind of like the color of the copper and the counter weight it provides.
With that said, I could see them going away too
Thanks
Royce
 
OP
R

royce

Well-known member
Joined
Jun 22, 2014
Messages
3,103
Location
fairbanks ak
Got locked in on the vise that will land on this stand.
954 Parker that was dolled up by Kevin Scott.
New jaws, new handle, refitted collar, new handle friction screw and puck, base flattened.
I just love Kevin's rebuilds, perfect level of finish, not over polished.
Looking forward to taking possession of it to see if it looks as good on the stand as envisioned.
 

Attachments

  • s-l1600.jpeg
    s-l1600.jpeg
    497.8 KB · Views: 179

KMScott

Well-known member
Joined
Feb 14, 2012
Messages
4,637
Location
Daufuskie Island, South Carolina
Got locked in on the vise that will land on this stand.
954 Parker that was dolled up by Kevin Scott.
New jaws, new handle, refitted collar, new handle friction screw and puck, base flattened.
I just love Kevin's rebuilds, perfect level of finish, not over polished.
Looking forward to taking possession of it to see if it looks as good on the stand as envisioned.
South Carolina to Alaska. Here it comes Royce. Look forward to seeing it on one of your stands.
 

senlow

Well-known member
Joined
Apr 26, 2008
Messages
2,230
Location
Wheat Ridge, Colorado
I think that the Lejeune bolts look great. The copper hardware dish is really cool. Hmm, what if you copper plate the Lejeune bolts to tie in with the hardware cup? Maybe the bolts attaching the vise could also be copper plated.
 
OP
R

royce

Well-known member
Joined
Jun 22, 2014
Messages
3,103
Location
fairbanks ak
Thanks Senlow,
I'm too cheap to have them plated and think I'll just fire black or rust them.

Royce
 

Firstram

Well-known member
Joined
May 16, 2017
Messages
1,390
Thanks Senlow,
I'm too cheap to have them plated and think I'll just fire black or rust them.

Royce
Heat them with a torch and a brass wire brush. It's not a thick coating but it is a nice look on the cheap!
 

Bears Fan

Well-known member
Joined
Jan 26, 2012
Messages
3,437
Location
Indiana
Just found your thread Royce, another amazing, gorgeous project...its perfect. (y)

I don't have any suggestions or changes, it would be like me telling Michelangelo how to paint :unsure:
 
To avoid these ads, REGISTER NOW!
OP
R

royce

Well-known member
Joined
Jun 22, 2014
Messages
3,103
Location
fairbanks ak
How's the balance now with the vise mounted on?
Hey Bears,
Got the mounting plate tapped and welded to the column this morning.
The plate came out of the bone pile with some free holes in it.
They could be handy if this stand is ever made into a table
Center of gravity is good.
Also got the tray edging rough cut and formed.
 

Attachments

  • IMG_6363.jpeg
    IMG_6363.jpeg
    1.1 MB · Views: 115
  • IMG_6372.jpeg
    IMG_6372.jpeg
    912.1 KB · Views: 148

Monza Harry

Well-known member
Joined
Dec 29, 2018
Messages
1,433
Location
Windsor ON
See we all knew it would be better than our suggestions! You have a plan in your head right from word go [even if you didn't know it], sometimes you can't see it for the minutiae of the build. You are there and know your "bone pile", just let the vision dance and run out of your head straight to your hands! Looks fabulous Royce! Harry
 
OP
R

royce

Well-known member
Joined
Jun 22, 2014
Messages
3,103
Location
fairbanks ak
Waited for it to cool and got it back in the shop for final assembly.
The pics do not capture the range of color too well, amber to red to brown to black.
The fire blacked bolts contrast nicely with the column.
The copper bits look sharp but are a bit too bright, they will darken with time.
I think it's done and all in all not a bad design in my lying eyes.
Hats off to Kevin for fixing up the vise, it's a perfect fit.

Royce
 

Attachments

  • IMG_6434.jpeg
    IMG_6434.jpeg
    867.2 KB · Views: 134
  • IMG_6439.jpeg
    IMG_6439.jpeg
    874.1 KB · Views: 123
  • IMG_6442.jpeg
    IMG_6442.jpeg
    831.9 KB · Views: 111
  • IMG_6441.jpeg
    IMG_6441.jpeg
    882.7 KB · Views: 136

RMERR

Well-known member
Joined
Mar 22, 2017
Messages
429
Location
Northern CA
Very cool Royce, agree with budjet76, cleaner look without the copper cans. This whole thing is a beautiful blend of old world, steampunk, and modern art. Funny, I've never really considered a tray under a vise, but seeing yours it makes a ton of sense and looks great too. Thanks for letting us watch and play along with you on this.
 
OP
R

royce

Well-known member
Joined
Jun 22, 2014
Messages
3,103
Location
fairbanks ak
Thanks RMERR,
It is my pleasure to share.
Having a place to set and hang tools is down right handy and fun to design.
Here is a few pics of others I've came up with, for inspiration.

Royce
 

Attachments

  • IMG_1614.jpeg
    IMG_1614.jpeg
    739.7 KB · Views: 117
  • IMG_6046.jpeg
    IMG_6046.jpeg
    839.9 KB · Views: 114
  • IMG_1530.jpeg
    IMG_1530.jpeg
    977.1 KB · Views: 117
  • IMG_9270.jpeg
    IMG_9270.jpeg
    926.7 KB · Views: 115
  • IMG_7110.jpeg
    IMG_7110.jpeg
    888.9 KB · Views: 125

RivennHewn

Well-known member
Joined
Jun 4, 2011
Messages
10,370
Location
PNW
Ever thought about stripping the vise, and matching it with the same finish as the stand, giving the whole thing a monotone appearance?
 
OP
R

royce

Well-known member
Joined
Jun 22, 2014
Messages
3,103
Location
fairbanks ak
Ever thought about stripping the vise, and matching it with the same finish as the stand, giving the whole thing a monotone appearance?
Riven, I'm thinking I like it as is.
The pics don't represent the colors of the stand too well.
They start at the bottom grey to amber to red to brown to almost black at the top.
With that said, the flat black looks great against the stand.
Also Kevin sprayed a super durable epoxy and urethane paint job on her!

Royce
 

senlow

Well-known member
Joined
Apr 26, 2008
Messages
2,230
Location
Wheat Ridge, Colorado
The completed stand is amazing. The Lejeune bolts tie in well with the button head bolts that hold the vise in place. Removing the copper counterweights fits in with the clean lines of the stand.

Royce, I really enjoy following along with your projects. Watching your projects evolve as you are building them is cool. Keep posting your fun projects!
 
OP
R

royce

Well-known member
Joined
Jun 22, 2014
Messages
3,103
Location
fairbanks ak
The completed stand is amazing. The Lejeune bolts tie in well with the button head bolts that hold the vise in place. Removing the copper counterweights fits in with the clean lines of the stand.

Royce, I really enjoy following along with your projects. Watching your projects evolve as you are building them is cool. Keep posting your fun projects!
Thanks Senlow.

Royce
 
To avoid these ads, REGISTER NOW!
Top Bottom