To avoid these ads, REGISTER NOW!

Interior Trim...I dont know what to do! (Stairs and Cabinets)

robs400

Well-known member
Joined
Aug 19, 2010
Messages
116
Location
Central MA.
Little background info... I'm not a carpenter...just a guy that is trying to learn to do all the trim on the inside of his house. Last year I tackled all the windows and doors...the jamb extensions, sills, mitered returns...and all that jazz. It was time consuming, but I learned a lot along the way, picked up some useful tools and was happy with how things came out.

This winters project has been the baseboard molding. That has been straightforward enough and is coming along nicely. Like most projects it seems tho, in order to correctly and completely finish this one, a number of other ones need to be worked on first.

I now have most of the base molding up. Its an open concept living area for the living, dining, and kitchen area...so the room wont really look completed until all of the molding is done. I have two problems right now that I dont know how to approach....yes I have searched online for pictures and instructions...but I feel this group here always yields good first hand experience.

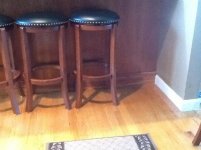
The molding needs to terminate at the existing kitchen cabinets. The way the cabinets were finished off did not look great so I pulled off the molding that the builder put up, as I needed to anyways to install the baseboard I am working on.


You can see what he had there was a different height and thickness that the toe kick....so where they met looked incorrect, as they were different heights, and end grain was visible on both pieces. I see some cabinets that have no molding on the end, however thats not really an option now as there are holes now from the nails that were there, and the stain is a different color below the molding line.

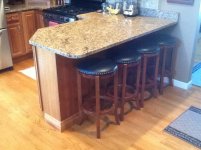
The island shows how the molding meets in that corner, as I have not messed with any of that yet...


I'm thinking I will have to modify the toe kick somehow, prob by cutting it shorter so it sits flush...and then put up a taller piece of trim along the side with a mitered return on the front of it?

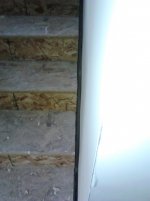
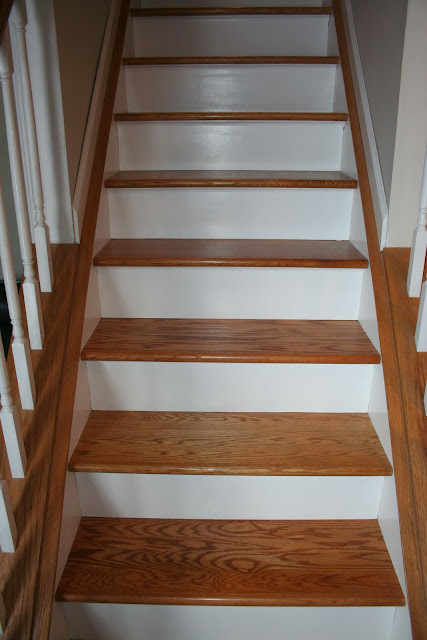
The next bigger problem is where the baseboard molding meets the stairs...as they are not finished yet. Lots of options here...and I tend to over think things.


Right now I am thinking of installing oak treads and scribing the skirt board to fit OVER the treads. Based on my research tho it seems there are supporters of doing stairs a few different ways.

I dont really want to mess with the existing rough stairs if I dont need to. I'd like to do this and do this right, even if it takes me some time as I like the house and plan on being here for a while. I'm thinking the skirt board will just be pine as the rest of the molding in the house I have painted...so if I screw it up at least its a "cheaper" piece of lumber. So lets hear it guys...any input or experiences with these items would be appreciated.

And a crappy picture of the living area to give you a feel for the room...


To avoid these ads, REGISTER NOW!

rsanter

Well-known member
Joined
Dec 22, 2007
Messages
18,521
Location
visalia ca
For the stairs they typically use a small 1/4 round trim piece that matches the color of the wood steps.

For the end piece of the cabinet. I like to cut into the side of the cabinet to make a toe kick just not as deep as the front toe kick. For tile floors I use tile on the toe kick but in your case I would match the cabinet like the front toe kick does.
The easiest would be the small 1/4 round matching the floor like I said to use on the stairs

Bob
 

pete379

Well-known member
Joined
Dec 4, 2009
Messages
471
hmmm... on our cabinets the ends also have a toe kick. perhaps a moulding of the same wood as cabinet (would'nt have to be same height as painted moulding, look like part of cabinet) definitely need to miter existing end of toe kick ??? I'm sure somebody will have a good idea !!
pete
 

Hpozzuoli

Well-known member
Joined
Dec 11, 2013
Messages
3,428
Location
Rhode Island
Here's how I terminated my moulding at the island. Same as you can do with cabinets. I have all shrock cabinets. I contacted them and got some factory matching baseboard to make it work.
 

Attachments

  • image.jpg
    image.jpg
    77.1 KB · Views: 138

K'ledgeBldr

Well-known member
Joined
Aug 22, 2011
Messages
1,925
Location
Johns Creek, GA
I've never seen baseboard run along cabinets! The only thing I've seen is shoe mold.

For the stairs- remove the rough treads, run the skirt (there should be an inch or so between the stringer and the drywall)- 1X10, then starting at the bottom, fit the first tread (check your rise), use lots of construction adhesive and secure with finish nails. Finish off the top of the skirt with basecap. The treads and risers shouldn't require any other trim- LESS IS MORE.

Word of caution- every tread will be a little different in size and squareness. So, don't assume that everyone will be the same dimension (there is actually a jig out on the market for this exact circumstance).

I've had some stair-guys that like to leave the treads just a smidge shy of the skirt. Thats so if the tread flexes a little it won't squeak rubbing against the skirt. Great idea in concept- but really looks like ****! And if the job is done correctly they shouldn't squeak anyway. That part comes from having a good tight fitting riser.
 
OP
R

robs400

Well-known member
Joined
Aug 19, 2010
Messages
116
Location
Central MA.
I've never seen baseboard run along cabinets! The only thing I've seen is shoe mold.

For the stairs- remove the rough treads, run the skirt (there should be an inch or so between the stringer and the drywall)- 1X10, then starting at the bottom, fit the first tread (check your rise), use lots of construction adhesive and secure with finish nails. Finish off the top of the skirt with basecap. The treads and risers shouldn't require any other trim- LESS IS MORE.

Word of caution- every tread will be a little different in size and squareness. So, don't assume that everyone will be the same dimension (there is actually a jig out on the market for this exact circumstance).

I've had some stair-guys that like to leave the treads just a smidge shy of the skirt. Thats so if the tread flexes a little it won't squeak rubbing against the skirt. Great idea in concept- but really looks like ****! And if the job is done correctly they shouldn't squeak anyway. That part comes from having a good tight fitting riser.

I'll have to go under the stairs tonight and see what the stringers look like...I'm having a hard time picturing how there is a gap that a 1X could slide into along the sides.

So you are saying I need to remove the existing plywood treads that are there? If I do that then there will only be the stringer to glue/nail to when installing the tread??
 

DPG

Well-known member
Joined
Feb 9, 2014
Messages
473
Location
Western Colorado
I'll have to go under the stairs tonight and see what the stringers look like...I'm having a hard time picturing how there is a gap that a 1X could slide into along the sides.

From the picture that you posted, your stairs were not built to be able to slide a skirt between the wall and the stringers. What you can do is rip some 1/8" masonite ito 11 1/4" strips or so and make a skirt template out of that then transfer that to the oak or whatever. The hardwood at the main floor down to the top of the 1st step - don't forget that the distance between needs to be the same as rest of the steps.
 

DPG

Well-known member
Joined
Feb 9, 2014
Messages
473
Location
Western Colorado
I'll have to go under the stairs tonight and see what the stringers look like...I'm having a hard time picturing how there is a gap that a 1X could slide into along the sides.

So you are saying I need to remove the existing plywood treads that are there? If I do that then there will only be the stringer to glue/nail to when installing the tread??

From the picture that you posted, your stairs were not built to be able to slide a skirt between the wall and the stringers. What you can do is rip some 1/8" masonite to 11 1/4" strips or so and make a skirt template out of that then transfer that to the oak or whatever. The hardwood at the main floor down to the top of the 1st step - don't forget that the distance between needs to be the same as rest of the steps.
 

ShadowRuleZ

Well-known member
Joined
Feb 27, 2011
Messages
1,916
Location
Detroit
I just did my stairs, but mine were mortised in so I had some framing that I could cover with painted quarter inch for the skirts. I had to cut the nose off the existing stairs, and then I cut oak treads to fit (I built my own adjustable wood template that I could adjust to the exact width/angle of the stair) and glued them in with a few nails in the far back. I did the next riser after each tread also using the template and cutting it a bit short. That got nailed on before I went to the next tread. I then put a piece of coved molding at the top of the risers below the treads to fill in the space.

Doing the skirt first let me not worry about getting it exact to the stairs and I could cover that gap up with the treads/risers. It's not perfect but it looks good enough to me.
 
OP
R

robs400

Well-known member
Joined
Aug 19, 2010
Messages
116
Location
Central MA.
I just did my stairs, but mine were mortised in so I had some framing that I could cover with painted quarter inch for the skirts. I had to cut the nose off the existing stairs, and then I cut oak treads to fit (I built my own adjustable wood template that I could adjust to the exact width/angle of the stair) and glued them in with a few nails in the far back. I did the next riser after each tread also using the template and cutting it a bit short. That got nailed on before I went to the next tread. I then put a piece of coved molding at the top of the risers below the treads to fill in the space.

Doing the skirt first let me not worry about getting it exact to the stairs and I could cover that gap up with the treads/risers. It's not perfect but it looks good enough to me.

Any chance you have a picture of how yours came out...even if it was just one of the steps? I have been trying to take notice of peoples stairs around here, but everyones house I go to has carpet so it doesnt help me at all. I understand what your saying, but I just want to see what the joint looks like.

Was there a reason not to make the riser full height and use a piece of cove molding? Or was it just so that you had one less measurement to try and have to hit accurately? THanks for the input.
 

K'ledgeBldr

Well-known member
Joined
Aug 22, 2011
Messages
1,925
Location
Johns Creek, GA
I'll have to go under the stairs tonight and see what the stringers look like...I'm having a hard time picturing how there is a gap that a 1X could slide into along the sides.

If they are built in the "usual" way- the outside stringers will have strongbacks (a 2X4) nailed to the side, bottom edge. This is what gives you the gap between wall framing/drywall and the stringer (pic below).

So you are saying I need to remove the existing plywood treads that are there? If I do that then there will only be the stringer to glue/nail to when installing the tread??

That would be correct. If you were to leave the plywood treads in place and add the oak treads you'll throw off the rise at the first and last steps.
 

Attachments

  • p_SCD_172_09.jpg
    p_SCD_172_09.jpg
    52.6 KB · Views: 57
To avoid these ads, REGISTER NOW!

Slednut

Well-known member
Joined
Dec 20, 2012
Messages
2,550
Location
Washington state
I'll have to go under the stairs tonight and see what the stringers look like...I'm having a hard time picturing how there is a gap that a 1X could slide into along the sides.

So you are saying I need to remove the existing plywood treads that are there? If I do that then there will only be the stringer to glue/nail to when installing the tread??

Photo of my stairs with the 1" gap.
 

Attachments

  • P82A0218.jpg
    P82A0218.jpg
    128 KB · Views: 63

ShadowRuleZ

Well-known member
Joined
Feb 27, 2011
Messages
1,916
Location
Detroit
Any chance you have a picture of how yours came out...even if it was just one of the steps? I have been trying to take notice of peoples stairs around here, but everyones house I go to has carpet so it doesnt help me at all. I understand what your saying, but I just want to see what the joint looks like.

Was there a reason not to make the riser full height and use a piece of cove molding? Or was it just so that you had one less measurement to try and have to hit accurately? THanks for the input.

It was just easier for me to not have to worry about one more measurement that needed to be exact.

The heights on the first/last of mine worked out since I put down tile at the bottom and I'm going to put down a wood floor on the top.

The sides of mine are actually a 2x12 or something that has the original treads mortised in (so no stringer down the middle or on the sides). If I had stringers, I probably would have replaced the treads instead of putting them on top of the existing.

IMG_7657.JPG
 
OP
R

robs400

Well-known member
Joined
Aug 19, 2010
Messages
116
Location
Central MA.
This project has turned into a couple of them having to get completed...but what else is new....Looks like the stairs will have to get done either way tho so I have started looking into them a bit more....and it seems everyone has different ideas.

Currently, the outside stringers are up against the wall, as previously mentioned. So I thought I had two options, I could either rough cut the skirt boards and install them, then cut the treads and risers to fit in between OR install the full width threads and scribe and accurately cut (somehow??) the skirts to fit over the treads.

The first option was what I was leaning towards as I feel I could cut the treads accurately enough to give me a result I would be happy with...but in order to do that, I lose at least 3/4" of the mounting surface of the outside stringers. So if I wanted to screw the outsides of the treads down, I only have 3/4" at most of working surface to do so, so my tread edge to screw hole center would only be 3/8" which that just seems really tight to me.

I have also found that the rise of stringers is not perfect...I either have to choose that the first step will be low or that the top step will be low. If I put the treads on top of the plywood that is there, then all the steps will be around 8" of rise except the top one, which will be 7-1/4", OR I can pull all of the plywood off (and deal with the small screw to edge distance) and have the first step at the bottom have a rise of 7-1/4" and the rest at 8".

Boy do I feel lost....
 

K'ledgeBldr

Well-known member
Joined
Aug 22, 2011
Messages
1,925
Location
Johns Creek, GA
Well if it were me, I'd just rip out the entire thing and start over.

Do it right, do it once. Besides; if you were to sell, a home inspector would Red Flag the stairs because of the rise.

8" is a hefty step- 7-1/4" is ideal top to bottom. But you can have slight variances within the run. Check for current residential stair code.
 

wrenchguy

Well-known member
Joined
Sep 22, 2011
Messages
4,698
Location
NW Indiana
This project has turned into a couple of them having to get completed...but what else is new....Looks like the stairs will have to get done either way tho so I have started looking into them a bit more....and it seems everyone has different ideas.

Currently, the outside stringers are up against the wall, as previously mentioned. So I thought I had two options, I could either rough cut the skirt boards and install them, then cut the treads and risers to fit in between OR install the full width threads and scribe and accurately cut (somehow??) the skirts to fit over the treads.

The first option was what I was leaning towards as I feel I could cut the treads accurately enough to give me a result I would be happy with...but in order to do that, I lose at least 3/4" of the mounting surface of the outside stringers. So if I wanted to screw the outsides of the treads down, I only have 3/4" at most of working surface to do so, so my tread edge to screw hole center would only be 3/8" which that just seems really tight to me.

I have also found that the rise of stringers is not perfect...I either have to choose that the first step will be low or that the top step will be low. If I put the treads on top of the plywood that is there, then all the steps will be around 8" of rise except the top one, which will be 7-1/4", OR I can pull all of the plywood off (and deal with the small screw to edge distance) and have the first step at the bottom have a rise of 7-1/4" and the rest at 8".

Boy do I feel lost....
get some retired stairbuilder help, what u have is a mess as far as finishing out. its actually framed for carpet and no skirts. how old is that stairframing? if u really want skirts u'll have to sawtooth them in or rip out what u have.
 
Last edited:
OP
R

robs400

Well-known member
Joined
Aug 19, 2010
Messages
116
Location
Central MA.
I have never felt that the stairs felt steep, and no one has ever mentioned it either. The current bottom stop is 3/4" lower than the rest, and that has never been noticed either until I actually measured it. Typically I would opt to start over as well as I like to do things correct, however I see no easy way of fixing the rise issue unless another step was added in the mix, and being that the floor is finished both at the top and bottom I see no way of doing that.
 

wrenchguy

Well-known member
Joined
Sep 22, 2011
Messages
4,698
Location
NW Indiana
I have never felt that the stairs felt steep, and no one has ever mentioned it either. The current bottom stop is 3/4" lower than the rest, and that has never been noticed either until I actually measured it. Typically I would opt to start over as well as I like to do things correct, however I see no easy way of fixing the rise issue unless another step was added in the mix, and being that the floor is finished both at the top and bottom I see no way of doing that.

steep is not the issue, tripping on a 8" rise is. its different the bottom because u added the height of a finished main floor. r the ones between top and bottom 8" now?
 
OP
R

robs400

Well-known member
Joined
Aug 19, 2010
Messages
116
Location
Central MA.
steep is not the issue, tripping on a 8" rise is. its different the bottom because u added the height of a finished main floor. r the ones between top and bottom 8" now?

Yes, they are roughly 8" rise on all the "middle" steps. The rise of the first step from the finished platform/landing to the top of the first plywood step is 7.25". The rise on the last step from the top of the plywood tread to the finished wood floor above is roughly 8".

To answer one of the questions above. The stair case can be no older than the house obviously. I purchased it in 08 unfinished. So the construction of the steps would have been in the time from of 2006 I am guessing.
 

wrenchguy

Well-known member
Joined
Sep 22, 2011
Messages
4,698
Location
NW Indiana
Yes, they are roughly 8" rise on all the "middle" steps. The rise of the first step from the finished platform/landing to the top of the first plywood step is 7.25". The rise on the last step from the top of the plywood tread to the finished wood floor above is roughly 8".

To answer one of the questions above. The stair case can be no older than the house obviously. I purchased it in 08 unfinished. So the construction of the steps would have been in the time from of 2006 I am guessing.

builder set'em up 4 carpet or didn't know how set'em up 4 both ways of finish, carpet and or skirts. u can reframe to a less rise if u got about 10" of run to give up at the bottom. what does ur plywood tread measure front to back and how much does it over hang the framing plum cut? never mind, i see these go to a landing, ur stuck, carpet them.
 
Last edited:

Sureshot

ALLIANCE MEMBER
Joined
Jan 3, 2011
Messages
3,134
Location
Bridge Creek, OK
Your steps were built for carpet. They will need the nose cut off and treads installed on top if you want wood. Lots of stuff on you tube and tread kits available from HD and I am sure other places. I just did my steps and learned a ton from the vids and much searching. JMHO and I may have misunderstood some of the info here.
 
OP
R

robs400

Well-known member
Joined
Aug 19, 2010
Messages
116
Location
Central MA.
Your steps were built for carpet. They will need the nose cut off and treads installed on top if you want wood. Lots of stuff on you tube and tread kits available from HD and I am sure other places. I just did my steps and learned a ton from the vids and much searching. JMHO and I may have misunderstood some of the info here.

Why does the tread have to be installed on top of what is there already? If I do it that way it will throw my top step off....If I pull all of them off and install the new treads to the stringers it will leave my bottom one off (short) which I think I would rather.
 

wrenchguy

Well-known member
Joined
Sep 22, 2011
Messages
4,698
Location
NW Indiana
Why does the tread have to be installed on top of what is there already? If I do it that way it will throw my top step off....If I pull all of them off and install the new treads to the stringers it will leave my bottom one off (short) which I think I would rather.

ur right. i've done alot of inplace staircase jobs, its labor intensive.

if ucarpet u ain't gotta cut off the overhang. u'll have the "hollywood" style carpeted steps as opposed to "waterfall", plus u want keep ur tread depth.
 
Last edited:
To avoid these ads, REGISTER NOW!
Top Bottom