To avoid these ads, REGISTER NOW!

InTheMitten Garage Build

InTheMitten

Well-known member
Joined
Mar 18, 2013
Messages
73
Location
Michigan
Since I've been a lurker of Garage Journal for awhile, I figured now that we've pulled the trigger on this project it's time to share some of the pictures and progress along the way.

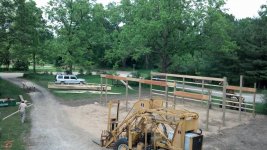
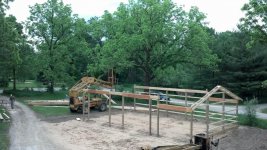
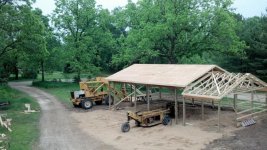
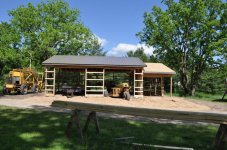
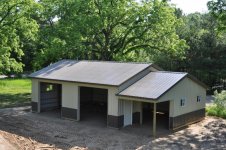
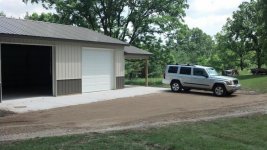
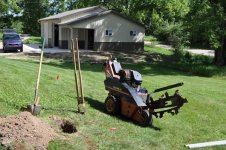
26' x 42' pole building
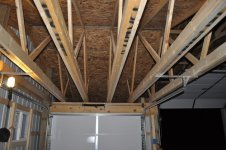
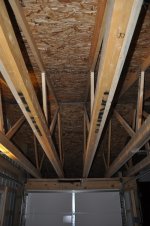
26' x 32' w/ 10' walls and scissor trusses
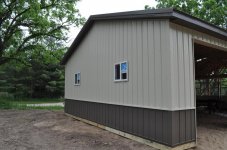
26' x 10' (remaining) w/ 8' walls and standard trusses. Adds a bit of architectural shift to things so it doesn't look totally like a box out in the side yard of our home.

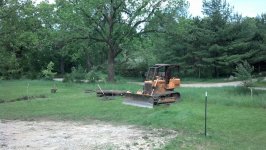
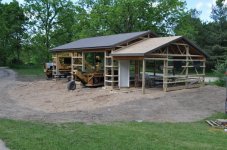
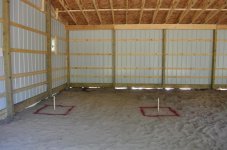
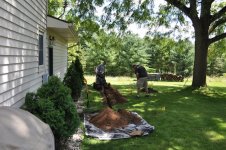
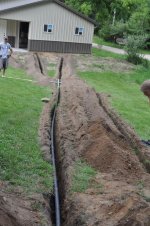
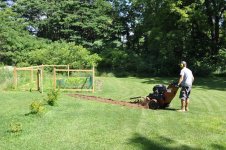
Site prep took place on Friday. With quick verification that it was "ok" to cut the phone line, the crew proceeded and knocked it out in a day. Overall I believe just over 100yds of sand was brought in to ensure everything was leveled out and compacted. Very professional crew and I'm pleased with the outcome overall.

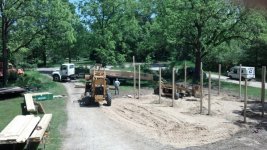
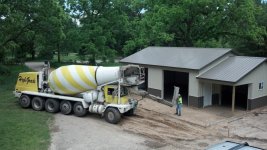
The weather is looking good today and assuming inspections go well this morning for post footings the crew should be making good progress. Will try to update at least once a day.
 

Attachments

  • IMG_20130530_155045_010.jpg
    IMG_20130530_155045_010.jpg
    134.3 KB · Views: 180
  • IMG_20130531_080801_549.jpg
    IMG_20130531_080801_549.jpg
    130.6 KB · Views: 169
  • IMG_20130531_121948_595.jpg
    IMG_20130531_121948_595.jpg
    123.1 KB · Views: 166
  • IMG_20130531_163544_175.jpg
    IMG_20130531_163544_175.jpg
    116.8 KB · Views: 173
  • IMG_20130604_070319_914.jpg
    IMG_20130604_070319_914.jpg
    96.7 KB · Views: 165
To avoid these ads, REGISTER NOW!
OP
I

InTheMitten

Well-known member
Joined
Mar 18, 2013
Messages
73
Location
Michigan
I got busy and wasn't able to post earlier so this is an update of Day-1 and Day-2!

Day 1 of the build went well. No issues with our inspections even though the township was in a slight crank about making sure they used a 19" footing cookie rather than a 16".

So far so good. By the end of day one, most all the poles were set, all truss carriers and some of the perlins were in and you could see it taking shape.

Day-2 left me wanting to be onsite to watch the progress but meetings called my attention away. Snapped a quick shot out the window when I left around 8:30am of them setting the gable truss. By 4pm when I got back all the trusses were in and sheeting on the entire large portion.

Sounds like more materials arrive on Friday and steel work can begin then.

Cheers!
 

Attachments

  • IMG_20130604_155251_650.jpg
    IMG_20130604_155251_650.jpg
    119.8 KB · Views: 281
  • IMG_20130604_122102_337.jpg
    IMG_20130604_122102_337.jpg
    125.2 KB · Views: 295
  • IMG_20130605_082047_149.jpg
    IMG_20130605_082047_149.jpg
    119.7 KB · Views: 307
  • IMG_20130605_185043_299.jpg
    IMG_20130605_185043_299.jpg
    118.4 KB · Views: 455
OP
I

InTheMitten

Well-known member
Joined
Mar 18, 2013
Messages
73
Location
Michigan
Sorry - took some time off this weekend, didn't get around to any updates. Working on more pics for you all!

Bib Overalls - Appreciated comments on the style, definitely what we were going for. Heavy consideration was given on how it would "look" since it's the first thing you see when you enter our driveway and look out the front. That birds eye shot is actually from a bedroom window to give you a perspective.

Mixed use for the building. Short end will be mainly storage of power equipment, yard tools, trailer, etc. Tall end has scissor trusses (12' to the peak) to accommodate a lift down the road. So that side is dedicated to vehicle ops! Hot rods.. yes, you're reading my mind.

Mhayden550 - appreciated and your input has also been appreciated in the planning process.

Astroracer - Grand Rapids area!

More pics coming as soon as I upload them!
 
OP
I

InTheMitten

Well-known member
Joined
Mar 18, 2013
Messages
73
Location
Michigan
Finally was able to sneak away and get some updated photos. My office is at home so needless to say, it's been hard not to get distracted from work and watch the building get completed.

Steel was on the roof on Friday of last week so we could start to get a good idea of what the dimension of things was going to look like.

Rain delay on Monday unfortunately pushed the crew back a day. Thanks Mother Nature. They made up for it on Tuesday and got the majority of the steel on. A couple minor issues had to be addressed along the way. Possibly more me being picky than anything. Panel alignment in one spot wasn't what I called stellar, plus one of our windows delivered had a broken casement - which was installed anyway!? :mad:

After some "discussions" we resolved that issue and I see things are moving forward. Really liking the color combo and the decision to run with matching trim colors by the steel. I think it gives it a softer look.

The photos show a bit more detail on the small porch area (8'x10') by the man door and the smaller garage door too.

Concrete is coming Friday - thanks for the comments!

Cheers!
 

Attachments

  • DSC_0367.jpg
    DSC_0367.jpg
    100.8 KB · Views: 317
  • DSC_0361.jpg
    DSC_0361.jpg
    133.5 KB · Views: 317
  • DSC_0358.jpg
    DSC_0358.jpg
    125.8 KB · Views: 422
  • DSC_0334.jpg
    DSC_0334.jpg
    137.1 KB · Views: 313
  • DSC_0331.jpg
    DSC_0331.jpg
    121 KB · Views: 334
  • DSC_0329.jpg
    DSC_0329.jpg
    134.5 KB · Views: 341
OP
I

InTheMitten

Well-known member
Joined
Mar 18, 2013
Messages
73
Location
Michigan
Thanks!
Agreed - the 2-tone really helps to break it up and the windows add just enough light in there so it doesn't feel like a cave.

The building crew is pretty much wrapped up. There are a couple pieces of corner trim left to get in and our man door is yet to be swapped out for a 6-panel. Otherwise they're done.

Concrete got pushed from Friday to Monday (tomorrow). They're focused on the inside and if weather permits hope to pour the aprons in the afternoon as well.

We're going with 4" interior (5.5 sack) trowel finished with one center floor drain and a minimal slope. They told me if I marked out where the vehicle hoist would be in the future that they'd drop 6" in there for us. So mark away I did.

Out front we're doing a 10' apron across the entire front. That too will be 4" (6 sack) finish. Would have liked to have gone a touch longer but we'll be doing some driveway work in the near future and we wanted to get aprons in there now rather than later.

Will snag some additional pictures once concrete is poured.

Cheers!
 

Attachments

  • DSC_0370.jpg
    DSC_0370.jpg
    146.4 KB · Views: 231
  • DSC_0380.jpg
    DSC_0380.jpg
    117 KB · Views: 229
  • DSC_0379.jpg
    DSC_0379.jpg
    82.2 KB · Views: 263
OP
I

InTheMitten

Well-known member
Joined
Mar 18, 2013
Messages
73
Location
Michigan
Concrete was a success today! Weather held on and the crew showed up around 7:30am. By 3pm they were knocking the forms loose on the apron and headed out.

I had a slight fear of rain coming in but fortunately it held off long enough for everything to setup just right. Covered the eve drip line area with plastic just in case we get a bit of rain in the next couple of days. I don't need green concrete getting worn away at all.

Looks great. A few interior shots I was able to catch this evening and exterior shots of course.

Cheers!
 

Attachments

  • IMG_20130617_211935_145.jpg
    IMG_20130617_211935_145.jpg
    105.5 KB · Views: 295
  • IMG_20130617_211850_187.jpg
    IMG_20130617_211850_187.jpg
    111 KB · Views: 302
  • IMG_20130617_151525_719.jpg
    IMG_20130617_151525_719.jpg
    89.9 KB · Views: 301
  • IMG_20130617_151901_923.jpg
    IMG_20130617_151901_923.jpg
    102 KB · Views: 333
  • IMG_20130617_135511_990.jpg
    IMG_20130617_135511_990.jpg
    100.4 KB · Views: 308
OP
I

InTheMitten

Well-known member
Joined
Mar 18, 2013
Messages
73
Location
Michigan
Thanks!

Yes, hard12catch33 - located in the GR area.

Thanks Grandamn_GT - colors are Light Stone (light color) and Terratone which is a McElroy Metals product. Ended up going with their "kynar" finish on the dark for furthering the color last, etc. Better warranty on it and not that much more of an investment.

Control joints were cut yesterday (Tuesday) morning and I finally got a chance to get out there and walk around inside. Pretty sweet!

Just heard our overhead doors are coming in next week around mid-week. No windows in the doors, just went with a nice raised panel insulated door. I believe the style is known as "ranch" and has a more horizontal / rectangle raised panel over the traditional squares. The thought was it would be "less busy" with the larger doors.

OH doors will be truss profile on the scissor trusses and I'm looking at the LiftMaster 3800 series side-mount units for openers.
 
OP
I

InTheMitten

Well-known member
Joined
Mar 18, 2013
Messages
73
Location
Michigan
Nothing much new to report since concrete has been down. Builder showed up and swapped our man door out for the proper 6-panel and finished up the two pieces of corner trim that needed to be installed. Looks good.

Overhead doors will be installed tomorrow so more pictures of what I hope is a finalized building look.

We've been looking at our exterior lighting options and have been leaning toward recessed can lighting in the eves. Maybe 2 per door then a series of 4 under the porch area. I was concerned about space being an issue in the framing of the overhangs and then discovered some cool LED recessed fixtures at HD today. They can either be retrofitted onto existing can lights or right on a standard junction box - which is what we would do in this case.

Considering a quick scuff of those trim rings though and a can of paint to try and come closer to the Terratone color!

Thoughts?
http://www.homedepot.com/p/Commerci...e-LED-Trim-CER5741WH/203490009?N=bvlwZ1z115g2
 

astroracer

Well-known member
Joined
Jun 22, 2005
Messages
3,001
Location
Mid_Michigan
The lights should work well. See if you can find a similar color in the Krylon "Fusion" line of spray paints for plastic. Scuff the trim with scotchbrite and spray it.
Mark
 
OP
I

InTheMitten

Well-known member
Joined
Mar 18, 2013
Messages
73
Location
Michigan
The lights should work well. See if you can find a similar color in the Krylon "Fusion" line of spray paints for plastic. Scuff the trim with scotchbrite and spray it.
Mark

Good call Mark! I've been considering that stuff to paint the faux shutters on our house too. Just took a measurement of the eves today and need to snag one of those lights to see how it's going to work out.
 
OP
I

InTheMitten

Well-known member
Joined
Mar 18, 2013
Messages
73
Location
Michigan
To my surprise we had more action today than I expected! Dirt work, garage doors and inspections.

I needed to have some extra gravel brought in to bring the driveway and apron together and eliminate additional washing of dirt that we were having. We had quite the rain storm on Monday roll through which resulted in me having to shovel 1/2 yard of sand back in place. Not fun but could have been worse.

Used the same excavating crew that did the site prep. Outstanding guys to work with and they like our project had easy access to get to. Just ran with regular road gravel for now as eventually it will all be paved or concrete.

Doors look great and operation is very smooth. Super happy with them and the decision to go with truss profile tracks.

Final inspection went off without a hitch too! About a 5 minute walk through with the inspector. "Nice building - move your stuff in." OK!

Took more measurements for electrical service. Looks like we're about 112' - 115' from point a to point b. Planning a 200 amp panel (future thinking), extra conduit for communications line and whatever else. Still toying with the idea of a water line out there just for car washing.

Just a couple quick pics I took. Will be taking more of the inside and posting later.

Cheers!
 

Attachments

  • -1.jpg
    -1.jpg
    104.9 KB · Views: 249
  • -2.jpg
    -2.jpg
    93.3 KB · Views: 337
To avoid these ads, REGISTER NOW!
OP
I

InTheMitten

Well-known member
Joined
Mar 18, 2013
Messages
73
Location
Michigan
Looking for insulation recommendations for the inside if anybody would like to toss out some opinions.
 
OP
I

InTheMitten

Well-known member
Joined
Mar 18, 2013
Messages
73
Location
Michigan
No updates in awhile. At a standstill currently. Seamless gutters were to be put on last week but when the crew showed up I noticed their color was wrong. So... rescheduled for this week!

Been taking a lot of measurements inside to determine insulation amounts needed for the walls themselves. With a particular home improvement store running a promo right now... it's enticing to pick up all the bats needed to do the walls.
 
OP
I

InTheMitten

Well-known member
Joined
Mar 18, 2013
Messages
73
Location
Michigan
I like it a lot! Love looking at this stuff, saving ideas for one day...

Thank you!
Gathering ideas is one of the best things you can do. Plus, if you know people with garages and can go hang in their space for a bit to get a feel for certain elements, that really helps with determining what will work for you and what doesn't.
 
OP
I

InTheMitten

Well-known member
Joined
Mar 18, 2013
Messages
73
Location
Michigan
Latest update.

Seamless gutters are up - look great too! Very happy with the way those turned out and just in time for a storm.

Just finished up the first coat of the concrete sealer this afternoon. Coat #2 will go on tomorrow and hopefully I'll be able to catch a couple photos then too.

Was able to take advantage of a couple good sales recently and picked up pretty much everything needed for our electrical work. Progress!

Cheers!
 
OP
I

InTheMitten

Well-known member
Joined
Mar 18, 2013
Messages
73
Location
Michigan
Finally getting around to some updates with photos! Been super busy work-wise which hasn't left for much fun time with the garage.

Concrete has all been sealed inside. The product I used was Dayton Superior's Tuf Seal J35 (see attached pic). Super nasty stuff. Full respirator, gloves, etc. when applying. It's fairly caustic and appears to etch the concrete on contact - at least that's what I gathered from the paint it ate off my trailer...
Went on great. Ran 2-coats, one perpendicular to the other and within 2-hours you can walk on it. 12-hours heavy use. Same stuff they use in big industrial manufacturing plants. We'll see how it holds up.

Gutters were installed and just in time for a few big rain storms here. Very nice to have the water somewhat under control. Still need to bury drain pipe but we'll get there.

Picked up the majority of our electrical supplies and we'll start to plug away at that when time allows.

Today I snagged 1" direct burial gas line to run out there. 125' plus the ends needed to do it right. I estimated a bit longer than we need and consider this "cheap insurance."

Picking up the trencher on Sunday and we'll get to working everything into the ground.

Cheers!
 

Attachments

  • IMG_20130731_202339_755.jpg
    IMG_20130731_202339_755.jpg
    62.5 KB · Views: 104
  • IMG_20130720_095134_218.jpg
    IMG_20130720_095134_218.jpg
    28.3 KB · Views: 92
  • IMG_20130718_135314_338.jpg
    IMG_20130718_135314_338.jpg
    88.3 KB · Views: 99
  • IMG_20130718_135256_849.jpg
    IMG_20130718_135256_849.jpg
    83.5 KB · Views: 103
  • IMG_20130720_095656_375.jpg
    IMG_20130720_095656_375.jpg
    120.1 KB · Views: 90

matouse3

Well-known member
Joined
Feb 19, 2012
Messages
289
Location
Mid-Michigan
Wow, very nice looking place. Can't wait to see what you do with the inside.

I see you had a call for insulation suggestions above- any ideas on what you plan to do yet? I'll suggest spray foam but its usually not in the budget. Wouldn't hurt to get a quote or two though so that you can compare to other possibilities.
 

zcar751

Well-known member
Joined
Apr 15, 2013
Messages
831
Location
Knoxville, TN
Nice build so far. I like the color combo and the layout.
I didn't read or missed if you plan on putting up finished interior walls. If you are then I would use regular fiberglass rolls, if not I would spray foam ceiling and walls then spay them white.
 

Outlander

Well-known member
Joined
Jul 30, 2010
Messages
5,154
Location
Quebec, Canada
I like the small covered 'porch' area. I like to work outside and often wish I had just something over my head.

Nice build, thanks for sharing.
 
OP
I

InTheMitten

Well-known member
Joined
Mar 18, 2013
Messages
73
Location
Michigan
Wow, very nice looking place. Can't wait to see what you do with the inside.

I see you had a call for insulation suggestions above- any ideas on what you plan to do yet? I'll suggest spray foam but its usually not in the budget. Wouldn't hurt to get a quote or two though so that you can compare to other possibilities.

Thank you!
The insulation I ended up just going with bats. R19 for the walls and R30 for the roof/ceiling. A buddy of mine who use to run the family insulation business gave me some tips, we discussed doing blown in for the attic space, etc. and in the end he told me the most cost-effective way would be R30 bats for the ceiling and call it a day. So that's what we'll be doing.

Pics and full details to come.
 
OP
I

InTheMitten

Well-known member
Joined
Mar 18, 2013
Messages
73
Location
Michigan
Nice build.

Sorry if I missed it,

What size of doors did you go with?

Thanks! No worries.

The big doors are 10' x 9' then specified for ceiling profile tracks which match the 2/12 pitch inside.
The small door is just a standard 8' x 7' - all insulated.
 
OP
I

InTheMitten

Well-known member
Joined
Mar 18, 2013
Messages
73
Location
Michigan
Here we are 1-week later (ish..) from my last post and more has been accomplished.

HD made an early delivery (1-week early) with insulation and purlins for inside. Details and pics on that soon.

Last Sunday I rented a Ditch Witch for the afternoon. In addition to the services out to the building from the house, I took advantage of the time and dropped in trenches for all downspouts on the pole barn and the floor drain out the back. Also our home never had any downspout drains on the one side. In addition, we were tired of dragging 100' of hose out to the garden. In the end, we trenched nearly 800' and it's the best money we ever spent. Hand digging a few spots required a pick-axe for the clay we've got around here.

I figured a couple shots of testing out the Ditch Witch for the first time was warranted. I tackled the garden water line first. Something about not having a darn thing around me for 100' was helpful when trying to control the beast. Only 14 levers to pull and push meanwhile the thing is trying to run you over the entire time! :willy_nil

Started at 11am (due to slow tool rental people) and wrapped up around 10pm. Electrical conduit (1.5") is run in its own trench and down approx. 18-24" for code.
Nat. gas line is in the trench with a future water line that will be a 1/2" pex line run inside of 1" conduit. Then another 3/4" conduit for communications or whatever else we might want to pull out there. More on all that later.

Our focus was on getting the conduit in the ground. Then the next day I got the downspouts buried just in time before a rain storm came through.

Tired of shoveling dirt and looking forward to pulling some wired!

Cheers!
 

Attachments

  • DSC_0421.JPG
    DSC_0421.JPG
    129.3 KB · Views: 115
  • DSC_0428.jpg
    DSC_0428.jpg
    108.9 KB · Views: 128
  • DSC_0414.JPG
    DSC_0414.JPG
    144.6 KB · Views: 116
  • DSC_0398.JPG
    DSC_0398.JPG
    134.3 KB · Views: 111
OP
I

InTheMitten

Well-known member
Joined
Mar 18, 2013
Messages
73
Location
Michigan
It's apparent that I'm on a 2-week post cycle here. Sorry for the lag in time guys!
Making more progress but it's a lot slower as I get into items that require help from others with experience in areas that I don't have.

Since the last post I've made some structural additions to the building and have made progress on the electrical service.

All of the standard trusses on the short side of the building have been beefed up to use the above open area as storage. Each truss has been sistered up by a 2x6x18 on each side of the bottom cord. A little tricky in spots but I got them up there, free spanning 18' and just need to add a couple sheets of plywood and it's a sweet storage loft!

Progress has been made on the electrical service. Got the panel mounted and with a little bit of figuring I have it set so our steel trim (J-channel) will be flush with the edge of the box. Ignore the nasty steel I was using as my guide. Leftover piece that had been sitting outside.

With the final conduit connections made in the pole barn and the house we measured up and got the service feed cable pulled in without too much hassle. 124' in total.

More on the electrical layout and progress soon. Cheers!
 

Attachments

  • DSC_0458.JPG
    DSC_0458.JPG
    69.3 KB · Views: 129
  • DSC_0459.JPG
    DSC_0459.JPG
    124.5 KB · Views: 124
  • DSC_0453.JPG
    DSC_0453.JPG
    43.3 KB · Views: 133
  • DSC_0456.JPG
    DSC_0456.JPG
    92.3 KB · Views: 113
OP
I

InTheMitten

Well-known member
Joined
Mar 18, 2013
Messages
73
Location
Michigan
I have been slowly picking away on things since my last update. We're connected between the house and the pole barn now, roughed in a plug so we can operate lights out there as we continue to pull wire.

Worked up a simple electrical layout, trying to "zone" things in a logical format. We pulled quite a bit of the long runs through this evening to feed many of the outlets along the walls. Switch feeds for the lights were also run and now we need to piece in the rest of it.

A touch nervous about popping holes in the soffit for our recessed can lights, but "measure twice cut once" and we should be fine.

Anybody have a suggestion for cutting those holes at all?
Will post more photos once additional progress is made.

Cheers!
 
To avoid these ads, REGISTER NOW!
Top Bottom