To avoid these ads, REGISTER NOW!

Iron Hill smithy

Vice

Active member
Joined
Jun 15, 2018
Messages
27
Location
USA
Hello everyone well Today I made the last step I needed to prepare for my home forge set up to be in working order. The leg vise has been mounted, and with it, all three main components to the shop are fully armed and operational (for the most part).

I have not found a local source of bituminous coal, so for the moment I have only run my forge off of store-bought charcoal brackets ( having worked with regular coal and coke for five years in my local blacksmith shop I hate using this charcoal)

View media item 89906
Here is the whole shop at the moment.

View media item 89907
Here are the three main parts of the shop: the forge, the Anvil, and the newly set up Leg Vise.

View media item 89908
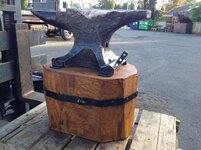
Here we have the Main forge and Anvil. The forge at the moment is a portable forge my parents found at a yard sale, but the eventual plan is to make a more permanent forge structure from the sandstone blocks around it. I am also going to have to find or make a new stand for my current anvil due to it being too short. The Anvil its self was my great grandfathers and came from my families homestead, and it shows its age so for the moment it will be used but I don't exactly want to try refacing it cause at that point it loses some of its characters but what do yall think I should do with the old girl?

View media item 89905
And here is the Leg vise I have a thread started that will be focused on the restoration of this vise because it is in VERY rough shape.
 
To avoid these ads, REGISTER NOW!

wrenchguy

Well-known member
Joined
Sep 22, 2011
Messages
4,697
Location
NW Indiana
Can't argue with success! looks great.

i actually need a real blacksmith 4 a project i'm refurbing.
 

lis2323

Well-known member
Joined
Dec 25, 2016
Messages
3,234
Cool setup! Iron Hill. I love the name.


Sent from my iPad using Tapatalk
 

oldironfarmer

Well-known member
Joined
Jun 25, 2016
Messages
6,664
Location
Terlton, Oklahoma
You're getting there.

Charcoal briquettes are unsuitable for blacksmithing, as you know. Real charcoal is a little more expensive but works well. Look for "hardwood charcoal" or similar on the bag. Or, make your own charcoal. You can pick up leftovers from a camp fire, or better yet, build a good fire in a pit then cover with a piece of sheet metal and pile dirt on it. Let it smolder until it goes out and you'll have a pile of charcoal.

I was saving charcoal in a bucket to try in the forge and forgot and used it one day thinking it was coke brought home from a show. I really couldn't tell the charcoal was not coke.

Use the anvil like it is. I hope you know they are crowned for blacksmith use, farrier's anvils are flat on top. Please don't weld or grind on it and screw it up. That anvil if fine to use just like it is. The stump looks good, if it needs to be higher put some of your rocks under it. The best way to hold the anvil on the stump is to cut boards the shape of the curves on each side and screw them to the stump. They will keep the anvil from walking. Anvils need to be able to bounce so don't try to tie it down.

A blacksmith shop takes four parts. You need a slack tub.

Keep posting, we want to watch what you do. Pictures are great!

Welcome to Garage Journal.
 
To avoid these ads, REGISTER NOW!

lis2323

Well-known member
Joined
Dec 25, 2016
Messages
3,234
Lots of different ways to secure your anvil. Here’s how I mounted mine.

2e022c0c796cc7494265ece5c5dccf97.jpg7c2b15019d2b799352cc6404342dbb75.jpg

Enjoy your new smithy!


Sent from my iPad using Tapatalk
 

Attachments

  • 2e022c0c796cc7494265ece5c5dccf97.jpg
    2e022c0c796cc7494265ece5c5dccf97.jpg
    590.5 KB · Views: 0
  • 7c2b15019d2b799352cc6404342dbb75.jpg
    7c2b15019d2b799352cc6404342dbb75.jpg
    431.2 KB · Views: 1

Spareparts

Well-known member
Joined
Mar 12, 2010
Messages
2,042
Location
Lansing Ks.
We used the bottom of an old utility pole, about 30". Got it from the utility Co, it had the top broken off from a tornado. We have a large vise bolted to it for about 30 yrs. Your utility co will more than likely give it to you instead of then having to dispose of it.
 
OP
V

Vice

Active member
Joined
Jun 15, 2018
Messages
27
Location
USA
Back in the forge again we go. This time just some pictures to show what I will need to be doing to the shop in the coming weeks/months.


View media item 89940
Here is the covering of the shop. It was mostly made as a temporary structure until I got the shop fully operational and could afford to use properly treated lumber instead of freshly cut trees.

View media item 89934
Here is the front post by far the worse of the two. It has nearly rotten through, and I am not sure how much longer it can stand on its own. For the moment we have a metal pole bracing it up in case it decides to fall before we get the lumber to replace it.

View media item 89936
Here is the rear post. It is in much better shape than the front post. For some reason, it isn't as rotten if at all like the front post is. But we still will replace it at the same time as the other post once we get the lumber for it.
 

Seppala

Well-known member
Joined
Sep 2, 2014
Messages
720
Location
North Fork of Long Island, N.Y.
The edges are pretty beat on your anvil. Forge or fabricate a 2 inch tall square or rectangular shaped block that will fit in the hardie hole. Grind the edges for what your needs will be.
 
OP
V

Vice

Active member
Joined
Jun 15, 2018
Messages
27
Location
USA
Quick update on the forge.

I opened up the vise and took apart the pivot part as well as taking off the outer jaw. Cleaned it up a bit and put a whole new nut bolt and washers on it. Here is the vise after being given new life and opening up under its own power.

View media item 90142
 
To avoid these ads, REGISTER NOW!
Top Bottom