To avoid these ads, REGISTER NOW!

Is this a crazy idea?

Kristang

Well-known member
Joined
Sep 2, 2018
Messages
92
Location
Minneapolis
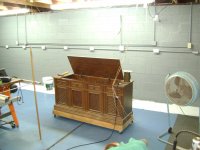
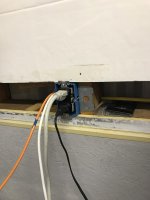
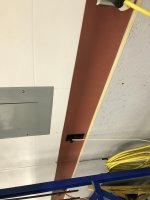
Hear me out. I just finished framing my 26x28x12 stick built garage. I am going to use steel liner panels for the interior walls and ceiling. I have been racking my brain trying to figure out how to mount my outlets and switches flush with the wall panels. I don't like conduit, so that is not an option! Lol I can mount 2x4's horizontally between the 2x 6's to attach the steel to the garage framework and mount the electrical receptacles horizontally but cutting the steel for the boxes will be awful with a 12' long sheet! So, here is my perhaps, "crazy" idea. What if I run steel 3'(or ?) up from the floor, then do a 2' strip of drywall around the perimeter for my receptacle boxes and then steel from the drywall to the ceiling? If I did this, what could I use to finish the edge between the steel and the drywall? In my mind I can use a different color on the bottom steel, then do a checkered border on the drywall and then white to the top. Makes sense in my brain! What do you guys think?
 
To avoid these ads, REGISTER NOW!

jdewitt

Well-known member
Joined
Feb 27, 2019
Messages
328
Location
Here!
Keep all your wiring inside the 2' horizontal section and you can uncover it at any time to make upgrades, add receptacles or run other services. Use plywood and design it to be removable.
 

rsanter

Well-known member
Joined
Dec 22, 2007
Messages
18,493
Location
visalia ca
I would do steel from the floor and then from the ceiling leaving the gap in the middle.
I would not use drywall but I would use another section of steel or perhaps aluminum.
I would make this part removeable without disturbing the top or bottom sections
 

markushofer27

Well-known member
Joined
Feb 4, 2012
Messages
114
Or u can leave some extra slack at each box a nail em as u put the sheets up so u stay centered between the ribs, a step bit and tin snips after the sheet is up makes it pretty easy.
 

tonyciambrone

Well-known member
Joined
Nov 4, 2015
Messages
1,152
Location
Northern Illinois
you should learn to love conduit

nothing is better than exposed work in my opinion
easy to trace, easy to modify, easy to expand. Electrical in the walls is for houses.
 
OP
K

Kristang

Well-known member
Joined
Sep 2, 2018
Messages
92
Location
Minneapolis
Or u can leave some extra slack at each box a nail em as u put the sheets up so u stay centered between the ribs, a step bit and tin snips after the sheet is up makes it pretty easy.


That thought crossed my mind too.

Conduit just looks too "industrial" for me.
 

gregs

Well-known member
Joined
Mar 16, 2007
Messages
1,589
Keep all your wiring inside the 2' horizontal section and you can uncover it at any time to make upgrades, add receptacles or run other services. Use plywood and design it to be removable.

I did a variation of this. I put 4' high OSB around the perimeter of my shop. Then I left a 8" gap and ran rigid insulation board the rest of the way up. So in the 8" horizontal section I used it as a chase to run my various electrical circuits both 120 and 240. For the outlet boxes I used the remodeler kind that have the adjusting screw to move them in out to get them perfectly flush. After everything was laid out and finished, I made a cover strip out of that thin luan type plywood. Made a jig to cut out for the boxes and used screws to attach it. Painted the OSB gray, the cover red, and the insulation is white. I have already opened it up a couple of times to add various extra outlets like dedicated 220v outlets for my window a/c's.
 
OP
K

Kristang

Well-known member
Joined
Sep 2, 2018
Messages
92
Location
Minneapolis
I did a variation of this. I put 4' high OSB around the perimeter of my shop. Then I left a 8" gap and ran rigid insulation board the rest of the way up. So in the 8" horizontal section I used it as a chase to run my various electrical circuits both 120 and 240. For the outlet boxes I used the remodeler kind that have the adjusting screw to move them in out to get them perfectly flush. After everything was laid out and finished, I made a cover strip out of that thin luan type plywood. Made a jig to cut out for the boxes and used screws to attach it. Painted the OSB gray, the cover red, and the insulation is white. I have already opened it up a couple of times to add various extra outlets like dedicated 220v outlets for my window a/c's.

Do you have any pictures? I would really like to see what you did for the cover.
 

bobj49f2

Banned
Joined
Nov 13, 2009
Messages
430
Location
SE Wisconsin
Sounds like a lot of planning and extra work. For our pole building with 15' walls we used OSB from the floor up to 8', and corrugated steel above that to the ceiling. We used the OSB for few reasons. First, if it got damaged or we wanted to add something to the electrical we could fairly easily remove a sheet or two. The corrugated would be a mess having to remove more panels to access behind another panel. Second, we can hand shelves or cabinets. Third, kind of goes with the first, we can paint it any color we want. We used the electrical boxes with the holding ears that clamp into the OSB. On the steel ceiling, for the outlet boxes for the lights, hanging cord reels and the fans we located the flattest areas, popped 1" holes to correspond with the holes in the outlet handy boxes, ran the BX armor cabling in and screwed the boxes to the 2x4 joists of the ceiling. You could also do this with your walls.
 

bad_idea

Well-known member
Joined
Jun 11, 2011
Messages
4,332
Location
Pasquotank, NC
I like the strip of material idea. But I think a sanded plywood painted a contrasting color would give a nicer look. Make the strips 16" and you can get 24' out of one sheet. Attach the panels with a stainless pan head and it would give a nice look and make the panels easier to remove.
 

gregs

Well-known member
Joined
Mar 16, 2007
Messages
1,589
It took some planning and extra effort but I think it was worth it. After having to install 2 extra outlets for the a/c recently, I patted myself on the back for the idea. It was so easy to add the outlets and they look like they have been there the whole time. I dont have any pictures on this computer. But if you look at the posts by me, there is one for my Devoe epoxy floor and it has pics of the finished wall. If I can remember I will take a couple tonight and post them. I have a section off now running tv cable and cat6 into the shop.
 
OP
K

Kristang

Well-known member
Joined
Sep 2, 2018
Messages
92
Location
Minneapolis
I like the strip of material idea. But I think a sanded plywood painted a contrasting color would give a nicer look. Make the strips 16" and you can get 24' out of one sheet. Attach the panels with a stainless pan head and it would give a nice look and make the panels easier to remove.

Im completely on board with this idea BUT I need to figure out a way to trim between the removable panels and the steel panels so it looks nice. I actually want to do a colored steel on the bottom/removable panel on top of it and then bright white from there to the ceiling. Perhaps a contrasting color on that panel or black and white checkers.
 
To avoid these ads, REGISTER NOW!

homebuilt burner

Well-known member
Joined
Dec 8, 2014
Messages
1,763
Location
central Wisconsin
You could bend something out of trim coil. When I sided my house I made my window trim and I bent the J-channel into the window trim. I also see no reason why you could not put your board, plywood, or drywall up cover it with a U shaped piece of trim coil and put J-channel on top and bottom of it.
 
OP
K

Kristang

Well-known member
Joined
Sep 2, 2018
Messages
92
Location
Minneapolis
Finish the metal edges off with some J-channel. Your plywood will just be filler panels in between.


Yes, that is what I am thinking. I was digging around the interweb this morning and found PVC trim at the big box stores that might work well for this. I have to imagine its going to be straighter for long runs than wood will be. Going to go check this product out and see if it will work. I can mount it so it can be removed if necessary and I can paint it. I can use J trim on both edges of the steel panes to trim it, although I am concerned the top J channel will collect dust/debris. Need to think through that one...
 

Bert_

Well-known member
Joined
Dec 24, 2016
Messages
9,702
Location
NW Iowa
I will flat out refuse to do flush mounted boxes in a steel wall. I have ran concealed Romex into the back of surface mounted boxes as a sort of compromise.
 

gahrajmahal

Well-known member
Joined
Dec 12, 2008
Messages
2,521
Location
Cincinnati, Ohio
In a factory you run your conduit at ceiling level, then using a drop cord for the purpose, drop cords at working height wherever you need plugs. Typically a four outlet box. In my two car attached garage I have a combination of wall and ceiling outlet boxes since there are furnace chases running overhead. You can typically upgrade your electric garage door outlet box to a four outlet pretty easy, just be sure to not overload the circuits. (Mine are all 20 amp).
 

gregs

Well-known member
Joined
Mar 16, 2007
Messages
1,589
Hopefully you can see what I did and how I did it. I sheeted the bottom 4’with rigid insulation first. It’s actually 49” high, then I covered it with OSB to provide protection. I found a plastic trim piece that capped the edge of the OSB and that’s what the “cover” rests on. After that it just lays flat on the insulation board. I just used deck screws to attach it counter sinking the holes. I set my panel so that it was above the chase which allows cables to come out of the bottom into the chase. I put 120v outlets every 4’ with 240v in between.
 

Attachments

  • CA2A5897-3977-4CB7-B715-2B4A60662DF5.jpg
    CA2A5897-3977-4CB7-B715-2B4A60662DF5.jpg
    65.2 KB · Views: 124
  • 12C0C5BF-32F5-465B-AB86-6831EE0EC251.jpg
    12C0C5BF-32F5-465B-AB86-6831EE0EC251.jpg
    55.9 KB · Views: 116
OP
K

Kristang

Well-known member
Joined
Sep 2, 2018
Messages
92
Location
Minneapolis
Hopefully you can see what I did and how I did it. I sheeted the bottom 4’with rigid insulation first. It’s actually 49” high, then I covered it with OSB to provide protection. I found a plastic trim piece that capped the edge of the OSB and that’s what the “cover” rests on. After that it just lays flat on the insulation board. I just used deck screws to attach it counter sinking the holes. I set my panel so that it was above the chase which allows cables to come out of the bottom into the chase. I put 120v outlets every 4’ with 240v in between.

Excellent! Thank you
 

Monza Harry

Well-known member
Joined
Dec 29, 2018
Messages
1,433
Location
Windsor ON
If you decide to use a wood strip in the gap make it wide enough that you can "Rabbit" both the upper and lower edges and then that will cover your unfinished metal edges. You could add a 45* or bullnose on the outer edges to reduce the dust trap, a little. Harry
 

bobj49f2

Banned
Joined
Nov 13, 2009
Messages
430
Location
SE Wisconsin
I think there is a lot of overthinking to accomplish what is wanting to be done. The steel panel system has all kinds of trim pieces that can be used to dress the edge of the metal to give a clean finish. Where our corrugated steel on the walls met the ceiling we used a channel piece that the ends of both pieces were hidden. Where the OSB and the steel meet we use a "J" channel that made a finished appearance. Wherever you're buying your steel from talk to them and ask about the different type of channels they have. Also, save yourself more time by determining the length of your steel and have them custom cut the pieces. We did that with all of the steel we used our building save a lot of time.

Although I have outlets every ten feet about waist high in the OSB I also have four retractable cord reels hanging from the ceiling. Eliminates for extension cords in most cases.
 

Norcal

Well-known member
Joined
Mar 16, 2008
Messages
13,752
Hey, I resemble that remark:).

I was working with a cinder block wall though.

I think your idea is great.

Dennis

Not trying to be mean and nasty, but your choice of handy/gem boxes are the worst choice of boxes one can make, there is very limited cu in capacity, the device screws have to be shortened anywhere there is a fitting entering the ends, a 4 square box with a 1/2" raised device cover is so much easier to wire & cleaner looking + does not scream "DIY job" like a handy box does. The raised device covers offer the choice of a single or double duplex receptacle(s) without changing the box.
 
To avoid these ads, REGISTER NOW!
Top Bottom