To avoid these ads, REGISTER NOW!

I've started my garage floor...

TheBanker

Well-known member
Joined
Feb 22, 2010
Messages
428
Location
Franklin, Tn
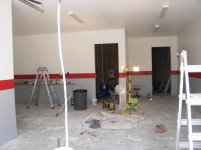
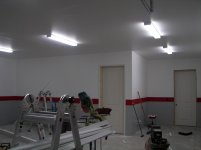
Ok, I've started my several week process of painting my garage floor. I usually only get about one day a week to work on it so it will be a slow process. I still have not decided on a covering but may just go with the cheap stuff so I can keep my total garage renovation under $3000.00. I will take pride in having it look great at low cost.

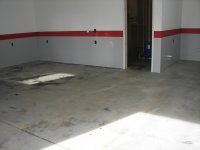
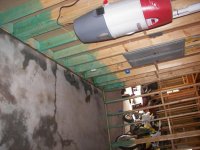
A few questions. All I am doing today is cleaning it to prepare for etching. How far in advance can you etch the concrete prior to coating? This is what it looks like now. The house is about 3 years old. As you can see I have a couple hairline cracks. I took a pic with the tape measure to show the largest part of the crack. Do I need to fill this?

attachment.php


attachment.php


attachment.php
 

Attachments

  • DSCF0121[1].jpg
    DSCF0121[1].jpg
    140.3 KB · Views: 2,836
  • DSCF0124[1].jpg
    DSCF0124[1].jpg
    140.3 KB · Views: 2,840
  • DSCF0128[1].jpg
    DSCF0128[1].jpg
    147 KB · Views: 2,819
To avoid these ads, REGISTER NOW!
OP
T

TheBanker

Well-known member
Joined
Feb 22, 2010
Messages
428
Location
Franklin, Tn
well I used that stuff to seal the small cracks. I cleaned the concrete with a regular cleaner/degreaser. It didnt work that well. I think its good enough though. I just need to clean up the few small oil stains. I believe it should be ready to etch, hopefully next weekend.
 

Attachments

  • DSCF0129[1].jpg
    DSCF0129[1].jpg
    142.8 KB · Views: 126
  • DSCF0130[1].jpg
    DSCF0130[1].jpg
    141.5 KB · Views: 128
  • DSCF0132[1].jpg
    DSCF0132[1].jpg
    148.4 KB · Views: 177

Kevin54

MEMBER EMERITUS
Joined
Jan 12, 2005
Messages
29,341
Location
Urbana, Ohio
Should I, or can I use this stuff to fill the crack?

Just out of curiosity, what if you aren't supposed to use that before doing the floor? I noticed that you asked and an hour later it was done.
Hopefully you won't have to dig it back out
 
OP
T

TheBanker

Well-known member
Joined
Feb 22, 2010
Messages
428
Location
Franklin, Tn
as you can see the crack is very small and I will be using heavy flakes so I am thinking it will be okay....????
 
OP
T

TheBanker

Well-known member
Joined
Feb 22, 2010
Messages
428
Location
Franklin, Tn
Quikcrete and Rustoleum are not as cheap as they appear. When I started adding it up they are just as expensive for WB as Epoxy-Coat for example. If I remember right Quikcete is $70.00 for 250 Sq ft. I need 500 sq ft. Since it is WB then I really should do two coats. So that would be 4 x 70 = $280.00 plus I want clear coat, thats another $140.00 for a total so far of $420.00. Now that is not including all the tools and such that are included in some kits. I think Epoxy-Coat was something like $484.00 for 500 Sq ft including clear and all tools.
 

Frogday

Active member
Joined
Oct 9, 2009
Messages
26
I used Epoxy-Coat to do mine a few weeks ago. Ended up using three of the 500SF kits to do 1000SF in three parts. I used the base coat/clear coat with heavy chips. The Epoxy-Coat will likely fill your small cracks, but you may have to spread it thick to get it to fill in the wider areas where the crack has broken out.
 

Frogday

Active member
Joined
Oct 9, 2009
Messages
26
I think I used about 12-14 lbs of chips to do just over 1000sf. The floor is gray with charcoal, milkweed, and cocoa brown chips. I am very pleased with the results. I put down the base and chips and then waited overnight and followed up with the clear coat.

Here are a few pictures:
garagefloor2.jpg


garagefloor1.jpg


garagefloor3.jpg
 

gabeancounter

Well-known member
Joined
Jan 8, 2010
Messages
914
Location
east bumble
Frogday, floor looks great. Did you have any product left over since you bought 1500sqft of product for the 1000sqft? More to the point, does the 500sqft kit cover 500sqft? thanks.. really like the chip combo .. might steal that mixture.
 
OP
T

TheBanker

Well-known member
Joined
Feb 22, 2010
Messages
428
Location
Franklin, Tn
Frogday, man that looks great! Your flake distribution looks good, very even. Did you do small sections at a time by painting then flaking then painting, ect. Or did you use the spike shoes and paint the whole thing then go back and flake?
 

Frogday

Active member
Joined
Oct 9, 2009
Messages
26
I'm sure the 500sf kit would cover 500sf, but the way I did the whole garage in three parts it seemed easier to just add another kit. I used all three kits.

I started out doing a 10'x10' section at a time. I marked the area with some tape to stay inside 100sf and did the first 400sf that way. Mix epoxy, spread it, roll it, then mix the next batch, spread and roll in the next area. Then go back to the first section and back roll then chip. I used spike shoes while putting things down, it makes it a lot easier being able to walk around on it.

It took me three weekends since I had to move cars and garage stuff around to clear each area. I would clean the floor Saturday afternoon, then put the epoxy on at around 6pm. The instructions say the clear needs to be put down within 18 hours, so Sunday morning I was doing clear each time. The floor temp was 59f and base coat and clear coat lost the tacky feel right at 12 hours of curing. I was doing the clear all in one section, just mixing the whole 500sf batch at one time.

The floor was fine for light foot traffic by Monday night and by Tuesday I was moving things to clear the next section. By Wednesday night I was putting cars on it that live in the garage. If I were doing it over, I'd mix full 500sf batches at a time to avoid the measuring. No matter how careful I was in measuring, it never seemed to work out exact. I used the stick and also bought some paint cups, but pouring a whole bucket of each part and mixing was easiest. I did end up with about 4lbs of extra chips, but I think I ordered about 18lbs because I didn't want to come up short...better to have extra chips than a section that is really light compared to the rest.

I have two lifts arriving sometime in the next hour, so I'll be putting those together over the next few days. :beer:
 

gabeancounter

Well-known member
Joined
Jan 8, 2010
Messages
914
Location
east bumble
Frogday,
Hopefully your lifts arrived in good shape. One other question concerning the use of the squeegee. Is it really necessary to use a squeegee or can it be spread using a 18" roller. I know HD has some cheap 18" for $6 but not serrated? I am not buying the kits but in bulk and trying to figure out what tools I really need. Thanks
 

Frogday

Active member
Joined
Oct 9, 2009
Messages
26
Frogday,
Hopefully your lifts arrived in good shape. One other question concerning the use of the squeegee. Is it really necessary to use a squeegee or can it be spread using a 18" roller. I know HD has some cheap 18" for $6 but not serrated? I am not buying the kits but in bulk and trying to figure out what tools I really need. Thanks

I'd definitely use the squeegee, it is the easiest way to spread the epoxy evenly in the area. I used what came in the kit and put it on an aluminum pole I picked up at Home Depot. The squeegee that comes in the kit looks like it is inexpensive, but does the job well. It wasn't the serrated type.

I would buy or make some spike shoes. If you have some old golf shoes you don't care about, they should work fine. I'd definitely get some inexpensive squeegees and 3/8" nap rollers for fine surfaces. Having a pole to put the roller and squeegee on made it a lot easier to spread the epoxy without bending over the whole time. Use the squeegee to spread it evenly in the space you are doing, then follow up with the roller to even it out. You will see what a difference the rolling makes. After the initial rolling, I was back-rolling perpendicular to the first rolling after 10 minutes. I'd also get a mixer that goes into a drill motor, and some buckets.
 
To avoid these ads, REGISTER NOW!

gabeancounter

Well-known member
Joined
Jan 8, 2010
Messages
914
Location
east bumble
I think I am going with the epoxy-coat as well. Looking to get the prep work done this weekend and hopefully install next weekend.
 
OP
T

TheBanker

Well-known member
Joined
Feb 22, 2010
Messages
428
Location
Franklin, Tn
Do you need much prep work? What size is your garage? Are you gonna post pics of your progress?

I have a riser that runs along two walls about 6' deep. I think my plan is to start at one end and do the riser all the way around first then do the main floor. I am planning on very heavy flake so I want to finish the vertical area on that riser with the flakes. Not sure if that is best if anyone has other ideas. Its alot of trim work with the wall, sink, water softener and cabinets. Not sure how i am gonna flake under the sink and cabinets.
 

gabeancounter

Well-known member
Joined
Jan 8, 2010
Messages
914
Location
east bumble
Banker,
I am going to do my main garage upstairs and the basement garage at the same time around 1350 sqft for both. I have some pics at home but here is the outside. I think you are correct in doing the ledge first with a small batch so you can sweep up the extra flake. Then apply the rest of the floor. Luckly I do not have any ledges.
 
Last edited:

gabeancounter

Well-known member
Joined
Jan 8, 2010
Messages
914
Location
east bumble
I am thinking I don't need a lot of prep. Just got to get up all that sheetrock mud etc from the basement project I have going. I am going to buy that purple stuff and give a good scrub then use the bond-loc from lowes to etch and clean again. We will see !
 

Frogday

Active member
Joined
Oct 9, 2009
Messages
26
Do you need much prep work? What size is your garage? Are you gonna post pics of your progress?

I have a riser that runs along two walls about 6' deep. I think my plan is to start at one end and do the riser all the way around first then do the main floor. I am planning on very heavy flake so I want to finish the vertical area on that riser with the flakes. Not sure if that is best if anyone has other ideas. Its alot of trim work with the wall, sink, water softener and cabinets. Not sure how i am gonna flake under the sink and cabinets.

Make sure you don't use the epoxy out of a bucket. After about 20 minutes the bucket will start to steam as the epoxy is turning into a goopy mess. I have a 14" riser around 25' or so in the back of my garage and thought I could mix a small amount and just paint it on out of the bucket. I made it to the last 5 feet before it was steaming and goopy.

If I were doing it again, I'd do a section of floor away from the riser. Pour the epoxy on the floor and transfer it with a roller to the riser...doing the riser and section of floor at the same time. While the epoxy is spread thin, you have a good amount of time to work with it.
 
OP
T

TheBanker

Well-known member
Joined
Feb 22, 2010
Messages
428
Location
Franklin, Tn
gabean...you working on it today?

Roger that Frogday. Maybe i will do the whole raised part in addition to maybe two inches on the lower part including the riser.
 

gabeancounter

Well-known member
Joined
Jan 8, 2010
Messages
914
Location
east bumble
Yep. Finished up some wiring. Put in the two 20 amp breakers and finishing wiring the 3 way switches. Hung two doors and started triming out the doors and window. First picture was this morning after making a trash run and picking up some trim and misc from HD. Second was this evening. I should have the trim punched out in the morning and hope to finish cleaning everything out to get on the floor by lunch time.
Good thing frogday reminded us about leaving it in the bucket for triming out cause I would have probably done the same thing.
 

Attachments

  • Picture 001.jpg
    Picture 001.jpg
    124.1 KB · Views: 182
  • Picture 006.jpg
    Picture 006.jpg
    140.1 KB · Views: 170

gabeancounter

Well-known member
Joined
Jan 8, 2010
Messages
914
Location
east bumble
Got the trim and the floor pressure washed. My floor had a lot more mud & paint on it than I thought. Also there was many spots that had flooring glue from when they laid the subfloor upstairs. Stopped around 2pm to play with the kids and ride "Betsy". Still need to etch the concrete but I forgot the plastic gloves and just needed a break. Making any progress banker? Paul:thumbup::3gears:
 

Attachments

  • Picture 021.jpg
    Picture 021.jpg
    129.4 KB · Views: 100
  • Picture 022.jpg
    Picture 022.jpg
    139 KB · Views: 116
  • Picture 019.jpg
    Picture 019.jpg
    147.6 KB · Views: 97
OP
T

TheBanker

Well-known member
Joined
Feb 22, 2010
Messages
428
Location
Franklin, Tn
Got the trim and the floor pressure washed. My floor had a lot more mud & paint on it than I thought. Also there was many spots that had flooring glue from when they laid the subfloor upstairs. Stopped around 2pm to play with the kids and ride "Betsy". Still need to etch the concrete but I forgot the plastic gloves and just needed a break. Making any progress banker? Paul:thumbup::3gears:

Your getting there. Yeah its amazing the things you find on the floor when you start really looking at it and cleaning.

I did not get to do to much on it this weekend. I worked on Sat. and my wife wanted a date night Sat. night. Today (sunday) I had some school work to do, a paper due on Tue. I did straighten up a bit and its pretty much ready for me to do a quick clean then start etching.
 
OP
T

TheBanker

Well-known member
Joined
Feb 22, 2010
Messages
428
Location
Franklin, Tn
Oh and I like the paint. Thats one thing I didnt think to much about. Maybe I will paint after I finish the floor.
 

gabeancounter

Well-known member
Joined
Jan 8, 2010
Messages
914
Location
east bumble
Thanks about the paint. I painted it all gray then decided it was too much. Took a lot of paint to get it back to white. The strip was much easier than I thougth it would be. Have to see if I can get the epoxy here by next weekend or I won't worry about etching until next weekend.
 
OP
T

TheBanker

Well-known member
Joined
Feb 22, 2010
Messages
428
Location
Franklin, Tn
Any idea on how far in advance you can etch? Thats why I have been waiting, because I dont want to etch then not be able to epoxy until a few weeks later.
 

gabeancounter

Well-known member
Joined
Jan 8, 2010
Messages
914
Location
east bumble
Not sure about how far in advance you can etch. I would assume it does not matter, but just have to keep off it or make sure it is clean again before putting the epoxy down.
Does anybody know if you should use baking soda to neturalize the acid before rinising off ? I have seen it mentioned before but not sure if its really needed?
 

AlphaGarage

Well-known member
Joined
Apr 16, 2008
Messages
1,298
Location
Every Garage, AnyTown, USA
Etching with acid loosens the calcium in the concret while not effecting much else, as a result there are small voids left where the calcium used to be. Those voids offer footholds for the epoxy primer to mechanically soak into and latch onto, they also increase the surface area for those coatings that chemically bond to concrete (not all do).

Once etched those voids aren't going anywhere, so you can etch in advance. However over time the will fill with dirt etc, so if there a long delay you'll want to do a good pressure wash.

Do not allow the acid solution to dry on the concrete, the released calcium will bond again as light dust which is difficult to remove, and will inhibit the coating from adhering well to the concrete.

You should neutralize the acid, and baking soda will do the trick.
 

CreteCoater

Well-known member
Joined
Mar 4, 2010
Messages
542
Location
Central PA
If you don't want to use baking soda, mix 8 parts water and 1 part ammonia in a pump up garden sprayer and spray over the acid to neutralize.
 

gabeancounter

Well-known member
Joined
Jan 8, 2010
Messages
914
Location
east bumble
Cretecoater or Alpha,
Can you give me a quick lesson on acid etching? I got a 2 gal plastic watering bucket and two gallons of acid. I am thinking about 1/3 gallon acid and filling the rest with water. About 630 sqft so I am thinking three batches (areas)? How long does the acid take before needing to be neturalized and rinsed? Should the floor be misted before applying the acid? Thanks
 
OP
T

TheBanker

Well-known member
Joined
Feb 22, 2010
Messages
428
Location
Franklin, Tn
I don't remember gabean. Did you decide on colors and flake options? I am working on getting a couple samples. I guess I am a little **** on the colors thing.
 

CreteCoater

Well-known member
Joined
Mar 4, 2010
Messages
542
Location
Central PA
Here is what I do gabean, im sure every manufacturer has a preferred method but for the concrete overlays I install this is my method. Sweep and pressure wash the floor. While it is still damp mix Muriatic acid 8 - 1 (eight parts water, one acid) in a pump up sprayer. Spray entire floor with acid solution. When the fizzing stops you can spray 8 parts water to 1 part ammonia to neutralize. Then pressure wash everything out and wait 48 hours to do your floor.

If the acid doesn't fizz you can try adding a little more to make the solution stronger. If it still doesn't react it's likely there is concrete sealer on the slab which means you need to diamond grind (my preferred method in the first place)

Hope this helps.
 

rugerlady

Well-known member
Joined
Aug 15, 2008
Messages
1,378
Location
Michigan
We usually recommend a 4:1 mix ratio with the water to acid. You should have the concrete damp before etching. We usually recommend using the baking soda to neutralize the acid. Make sure you triple rinse the floor. After the floor is dry you should be able to wipe your fingers across is and not have any chalky residue on your fingers. If you have any questions you can call me at the office or after hours my cell # is listed on the website
 
To avoid these ads, REGISTER NOW!
Top Bottom