
To avoid these ads, REGISTER NOW!

Jacobs 633C Chuck Rebuild Question

Sheriff Roscoe

Well-known member
Joined
Feb 6, 2014
Messages
189
Location
Great Lakes State
Hi guys. I'm trying to free up my 633C chuck by taking it apart and cleaning it. I was able to remove the outer shroud as seen in the picture (The two C sections were removed also but not shown). Upon disassembly, I could feel what seemed like tiny metal chips in the gunk. I washed everything thoroughly with kerosene and reassembled. The chuck spins better but still hangs up here and there.

So back apart it comes but now I'm thinking the 3 jaws need to be removed and cleaned and the 3 corresponding channels. I'm confused however as to how to disassemble beyond what is shown here.

Any pointers?
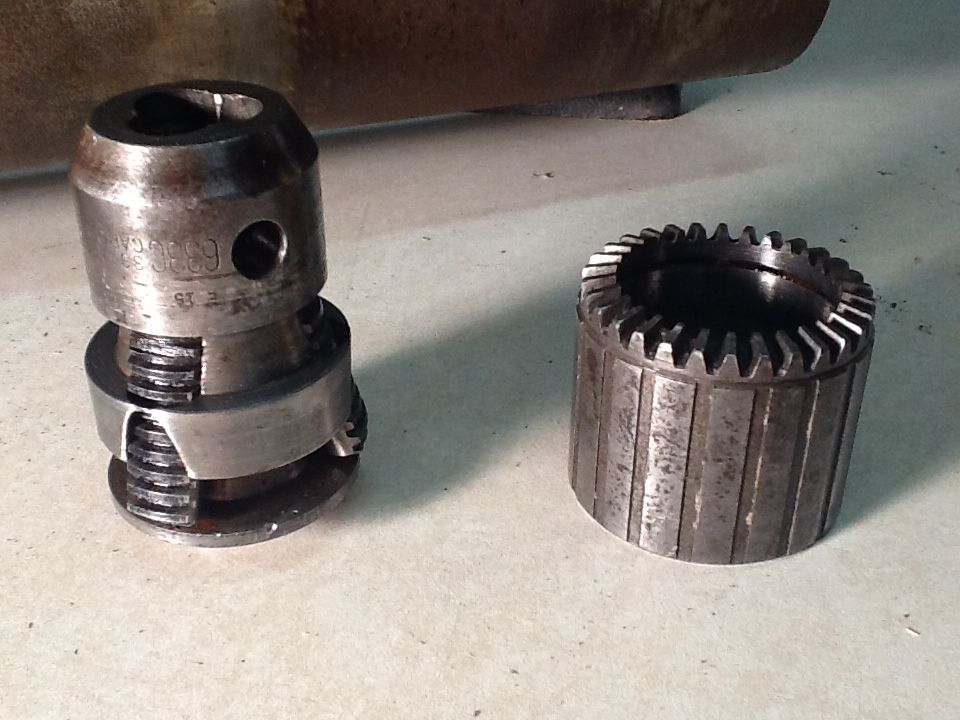
Craftsman100DPChuck.jpg
 
To avoid these ads, REGISTER NOW!

gtermini

Well-known member
Joined
Feb 1, 2013
Messages
533
Location
Amity, OR
http://www.beautifuliron.com/jacobs.htm EDIT: same as above.

I find it is usually necessary to face about .010-.025" off the end, as it gets burred over, which effects the chucks accuracy.

FWIW, I think most chucks aren't worth your time to mess with. They are so cheap to just replace.

Greyson
 
Last edited:

Davefr

Well-known member
Joined
Jan 7, 2010
Messages
11,847
Location
OR
The three gear racks come out. Just push them up and they come out thru the chuck opening. But before you do that mark them because they need to go back into the same slot.
 
To avoid these ads, REGISTER NOW!
OP
S

Sheriff Roscoe

Well-known member
Joined
Feb 6, 2014
Messages
189
Location
Great Lakes State
Thanks for the link Brent. It does say that once the chuck sleeve is off, the split nut and jaws can then be removed. Sounds simple enough but sliding the jaws out is proving to be a challenge.

Anyone know if the jaws should slide out the top (orientation as pictured above). This seems the obvious way but all three hang up before fully coming out. Perhaps I'm missing the obvious :dunno:

There is what appears to be a rivet centered inside (again from the top as oriented in the pic). I'm hoping this does not have to be drilled out as replacing it may be another challenge.
 

Davefr

Well-known member
Joined
Jan 7, 2010
Messages
11,847
Location
OR
Was typing as you posted. I'll keep working on them through the jaw opening.

Try wiggling them just a little. They're machined to pretty exact tolerances so any burr or piece of **** can make them hard to slide out.
 
OP
S

Sheriff Roscoe

Well-known member
Joined
Feb 6, 2014
Messages
189
Location
Great Lakes State
Some very light coaxing with a punch and hammer was all it took to remove each jaw. I touched the edges of each one to a wire wheel to remove any burrs and lightly filed any burrs on the edges of the jaw channels. Also did only one jaw at a time so I didn't have to worry about mixing them up.

You're right Dave; the tolerances are pretty tight. Getting the jaws back in was a little interesting but went in just fine with a little patience.

The chuck operates spins freely now except right near the fully closed position. Perhaps some excercising near this position will free it up.

Thanks for your help guys! :thumbup:
 
To avoid these ads, REGISTER NOW!
Top Bottom