To avoid these ads, REGISTER NOW!

Jared's MAC Tools workbench build

jnyost

Well-known member
Joined
Mar 19, 2009
Messages
187
Location
Central Ohio
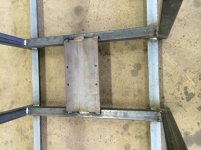
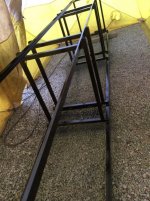
I've been contemplating my shop reorganization for quite a while and finally decided to take the leap. Part of the re-org included a new workbench built around toolboxes to help improve efficient use of space.

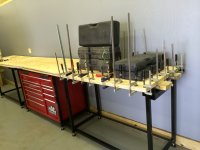
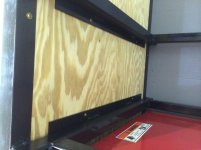
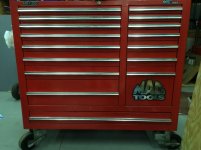
Although I already owned a MAC MB1700, it was far too tall to build a workbench around. It is 48" with casters and 42" without. The TECH 1000 was chosen to be the toolbox of choice for the workbench.

A LOT of this credit goes to the many other workbench builders on this site who have inspired some of the ideas that went into this workbench.

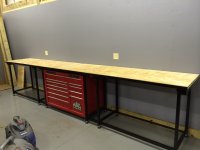
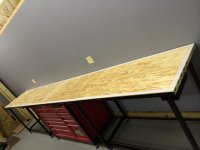
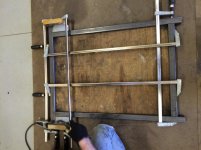
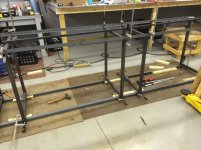
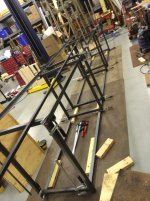
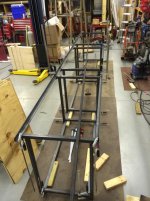
This is my MAC toolbox workbench build.....
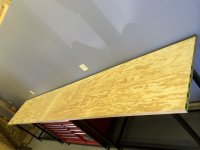
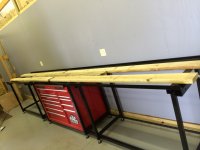
16' long
30" wide
41" high
3 Tech 1000 MAC Tools toolboxes
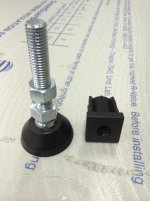
other goodies....
 

Attachments

  • IMG_5787 (Medium).jpg
    IMG_5787 (Medium).jpg
    79.6 KB · Views: 241
  • IMG_5788 (Medium).jpg
    IMG_5788 (Medium).jpg
    86.4 KB · Views: 257
  • IMG_5789 (Medium).jpg
    IMG_5789 (Medium).jpg
    71.4 KB · Views: 236
  • IMG_5790 (Medium).jpg
    IMG_5790 (Medium).jpg
    110.4 KB · Views: 280
Last edited:
To avoid these ads, REGISTER NOW!
OP
J

jnyost

Well-known member
Joined
Mar 19, 2009
Messages
187
Location
Central Ohio
Few more pics of the metal going together.
 

Attachments

  • IMG_5808 (Medium).jpg
    IMG_5808 (Medium).jpg
    100.3 KB · Views: 178
  • IMG_5795 (Medium).jpg
    IMG_5795 (Medium).jpg
    97.8 KB · Views: 171
  • IMG_5794 (Medium).jpg
    IMG_5794 (Medium).jpg
    120.6 KB · Views: 156
  • IMG_5793 (Medium).jpg
    IMG_5793 (Medium).jpg
    123.4 KB · Views: 170
  • IMG_5792 (Medium).jpg
    IMG_5792 (Medium).jpg
    112.3 KB · Views: 167
  • IMG_5791 (Medium).jpg
    IMG_5791 (Medium).jpg
    130.2 KB · Views: 188
OP
J

jnyost

Well-known member
Joined
Mar 19, 2009
Messages
187
Location
Central Ohio
I used leveling feet similar to those used by Steevo in his workbench build. Due to height, I chose not to use the locking nuts. I really don't think they'll be going anywhere.

It's hard to believe these things are rated for 3500# each.
 

Attachments

  • IMG_5915 (Medium).jpg
    IMG_5915 (Medium).jpg
    80.1 KB · Views: 128
  • IMG_5914 (Medium).jpg
    IMG_5914 (Medium).jpg
    80.6 KB · Views: 125
  • IMG_5823 (Medium).jpg
    IMG_5823 (Medium).jpg
    75.8 KB · Views: 137
  • IMG_5822 (Medium).jpg
    IMG_5822 (Medium).jpg
    83.4 KB · Views: 144
OP
J

jnyost

Well-known member
Joined
Mar 19, 2009
Messages
187
Location
Central Ohio
I welded the angle at the top of the bench upright to "wrap" the two sheets of plywood I play on using for the base of the top. It'll help protect the edges of the plywood and give it a bit of a finished look. In order to bridge the 3/16" gap between the bottom of the plywood and the top of the legs, I welded 3/16" flat stock and offset it a bit from the edge of the legs. I then drilled a couple holes in it to put screws through into the bottom of the plywood so I wouldn't have screws in the top.
 

Attachments

  • IMG_5860 (Medium).jpg
    IMG_5860 (Medium).jpg
    85.5 KB · Views: 174
OP
J

jnyost

Well-known member
Joined
Mar 19, 2009
Messages
187
Location
Central Ohio
I'm sure some of you may be wondering why there are gaps between the tool boxes. The gap on the left will be used to mount my air hose reel out of the way. I laid out the holes in the plate, welded nuts to the bottom, and then welded it in place. I'll be able to slide it in and out from the front even with the tool boxes installed.
 

Attachments

  • IMG_5863 (Medium).jpg
    IMG_5863 (Medium).jpg
    99 KB · Views: 128
  • IMG_5861 (Medium).jpg
    IMG_5861 (Medium).jpg
    93.5 KB · Views: 135
OP
J

jnyost

Well-known member
Joined
Mar 19, 2009
Messages
187
Location
Central Ohio
I mounted 2 1/2" by 1/4" box tubing at each end of the bench to work just like a hitch receiver on a truck. I plan on installing 2" tubing on items such as my bench grinder, polisher, sander, smaller vise, etc. This will allow a substantial way to affix them to the bench without it being permanent. I also drilled a hole and welded a nut over it to install a t-handle bolt to apply tension to prevent any slop and vibrations from the mount.
 

Attachments

  • IMG_5869 (Medium).JPG
    IMG_5869 (Medium).JPG
    130.4 KB · Views: 139
  • IMG_5868 (Medium).jpg
    IMG_5868 (Medium).jpg
    69.8 KB · Views: 134
  • IMG_5866 (Medium).jpg
    IMG_5866 (Medium).jpg
    84.5 KB · Views: 130

quattroJoe

Well-known member
Joined
Jan 9, 2014
Messages
586
Location
FL
Looking good! You must've put a lot of thought and planning into this project.
 
OP
J

jnyost

Well-known member
Joined
Mar 19, 2009
Messages
187
Location
Central Ohio
I'm all about the mb1700, let's see some pics!

I have two. First one, I've owned since about 1996. The other one was purchased just a couple weeks ago.
 

Attachments

  • IMG_5929 (Medium).jpg
    IMG_5929 (Medium).jpg
    85.7 KB · Views: 160
  • IMG_5930 (Medium).jpg
    IMG_5930 (Medium).jpg
    89.1 KB · Views: 142
Last edited:
OP
J

jnyost

Well-known member
Joined
Mar 19, 2009
Messages
187
Location
Central Ohio
Last Sunday I was ready for paint. A buddy and I carried it outside, sprayed it and wiped it down wax/grease remover. We then set up a temporary paint booth in the driveway and started spraying. The booth is two utility work tents salvaged from a local telephone company's trash.

I used etch primer and coated with "tractor" enamel (with hardener). We had to carry it back in that night with only the bottom coated black. Rain was coming for the next two days. After the weather cleared, it was back outside for two coats on the top. Once Wednesday evening, and another one Thursday evening.
 

Attachments

  • IMG_5900 (Medium).jpg
    IMG_5900 (Medium).jpg
    143.9 KB · Views: 116
  • IMG_5874 (Medium).jpg
    IMG_5874 (Medium).jpg
    135.1 KB · Views: 117
  • IMG_5872 (Medium).jpg
    IMG_5872 (Medium).jpg
    120.4 KB · Views: 107
  • IMG_5871 (Medium).jpg
    IMG_5871 (Medium).jpg
    99.4 KB · Views: 95
  • IMG_5870 (Medium).jpg
    IMG_5870 (Medium).jpg
    117.5 KB · Views: 108
OP
J

jnyost

Well-known member
Joined
Mar 19, 2009
Messages
187
Location
Central Ohio
Plan your work---

Work your plan---

I see that you heard that axiom, too...

Looking good...

Something that is VERY hard for me to do. Most of my projects start as ideas and come to life very quickly. I'm impulsive, and when I decide I want to build something or do something, it gets done without planning.
 

jakemac

Well-known member
Joined
May 21, 2013
Messages
9,035
Location
New England
I'm the opposite. I plan for months, changing my mind often. And then all of a sudden, I do the project "on the fly" without following my plans. I've been in my new house for 4 years now and only last month got around to putting up the pegboard for the benches I haven't built yet. I have most of the wood for the benches, but I'm still changing the plan for the framework everytime I look at the space.
 
OP
J

jnyost

Well-known member
Joined
Mar 19, 2009
Messages
187
Location
Central Ohio
I'm the opposite. I plan for months, changing my mind often. And then all of a sudden, I do the project "on the fly" without following my plans. I've been in my new house for 4 years now and only last month got around to putting up the pegboard for the benches I haven't built yet. I have most of the wood for the benches, but I'm still changing the plan for the framework everytime I look at the space.

Well I'm kinda like that, but my planning isn't on paper. My projects are always in my mind for months and then all of a sudden I get a burr up my *** to start it. Being ADD, my projects usually go unfinished also. I usually get bored with them prior to completion and move on to a different project.
 
To avoid these ads, REGISTER NOW!
OP
J

jnyost

Well-known member
Joined
Mar 19, 2009
Messages
187
Location
Central Ohio
Workbench in it's place, feet going in, and then all level.
 

Attachments

  • IMG_5913 (Medium).JPG
    IMG_5913 (Medium).JPG
    128.7 KB · Views: 143
  • IMG_5916 (Medium).jpg
    IMG_5916 (Medium).jpg
    74 KB · Views: 122
  • IMG_5917 (Medium).JPG
    IMG_5917 (Medium).JPG
    142.4 KB · Views: 125
OP
J

jnyost

Well-known member
Joined
Mar 19, 2009
Messages
187
Location
Central Ohio
Used my cherry picker to lift the box to take the casters off. Put the box on small furniture dollies and slid it into place. One in place. Other two should be here next week. Supposed to leave the warehouse on Monday.
 

Attachments

  • IMG_5919 (Medium).JPG
    IMG_5919 (Medium).JPG
    127.8 KB · Views: 253
  • IMG_5918 (Medium).jpg
    IMG_5918 (Medium).jpg
    111.1 KB · Views: 191

JDon99

Well-known member
Joined
Aug 8, 2013
Messages
1,039
Location
Desoto, MO
That a serious work bench, I like it. That receiver hitch idea is great! I may have to steal it someday. Where did you get those leveling feet? I've been planning a steel garage cabinet and thosw would work out great. Nice work!
 

JustinsGr8

Well-known member
Joined
Sep 20, 2013
Messages
358
Location
Fort Washington, Maryland
Last Sunday I was ready for paint. A buddy and I carried it outside, sprayed it and wiped it down wax/grease remover. We then set up a temporary paint booth in the driveway and started spraying. The booth is two utility work tents salvaged from a local telephone company's trash.

I used etch primer and coated with "tractor" enamel (with hardener). We had to carry it back in that night with only the bottom coated black. Rain was coming for the next two days. After the weather cleared, it was back outside for two coats on the top. Once Wednesday evening, and another one Thursday evening.

Sweeeet:bowdown:
"One mans trash........" Way to recycle the work tent:beer: , way better than buying a new one.:)
 
OP
J

jnyost

Well-known member
Joined
Mar 19, 2009
Messages
187
Location
Central Ohio
Well done, looking great.:thumbup:

Thanks!

That a serious work bench, I like it. That receiver hitch idea is great! I may have to steal it someday. Where did you get those leveling feet? I've been planning a steel garage cabinet and thosw would work out great. Nice work!

J.W. Winco
http://www.jwwinco.com/

Looks great. I will need to see that it person. It would look better in my shop. Want to build another? :)

It was a lot of fun. I'd be happy to help build one. I can't wait for you to see it in person. I still need to get over to your shop. Hopefully I'll have the other two boxes by the time you come over.

Sweeeet:bowdown:
"One mans trash........" Way to recycle the work tent:beer: , way better than buying a new one.:)

They definitely came in handy for that. VERY nice tents for free. CRAZY expensive when new.

really nice looking work bench/station please keep us updated might steal this one some day. Thanks...

You bet! Steal away.
 
OP
J

jnyost

Well-known member
Joined
Mar 19, 2009
Messages
187
Location
Central Ohio
My plans for the worktop base was an 1 1/2" of plywood with a Masonite top (that you'll see in the next post). That is a total of 4 sheets of 3/4" plywood ripped at about 30". My new table saw made the rip MUCH easier than my old contractor saw.

At 16', the worktop was going to take two sheets of plywood for each layer. Wanting everything on this bench to act as one large monolithic piece, I had to overlap my sheets to prevent matching seams. So for the bottom layer, I took one of the 8' sheets, cut it in half, and used the 4' pieces on the outside and the other 8' in the middle to bridge the seam of the top.

Top
8' - 8'
Bottom
4' - 8' - 4'

All of the plywood sections were coated with Tiebond III wood glue that was rolled onto every square inch. It was clamped around the edges, secured with some 1 1/4" deck screws in the middle, and topped with a couple hundred pounds of weight. I did a section at a time.

All pictures, except for the last one, show the work surface upside down.
 

Attachments

  • IMG_5948 (Medium).JPG
    IMG_5948 (Medium).JPG
    123.6 KB · Views: 202
  • IMG_5926 (Medium).jpg
    IMG_5926 (Medium).jpg
    76.5 KB · Views: 215
  • IMG_5925 (Medium).jpg
    IMG_5925 (Medium).jpg
    74.3 KB · Views: 192
  • IMG_5923 (Medium).JPG
    IMG_5923 (Medium).JPG
    146.1 KB · Views: 200
  • IMG_5922 (Medium).JPG
    IMG_5922 (Medium).JPG
    125.1 KB · Views: 185
  • IMG_5921 (Medium).JPG
    IMG_5921 (Medium).JPG
    120.8 KB · Views: 199
  • IMG_5920 (Medium).jpg
    IMG_5920 (Medium).jpg
    100.6 KB · Views: 195

rhtx

Member
Joined
Feb 21, 2014
Messages
10
That's going to be one heck of a bench !!! You stated you were using plywood for the top. Have you considered covering with stainless steel? I opted to go with galvanized due to the price. A good friend working in a sheet metal shop & had the edges broke & corners welded to give a 1 1/2 drop edge.
Plywood
f40bb11c-babe-4e27-9ccc-f97589cad45b_zpsdd261eaf.jpg

Galvanized steel top
103_zps9eed50dc.jpg
 

benjammn

Well-known member
Joined
Apr 27, 2013
Messages
52
Location
Chandler, AZ
oh and I like that saw, I bought a Jet cabinet for my buddies stereo shop a few years back, what a huge difference from a contractor style, so flipping easy to make fast accurate large cuts
 
OP
J

jnyost

Well-known member
Joined
Mar 19, 2009
Messages
187
Location
Central Ohio
I cut all my plywood sheets a little oversized, put all cut edges on one side, and aimed to keep that side as straight as possible. I used the straight edges of some cut plywood as a guide for a circular saw so it could be trimmed to size. After it was cut, the bottom edge was rounded with a router so it would sit flush down in the angle iron. If you look at angle closely, there is a rounded inside edge that would prevent a sharp edge from fully seating.

I had used Masonite on my previous bench and it has held up VERY well. I used it as a disposable top surface that was cheap and easily replaceable. Turns out it holds up very well and I've never had to replace it on the old bench. I also usually coat my Masonite with several coats of polyurethane (3-4). It helps seals the Masonite and keep it from absorbing any spills. It also soaks in like crazy and prevents any delamination. It helps make it a stupidly strong top.

I secured the Masonite with carpet tape and a few small dabs of wood glue. I wanted something that wasn't a huge pain to deal with if I had to replace a piece. The small dabs of wood glue could easily be sanded and the carpet tape is incredibly strong for what it is. I used screws on my last bench but didn't want any visible fasteners on this bench.

The Masonite was ripped a little oversized and put into place. It was then trimmed flush with the face of the angle using a trim bit in the router. The small gap between the Masonite and angle will be filled in with caulking. Hopefully I'll get to that tomorrow as well as sealing it.
 

Attachments

  • IMG_5957 (Medium).JPG
    IMG_5957 (Medium).JPG
    117.2 KB · Views: 158
  • IMG_5958 (Medium).JPG
    IMG_5958 (Medium).JPG
    113.1 KB · Views: 173
  • IMG_5959 (Medium).jpg
    IMG_5959 (Medium).jpg
    75.2 KB · Views: 160
  • IMG_5960 (Medium).JPG
    IMG_5960 (Medium).JPG
    112.5 KB · Views: 164
  • IMG_5964 (Medium).JPG
    IMG_5964 (Medium).JPG
    108 KB · Views: 201
  • IMG_5967 (Medium).JPG
    IMG_5967 (Medium).JPG
    114.8 KB · Views: 153
Last edited:
OP
J

jnyost

Well-known member
Joined
Mar 19, 2009
Messages
187
Location
Central Ohio
looking awesome!

Thanks!

That's going to be one heck of a bench !!! You stated you were using plywood for the top. Have you considered covering with stainless steel? I opted to go with galvanized due to the price. A good friend working in a sheet metal shop & had the edges broke & corners welded to give a 1 1/2 drop edge.

I plan on probably topping it with steel in the future. It will most likely be 3/16" or 1/4" that will be broke to have a front wrap and a backsplash. Unfortunately, it just isn't in the funds right now. There is a stupid amount of money currently invested in this project and the rest of my shop re-org (which you'll see in another thread in the short future).

oh and I like that saw, I bought a Jet cabinet for my buddies stereo shop a few years back, what a huge difference from a contractor style, so flipping easy to make fast accurate large cuts

I love my Grizzly. I spent the last 10 months researching and trying to decide on what saw to buy. The Grizzly give unparallelled performance for the price. It performs as well as saws twice it's price.
 
To avoid these ads, REGISTER NOW!
Top Bottom