To avoid these ads, REGISTER NOW!

Jib Crane & Mods

matt_i

Well-known member
Joined
Mar 14, 2008
Messages
10,722
Location
SE Michigan
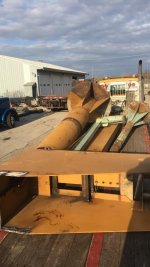
I took a nice trip to HGR surplus in Euclid/Cleveland at the start of the summer, got a couple of jib cranes for the shop and a couple of hoists.

Of course they are not turnkey but the heart of the machine is there and needed a couple mods, so I thought I'd make a build thread.

One of these cranes is going to be destined to service a workbench area, I've got a 250# limit here. The other is a 1/2 ton and is going to be setup over the main incoming garage bay.

Everything came in nice and dry....HGR stores their jib cranes out in the parking lot....so....they do grease the inner race of the tapered roller bearing on top of the column which is helpful.


Of course no crane is complete without an electric chain hoist, I ended up with two of them :) The Demag (blue one) is a 2 speed premium euro device and it was a "package deal" with the Gorbel jib crane. I held my breath on that one because they are quite expensive to buy, it was also sitting outside in the weather...but...fired up perfectly on the first try!


The second one is a CM Coffing JLC hoist, also a very expensive hoist to buy, new, and it also tested in great shape. One aside if you aren't familiar with HGR is that they take any and all items back in 30 day window if you aren't satisfied or it has major issues once powered up, etc, no questions asked. The buyer just has to provide return transportation back.

I started by dragging this ~11ft long column into the back shop which is also compromised on space because I'm supposed to be working on finishing drywall :wtf: but "scope creep" is standard practice with me.


Got it situated on the wellsaw (its classic 7x12 capacity) with a fair amount of sweating.


I have one support roller and repurposed 2x10 support :)


Cutting, the biggest question was whether I had to switch the fixed jaw over closer to the pivot point for "max cutting capacity"...which is sort of a pain due to having to move one saw guide via bolts, having to re-square the jaw with the blade, and then having to move it back and resquare it again at the end of the job. But as you can see I just squeaked by!


Done! That was definitely the easy part :)

 
Last edited:
To avoid these ads, REGISTER NOW!
OP
M

matt_i

Well-known member
Joined
Mar 14, 2008
Messages
10,722
Location
SE Michigan
So now onto phase 2 of the project...cut off the square plate and reweld it back onto the column.

Quick study of existing reveals only 1 heavy tack underneath


And what I think was probably a robot-positioned mig weld. Its perfect.


Prime mover for this job is a Metabo with their oem "metal slicer" cutoff wheels.


Just a process of slicing the weld, turn over and over.


Eventually its to a happy point where grinding sparks are seen from the other side, and then a smack from a heavy hammer is allowing the column to pull out slightly. I used 3 wheels on this project, glad I had bought that 50pack a couple years ago.


So now its time to put this back together...temporary workstation a bit higher was setup. Im using a flap wheel and the band-file to cleanup the ID of the plate..


And cleanup paint and mill scale from the tube OD


So now its time for some fixturing using 2x6s and assorted clamps.


A lot of time was spent tapping things around, adjusting clamps, and checking square all-over until I was satisfied. Kind of like the way one adjusts a 4-jaw chuck I tried to deal with opposing pairs and then work on the other pair.


So you might have noticed I don't like to grind or stick weld inside the shop due to the mess if I can avoid it. I have XL welding leads that go all the way thru the shop and to the drive in front.


So I dial up the Syncrowave to DCEP, 95A, Stick, ON...


Get some fresh 7018s


And BOOM, I have exactly nothing, no arc, checked ground, nothing. OOPS (!) it hits me, the tig welding torch and the "short ground" are still hooked up to the machine....


I have 2 sets of turnlock quick-connectors for the XL leads I just forgot a setup step :(


OK, now its working. Make a couple of tacks and check squareness all over, little more tweaking.


Some more tacks inside & out...normally I would tig weld the tacks so they could start extremely fine with minimal distortion vs. the clamping setup, but this setup is not going to easily fit back into the bench area, only to have to pull it back out for the final smoky stick welding. So its all going to happen right here.


Abridged version - pour the coals to it, trying to balance weld lengths across the OD. A little chipping and some wire brushing and it looks about the same size fillet as I had previously. Obviously not as perfect but I think it will do, I didn't grab a pic yet but the entire ID is also welded plate-to-tube which is an improvement on the original setup as well.


Got past the fun job of dragging the 150# part (?) by myself and tipping it up on the bench...whew! Its going to stay in that location and the gantry is going out to live in the new shop where it can be more useful for heavier stuff...the gantry is 4000# cap currently and tough to pull out due to this arrangement and for lifting "stuff" onto the L-shaped workbench array, is too much overkill.


That's all the progress for now, I have to attach it to the tabletop (its 1" thick A36), mount the arm, possible shimming and wire the hoist. Stay tuned and thanks for checking it out :)
 
Last edited:

zkdiesel

Well-known member
Joined
Oct 6, 2013
Messages
8,278
Location
chicagoland cornfields
What’s the price tag in cranes like that?


Sent from my iPhone using Tapatalk

I’ve gotten them in prices from free(12’ tall, 10’ reach 1/2 ton). Identical twin I paid $500 for
1/2 ton 15’ reach I paid 750
And had to give 2k for a 2 ton 14’ reach
 

Attachments

  • 31F656B1-43AA-4BFC-8879-336528B2794C.jpg
    31F656B1-43AA-4BFC-8879-336528B2794C.jpg
    71.4 KB · Views: 127
OP
M

matt_i

Well-known member
Joined
Mar 14, 2008
Messages
10,722
Location
SE Michigan
What’s the price tag in cranes like that?

So HGR Surplus works on a declining price scale. They price stuff initially at X and automatically it drops in price every couple of months down to the point where they're about to scrap it. But the general idea is that the lower the price the more people will be interested. Sometimes they have "flash sales" with 25% discounts on certain categories of items. Their business model is pretty good imo, they own none of this stuff, its all on consignment. They first deduct the cost of the trucking to Cleveland, and they split the profits 50/50 with whoever sent it to them.

In this I offered a "bulk lot price" for about 6 items, but it was ~$300 for this crane + the Demag hoist. The CM hoist was another ~$300. And I have another 1/2 ton jib waiting for attention. And the cost of driving my 5-7mpg truck to Cleveland and back :spit: buy I did smarten up slightly and get an I-pass to save on tolls :thumbup:
 

Kaizen

Well-known member
Joined
Jan 9, 2015
Messages
6,938
Location
New England
Thanks. Wouldn’t have thought it was that cheap. That’s a lot of steel!


Sent from my iPhone using Tapatalk
 

86turbodsl

Well-known member
Joined
Jul 1, 2005
Messages
6,554
Location
Michigan
I freakin love visiting HGR. I always find something i like there. And sadly never take enough money or trailer...
 
OP
M

matt_i

Well-known member
Joined
Mar 14, 2008
Messages
10,722
Location
SE Michigan
Project jib is back on!

I got a bug to advance some project to completion and marked out a few holes on the workbench, just transferred over from the post-base using a silver sharpie.


Some prep work was in the rearview mirror, the base has 1-1/4" holes punched in it and I'm using 3/4-10 bolts. Some more on that, I have basically 200 lbs hanging 8ft out = 1600 ft-lbs, on a single bolt of roughly 1/2 foot of radius, that's 3200 lbs of tension. Minor diameter is close to the tap drill size 21/32 = 4.8ksi, which is cool in a Grade 5 bolt that's 85ksi minimum. So all good on downsizing the fastener. The caps are just heavy washers that distribute the load and center it a little bit, machined out of a scrap of 1045 laying around...


After that it was an hour of magnet drilling. This tool is simply amazing when it comes to this. I stepped up thru 1/8, 3/8 and finally 21/32. I'm not sure I've ever tapped a 3/4-10 with this before, but I got the Tap Magic out and it powered thru like it was almost not there, I should have made a video. The motor has 2 geared reductions, I'm using the "high range" here. It would take days to do this by hand...


And then a step to remind me why I got the crane in the first place. Man is that arm heavy :) Had to be placed first on a 36" bench and then lifted high enough for the top bearing to seat.


Its swung right over to the wall, being out of level. An hour of messing with various shim washers, and I got it to a spot which isn't perfect but is good enough to be stationary.


After that its time for a proof test (me hanging on the end of the arm ;)) and to mount the little Demag hoist.


I decided to see if it could put a little air under the Reed 4C, and it can, effortlessly even in the super low speed of the hoist (it has 2 speeds).


Relocated the vise, which is one motivation for this move, I am planning to work on the heavy steel bench under the 2 big vises for my next project.


So the mechanical work is done here for awhile, I am currently running an extension cord over to a receptacle in the other side of the shop so another assignment is to pull wires thru the conduit and setup a 3ph receptacle near the hoist.

I still have another jib crane awaiting work, so the gears are turning, will post back when I get into that one.
 

zkdiesel

Well-known member
Joined
Oct 6, 2013
Messages
8,278
Location
chicagoland cornfields
You need a slug cutter mag drill. Start at final sizing on first lasss and actually doesn’t even cut the center, similar to a thick holesaw

Use it all the time for upfitting semi truck frames/ moving wheelbase

Digging the crane!
 

dr_clyde

Well-known member
Joined
Jan 7, 2009
Messages
6,425
Location
Holland, MI
Good stuff, Matt.

A couple of cranes are on my short list for my shop. I keep getting myself into jobs where the forklift just isn't very practical.
 

bimmer1980

Well-known member
Joined
Feb 5, 2009
Messages
2,103
Location
York, PA
Looks good! I have one beam hoist in the garage that came in handy for the forklift cylinder rebuild..... But that limits me to a 1' wide by 20' long lifting area....
 
To avoid these ads, REGISTER NOW!
OP
M

matt_i

Well-known member
Joined
Mar 14, 2008
Messages
10,722
Location
SE Michigan
This is light duty for sure, but mainly for things that are near my max lifting....and that's going down every year lol. There's an apron from a big Monarch lathe on the bench too, I tried that a couple years back and didn't have the guns to get it up there. Ended up using the gantry but the gantry is not the right tool for that space. I have plans to move the gantry (2t cap) out to the new shop area where it will be aligned with a garage bay and be so much more useful. But a 250# capacity will let me bring all kinds of stuff up for welding and/or teardown.
 
OP
M

matt_i

Well-known member
Joined
Mar 14, 2008
Messages
10,722
Location
SE Michigan
Its definitely not mainstream. :) Its heavily dependent on the ~1300 lb (48 x 96 x 1) x .283 lbs/cu-in tabletop to provide moment balance. And the ~450 lb Syncrowave also helps too.
 

Downwindtracker 2

Well-known member
Joined
Jun 13, 2019
Messages
1,715
Location
BC
For grinding out welds, I've found using a 1/8" disc , then a Zip Cut to be easier. If it's on the flat, a 7".
 

bradpac

Well-known member
Joined
Sep 8, 2013
Messages
721
Location
Central TX
Every working shop needs lifting devices. Age makes a man figure that one out. Nice setup.


Indeed. We have some younger guys around here who will get off the fork lift they are on and move something by hand. Us older gents are looking at them like they're crazy, you're already on the lifting tool, use it.
 

86turbodsl

Well-known member
Joined
Jul 1, 2005
Messages
6,554
Location
Michigan
Its definitely not mainstream. :) Its heavily dependent on the ~1300 lb (48 x 96 x 1) x .283 lbs/cu-in tabletop to provide moment balance. And the ~450 lb Syncrowave also helps too.

Indeed.

I find that i spend a lot of time working on things that lift other things. I agree with many of the posters here as i just eclipsed 50yrs.
 
OP
M

matt_i

Well-known member
Joined
Mar 14, 2008
Messages
10,722
Location
SE Michigan
o a little midway update on the project, after hanging the last piece of drywall so I could use the 48 sqft where the stack had been, I reorganized the shop and pulled out a few things. An ancient DoAll shuttle-feed automatic bandsaw, my larger 1/4 ton jib crane which had been living outside with the bearing fully buried in a blob of fluid film. This has a 12 foot arm on it, and was originally 14'3" tall and my shop is not...so here we go...


A little supporting of the big end and the little end...


You may not notice, but I had to remove both moving vise jaws because they don't open wide enough and go with the ratchet strap clamping...


No turning back now folks :eek: :D


It takes 2 cuts to get thru an 11" OD on a 10" capacity saw...this thing is truly fearsome at lopping off 1018 solid bar with the coolant going, I was downfeeding very conservatively here and coolant has been dry for a few years while I was busy building the shop extension.


I learned quite a bit after the first cut was done. First the tube is 10-3/4" OD instead of the 11" I thought I had. The wall thickness, previously unknown is 1/4", and I purposefully cut the tube 1-1/2" too long because I didn't know what kind of squareness I could expect relative to the cutoff plane. Preliminary checks with a carpenter square reveal approx 1/32" deviation across the end-cut, which is excellent in my opinion. But armed with that information I had to make a second cut at the actual dimension. I did not want to cut on a skewed plane and lose length that was not easily recovered.


Third cut is to remove the top bearing.


I did not want to get any closer to the weld for fear of cutting off the stud on which the bearing is piloted. I think I may be able to chuck that in the lathe to machine the top edge again although impressive surface speeds are going to be generated on a 10-3/4" OD...


Feeling proud I stood it up to admire it and take a picture...my Dad then asked how we were going to get it back in the shop...sheepishly I said we will have to lay it back down again....:)


I have done a little prep on the electric chain hoist, its a 1/4 ton Coffing with a slow 16fpm chain lift, just what I wanted for positioning. Only downside is its a 208v hoist by nameplate and I have 240vac. It works, but a loud buzzing from the hoist while its doing absolutely nothing was a turn-off. So....


As suspected the control transformer stepping down to 24vac for the control pendant was creating the buzzing.

Motor is a 200-208vac by nameplate so its just going to have to deal with a little extra heat :D the good news is it will be used very lightly.


But a little foray into ebay and I had a 240/208/120:24 transformer on the way. Wired in place of the other it is quite happy and silent now!


I have this great 3/4ton cap Jervis B Webb trolley, easy rolling, but a lot of height is lost on top of the hoist by virtue of the oblong link that's supplied with the trolley and the crane hook of the hoist.


However I have the answer to that, its buried in this block of steel ;)


The arrangement is this, its sized in width to the Ibeam arm of the crane:


And so now it waits for other planets to come into alignment


So that's all I have to offer right now, folks. A lot of sweatin' to cut a tube to length lol. Future plans after the tube is rewelded are to saw cut the floor and pour the crane foundation, then modify the garage door opener for clearance. I will report when meaningful progress has been made.
 
Last edited:
To avoid these ads, REGISTER NOW!
Top Bottom