To avoid these ads, REGISTER NOW!

Kaizen Foamed my Portable Box

quadrcr87

Well-known member
Joined
Jul 5, 2013
Messages
1,036
Location
Travelers Rest, SC
I have been wanting to try Kaizen foam for a while and with the quarantine in place I finally pulled the trigger.

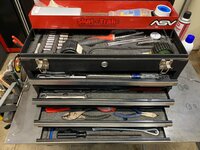
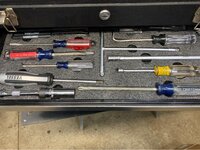
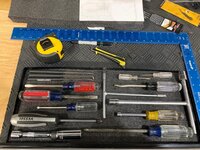
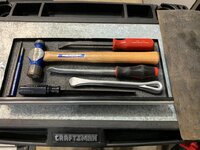
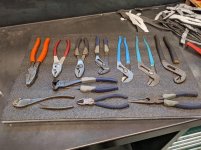
The focus was on a portable 4 drawer Craftsman Rally Box that I will take to the motocross track and off-road trips in addition to my 168 pc Husky blow molded case. The Husky box covers the basic ratchets and sockets but didn’t include some key items like a hammer, file, pliers, tape measure, etc. I was also able to incorporate some specialty tools like snap ring pliers, spark plug socket, safety wire pliers and even tire levers.

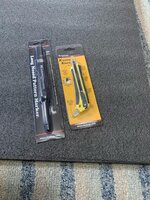
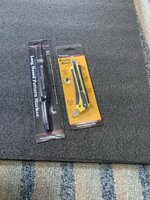
I went with the Fastcap 30mm black foam, Kaizen foam knife and long nose marker. I think Fastcap makes a great product and is leading the market.
be89327f93b398139758c1f41708e751.jpg

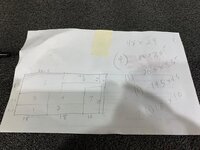
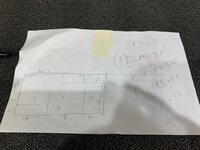
I sketched out a layout to best use the 2’x4’ sheet. I even have some left over to do a tool drawer in my office.
bb56b9439da773669a02b7cbe7a43828.jpg
5371e242c289bab90e492d308676e3c7.jpg

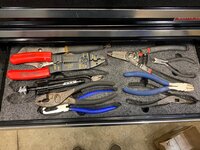
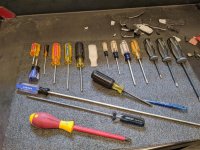
I placed all of the tools I needed in the box and determined the most efficient layout. I would say I focused more on fitment than placing like items together.
3a02c46d5b358230fb954bf61db52fcf.jpg

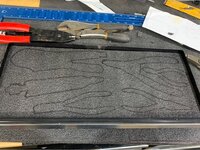
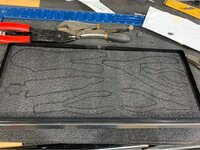
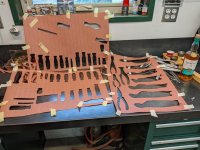
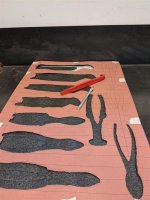
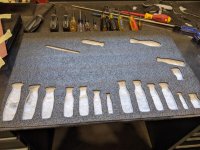
After I had a rough layout plan I pulled each drawer out of the toolbox and did all my tracing, cutting and fitting on the bench. This was also a great opportunity to grease the friction drawer slides.
51056d18f2ac90b8553b3d92c9c4d4b9.jpg
befae141ac13078ed25913216c753190.jpg
bfcb646338df0b7ca9424d54eb22e13b.jpg

After I had all the tools fitted in place I heated up a 1/2” piece of tubing with a MAP torch and carefully melted in some finger holes. I intentionally made the tools fit tight as this box is going to be bouncing around in my truck and trailer a lot.

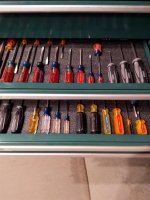
On to the finished drawers!
b6da998a1132500940bdb05c87753bfb.jpg
b9f7195d9b8bd00678f2cf924e0a6644.jpg

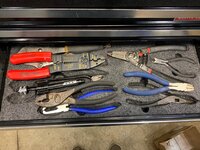
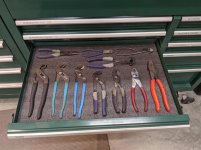
I went double layer on some of the pliers due to space limits. I put the smallest plier on the bottom. Both levels are a tight fit.
20d90f4489c7d5be9556bb80b25b7e44.jpg

433c4a2140eeddf942829313bd6bf2c5.jpg
440416601988fecaf90f6a46b9f3d9b4.jpg

The top of the box required some thought. First I had to make clearances for the locking mechanism and shelf hinges. Then I needed to consider the cantilever shelf and the clearance it needs when closed. With the 30mm foam there is not much space below the shelf so I needed a layout that still allowed access to the tools. I left the top shelf without foam as it is mostly tapes and misc supplies.
c7d95c3048ee6b17186bdd70a5caee36.jpg

The finished project
369dfc95b57cf7b848ab5498714ec67c.jpg


Sent from my iPhone using Tapatalk
 

Attachments

  • be89327f93b398139758c1f41708e751.jpg
    be89327f93b398139758c1f41708e751.jpg
    224.1 KB · Views: 9
  • 369dfc95b57cf7b848ab5498714ec67c.jpg
    369dfc95b57cf7b848ab5498714ec67c.jpg
    150.7 KB · Views: 9
  • c7d95c3048ee6b17186bdd70a5caee36.jpg
    c7d95c3048ee6b17186bdd70a5caee36.jpg
    150.5 KB · Views: 7
  • 440416601988fecaf90f6a46b9f3d9b4.jpg
    440416601988fecaf90f6a46b9f3d9b4.jpg
    154.1 KB · Views: 4
  • 433c4a2140eeddf942829313bd6bf2c5.jpg
    433c4a2140eeddf942829313bd6bf2c5.jpg
    163.6 KB · Views: 4
  • bfcb646338df0b7ca9424d54eb22e13b.jpg
    bfcb646338df0b7ca9424d54eb22e13b.jpg
    177.1 KB · Views: 4
  • befae141ac13078ed25913216c753190.jpg
    befae141ac13078ed25913216c753190.jpg
    206.5 KB · Views: 4
  • 51056d18f2ac90b8553b3d92c9c4d4b9.jpg
    51056d18f2ac90b8553b3d92c9c4d4b9.jpg
    203.6 KB · Views: 4
  • b6da998a1132500940bdb05c87753bfb.jpg
    b6da998a1132500940bdb05c87753bfb.jpg
    148.6 KB · Views: 4
  • 3a02c46d5b358230fb954bf61db52fcf.jpg
    3a02c46d5b358230fb954bf61db52fcf.jpg
    131.7 KB · Views: 4
  • 5371e242c289bab90e492d308676e3c7.jpg
    5371e242c289bab90e492d308676e3c7.jpg
    106.1 KB · Views: 4
  • bb56b9439da773669a02b7cbe7a43828.jpg
    bb56b9439da773669a02b7cbe7a43828.jpg
    132.8 KB · Views: 4
  • b9f7195d9b8bd00678f2cf924e0a6644.jpg
    b9f7195d9b8bd00678f2cf924e0a6644.jpg
    160.9 KB · Views: 3
  • 20d90f4489c7d5be9556bb80b25b7e44.jpg
    20d90f4489c7d5be9556bb80b25b7e44.jpg
    163.2 KB · Views: 9
Last edited:
To avoid these ads, REGISTER NOW!

Bogie1632

Well-known member
Joined
Feb 18, 2018
Messages
1,303
Location
Southeastern Wisconsin
That turned out nice. I've used Kaisen and other foams on hundreds of box drawers over the years (USAF = big on tool accountability + FOD prevention). Kaisen always seemed to be both high quality and inexpensive.

Did you run into any issues peeling the layers out cleanly?

V/R
Bogie
 

spyerx

Well-known member
Joined
Dec 29, 2019
Messages
134
Location
SoCal
That looks nice.
good buddy of mine is an industrial designer/engineer (think well known consumer tech company).
He purchased a bunch of high density foam, 3d scanned his entire set of tools, and water jet cut the inserts for a dozen drawers....
It looks amazing.
 

Ohmthis

Well-known member
Joined
Jan 20, 2013
Messages
3,018
Location
Outside of Louisville KY
Your drawers look great! It will no doubt help keep everything together. My problem Is I’d need twice as many drawers as I have now to do something like that. Even my portable box is crammed full, but in all honesty I need to go through it and clean old non used tools out. Great work!
 

tym

Well-known member
Joined
Mar 5, 2016
Messages
2,447
Location
MA
Your drawers look great! It will no doubt help keep everything together. My problem Is I’d need twice as many drawers as I have now to do something like that. Even my portable box is crammed full, but in all honesty I need to go through it and clean old non used tools out. Great work!
Ditto. I've acquired a number of partially full toolboxes the past couple of years. I should do something similar and re-sort all my tools.
 

infinite97

Well-known member
Joined
Aug 15, 2009
Messages
230
Location
Vancouver, WA
That looks awesome! Great job!!!

Years back, I had an opportunity to spend ~$1000 to get every drawer on my KRL box done in double layer black / blue foam. I passed, but the company that I was working with did some awesome work.
 
OP
Q

quadrcr87

Well-known member
Joined
Jul 5, 2013
Messages
1,036
Location
Travelers Rest, SC
That turned out nice. I've used Kaisen and other foams on hundreds of box drawers over the years (USAF = big on tool accountability + FOD prevention). Kaisen always seemed to be both high quality and inexpensive.

Did you run into any issues peeling the layers out cleanly?

V/R
Bogie

The product worked pretty well overall. I did struggle peeling the layers in a few spots. It leaves a bit of a rough finish a the bottom that is hard to level out. I see that Fastcap makes some special tools to assist but I didn't want to spend more on this small project. Maybe for the next one.

That looks nice.
good buddy of mine is an industrial designer/engineer (think well known consumer tech company).
He purchased a bunch of high density foam, 3d scanned his entire set of tools, and water jet cut the inserts for a dozen drawers....
It looks amazing.
I have seen some companies offering CNC machined liners and that would be great if you had a large box to do and knew your exact layout.

Your drawers look great! It will no doubt help keep everything together. My problem Is I’d need twice as many drawers as I have now to do something like that. Even my portable box is crammed full, but in all honesty I need to go through it and clean old non used tools out. Great work!

I struggles with the space limitations as well. My Husky portable box has the majority of the basic tools so I was able to do this one as an add on or specialty tool box. In college this 4 drawer rally box had almost every tool I owned including a full Craftsman USA mechanics tool set.

Ditto. I've acquired a number of partially full toolboxes the past couple of years. I should do something similar and re-sort all my tools.
Its a fun exorcise and allows you to decide what is worth keeping vs what is junk.

That looks awesome! Great job!!!

Years back, I had an opportunity to spend ~$1000 to get every drawer on my KRL box done in double layer black / blue foam. I passed, but the company that I was working with did some awesome work.

Thank you it definitely took some time. I have seen the layered color foam and think that would look great. Maybe ill pick some of that up for my large roller. I have a feeling my screwdriver drawer would look amazing
beer.gif
 
To avoid these ads, REGISTER NOW!

ChevyEFI

Well-known member
Joined
Sep 2, 2012
Messages
8,775
Location
Phoenix, AZ
I'm most impressed with your ability to not include the whole set of something, only the sizes needed. Only half kidding. Nice work!
 
OP
Q

quadrcr87

Well-known member
Joined
Jul 5, 2013
Messages
1,036
Location
Travelers Rest, SC
I'm most impressed with your ability to not include the whole set of something, only the sizes needed. Only half kidding. Nice work!


Those single wrenches are actually duplicates that I use most often for dirt bikes and ATVs. My husky set in a blow molded case has the full SAE and Metric wrenches and sockets 1/4, 3/8 & 1/2” already.


Sent from my iPhone using The Garage Journal mobile app
 

netbrad

Well-known member
Joined
Mar 3, 2011
Messages
356
Does that foam have any kind of rust preventative in it? How does it deal with moisture?
 

Bogie1632

Well-known member
Joined
Feb 18, 2018
Messages
1,303
Location
Southeastern Wisconsin
Does that foam have any kind of rust preventative in it? How does it deal with moisture?

No and not well in wet environments. Used this foam in mobile maintenance truck boxes. Foam is a closed cell so it doesn't absorb moisture per say but water can stay on it for quite a while. Kept our tools in place but they definitely corroded, worse on the boxes with bad or missing door seals. Tools left in their kits fared slightly better.

V/R
Bogie
 

jmiller_2308

Well-known member
Joined
Nov 16, 2013
Messages
559
Location
Shakopee, MN
Like the OP, I have been wanting to try some kaizen foam to secure some of my drawers that don't have other organization in them as well as to secure some of those tools from moving around when the drawers are opened or the box is moved.

I looked at a number of people presenting ideas as to how to do this and came up with a few additions that worked well for me that I thought I'd post about in case they were helpful to others.

I went with 20mm fastcap kaizen foam because I was concerned about drawer depth. 20mm worked fine for me but my menards mastercraft box could have accommodated 30mm. However, when pulling the excess foam out while paying attention to depth I am actually quite happy with the thinner sheet (more below)

I also went with the black/white/black foam as I wanted things to pop when they weren't in place. With the 20mm that means that I could remove at most the top black layer and 2 of the white layers or 3/8". Like I said, I was concerned this might be a bit shallow but it actually worked out quite well for me.

I didn't like the idea of marking up my foam with pen/pencil and decided to make paper overlays instead. This worked out really well as I was able to put layout lines on the paper to aid in laying out the tools. I also found that placing and drawing the tools easier on a solid surface then when I was trying to arrange directly on the foam.

I tried a number of ways of cutting the foam. I had high hopes that using a rotozip would allow me to make a consistent depth hole but it didn't work out that way. Instead the foam would compress while running the tool and that resulted in a less than even bottom. I also found that routing out stuff at the point where the layers join didn't come out clean. Finally, I'm just not steady enough to give a clean line when pulling the rotozip. In the end, a sharp xacto blade made the best cut for me.

One thing odd about cutting is that the foam had hard and easy sections to it. I had a single 2'x4' piece that I made into 3 drawer liners. Luckily for me it wasn't until I was working on the third drawer before I ran into the cutting issues. It was a real pain and might have caused me to abandon the project if I had hit the issue right away.

Tear out of the foam wasn't too bad. I used the "finger plow" method mostly but I also found that I could use a small trim tool to both help with the initial layer separation as well as to be able to actually pull a layer by placing the tool directly on the area of the foam that I was pulling an upper layer from. The tool also really helped when cleaning up a layer that split.

As for the depth thing, I wanted my tools to stay in place when I open and closed the drawers or when I rolled the box across the shop. I didn't need, nor want, to have to work at pulling the tools out. I really wanted to avoid needing finger holes to grab stuff.

To that end I laid out the screwdrivers so that the blade would sit on top of the foam and only the handle would be captured by a pocket in the foam. I ripped to different depths depending on the size of the handle. I wasn't sure how I wanted to do the pliers and so initially I made deeper pockets for them but this caused me to have to work at pulling them out. Before I got too far I tried just ripping out the top black 1/8" and found that gave me exactly what I wanted for the pliers. Namely, they stay in place, I can see when one is missing, and they are easy to pull out without having to have a finger pull.

This was quite a bit of effort and luckily I had a new bottle of glenlivet to celebrate the completion of the project.
 

Attachments

  • IMG_20200403_095810 (Medium).jpg
    IMG_20200403_095810 (Medium).jpg
    141.2 KB · Views: 55
  • IMG_20200403_092145 (Medium).jpg
    IMG_20200403_092145 (Medium).jpg
    95.2 KB · Views: 51
  • IMG_20200403_095607 (Medium).jpg
    IMG_20200403_095607 (Medium).jpg
    145.9 KB · Views: 49
  • IMG_20200401_150126 (Medium).jpg
    IMG_20200401_150126 (Medium).jpg
    151.4 KB · Views: 51
  • IMG_20200401_150042 (Medium).jpg
    IMG_20200401_150042 (Medium).jpg
    150.9 KB · Views: 51
  • MVIMG_20200403_095646 (Medium).jpg
    MVIMG_20200403_095646 (Medium).jpg
    124.8 KB · Views: 59
  • IMG_20200402_155721_01 (Medium).jpg
    IMG_20200402_155721_01 (Medium).jpg
    101.8 KB · Views: 55
OP
Q

quadrcr87

Well-known member
Joined
Jul 5, 2013
Messages
1,036
Location
Travelers Rest, SC
This was quite a bit of effort and luckily I had a new bottle of glenlivet to celebrate the completion of the project.

Great execution! I really like how much the white stands out when a tool is removed. I will try that out on my next project. For my home box I plan to keep it shallow for quick access like you did. I celebrated with an old fashioned mixed with Pendleton when I was done
smile.gif
 
To avoid these ads, REGISTER NOW!
Top Bottom