
You are using an out of date browser. It may not display this or other websites correctly.
You should upgrade or use an alternative browser.
You should upgrade or use an alternative browser.
Knives & blacksmithing and more
- Thread starter Junebuggy
- Start date
drivesitfar
Well-known member
JB: your tinkering day turned out another awesome piece. what did that piece of steel look like before you put your magic hands to work on it? i know it's hard to get pictures of before and especially during your work, but Woody has a camera stand that you might like to own that he takes YouTube videos with that are almost as amazing as your knives and nick nacks.
here's Woody's garage thread and a few of his videos and time lapse ones are sprinkled in there along with some cool thermo images since outside his garage gets to be -30 in the winter.
http://www.garagejournal.com/forum/showthread.php?t=263351&highlight=woody
i'm not telling you to buy one of Woody's cool camera mounts, but they look pretty nice and obviously work if you want to take a few videos or just a bunch of pictures. there is a link for his company's site in his signature if you don't have time or wish to take a gander at the entire garage transformation he did.
thanks again for posting your cool stuff
DPG
Well-known member
JB - thanks for posting your passions. A true artisan. I enjoy seeing your work.
drivesitfar
Well-known member
JB: thanks for the video on how to make the letter opener. you need to tell us how you made the end of the letter opener look like one piece of metal since it was 4 pieces of round stock you started with. hope you are feeling ok with all the hot weather.
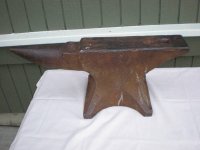
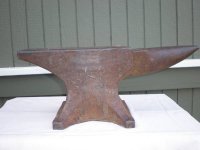
All: any knife makers or blacksmiths looking for an anvil. there are a couple nice 120 pounders in the Seattle craigslist this week. i could use one, but i need a new welder first so thought i'd pass on the information. here's the Hay Budden and the other one is a Peter Wright which are both my favorites.
just curious if the Hay Budden's line under the top plate is normal or has it had some modifications done to it?
Any new knives or cool projects to post?
Attachments


Amitygravel
Well-known member
drive , that's a steel face that's on the body of the anvil. Pretty desirable.
What do they have those anvils priced at ? Look to be in good shape.
I'll get a photo up later.
What do they have those anvils priced at ? Look to be in good shape.
I'll get a photo up later.
drivesitfar
Well-known member
AG: neither the Hay Budden or Peter Wright anvils are mine (wish they were) and they are listed currently for sale in Seattle's craigslist.
the Hay Budden 120 pounder is at $450 which is a lot spendier than the Peter Wright 125 pounder at $250.
The Hay Budden looked ok to me, but even though I've bought and sold maybe 10 anvils i'm still learning. one day i'll own a 300 pounder and a 100 pound anvil and have a forge to hit some hot metal. this year i'm going to learn to weld.
if you can't find the ads on Craigs i'll edit and post links for those members that might want them.
Attachments


johno
Well-known member
What is that last picture?
Anvils mating?
Anvils mating?
Seppala
Well-known member
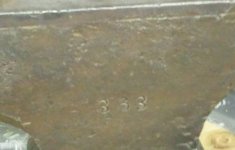
drivesitfar, that Hay-Bud is super clean and that line under the face is normal, that's where the hard steel face meets the wrought iron body. In my experience the number "333" refers to the weight of the anvil. If that is so the asking price is not unreasonable. American made anvils, to my knowledge, were never marked nor weighed using the British Imperial standard.
Last edited:
vintage nut
Well-known member
Junebuggy, it could be interesting to do another one of those, but use different drill rods, say w1 and o1. Sort of a rod Damascus look like the Vikings used for their swords. That's one thing I'd really like to try someday. Twist it up real tight and forge weld it together. Sorta like cable Damascus but with drill rod.
I'd also like to try a laminated blade with wrought iron sandwiching O1. That could look interesting, yet still be a real high performance blade.
Just need to keep my eye out for some wrought iron....
you can never have too many tools
I'd also like to try a laminated blade with wrought iron sandwiching O1. That could look interesting, yet still be a real high performance blade.
Just need to keep my eye out for some wrought iron....
you can never have too many tools
drivesitfar
Well-known member
JB & All: i'd love to find a Peter Wright with a 2 or 3 for the first # on the weight stamp that wasn't abused. I doubt the 333 is a weight stamp on the Hay Budden.
now my question is what do blacksmiths and knife makers consider to be their favorite size and brand of anvil?
Johno: where did your mind go sir. that is only one anvil in the picture but no that you mention it that anvil weighs about what my wife did when i married so maybe you are on to something. can we rub a couple hundred pound old anvils together to make a little one?
Vintage: i like the way that you think
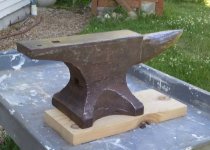
All: here's my aluminum anvil that i use as a paperweight or what might it have been made for?
have a good weekend all
now my question is what do blacksmiths and knife makers consider to be their favorite size and brand of anvil?
Johno: where did your mind go sir. that is only one anvil in the picture but no that you mention it that anvil weighs about what my wife did when i married so maybe you are on to something. can we rub a couple hundred pound old anvils together to make a little one?
Vintage: i like the way that you think
All: here's my aluminum anvil that i use as a paperweight or what might it have been made for?
have a good weekend all
Attachments


drivesitfar
Well-known member
JB: I've heard that if an anvil is in a fire it more than likely is a doorstop and probably why a few don't have any rebound. i usually use an inch steel ball bearing and drop it from about 10 inches and hopefully it bounces up more than 6 inches. I've mostly bought (and sadly sold) Peter Wrights and i agree having a huge one would be nice, but your 127 pounder is a good size and I've probably had 4 that size for a few months.
any little or big projects on the list for you this summer? sorry to hear the dust is bothering you, but i bet your side of the state is almost in a drought status with as little rain as we've had this year.
have a great weekend
PS: funny joke about the wife and 500 pound anvil, but so true
any little or big projects on the list for you this summer? sorry to hear the dust is bothering you, but i bet your side of the state is almost in a drought status with as little rain as we've had this year.
have a great weekend
PS: funny joke about the wife and 500 pound anvil, but so true
drivesitfar
Well-known member
JB: amazing knife again. did you finish the blade a while ago before you sold your shop and just now finished the rope and handle? or did you just do the steel too? cherries off the tree sounds awesome. in a few months we'll have fresh figs about 20 feet from where i'm sitting now.
we have strawberries now and next year we are planting raspberries to grow next to our basil and tomatoes.
have a good weekend
Vintage: so since your knife you gave me isn't stainless i was able to get it back away from my wife. i'm telling you i just opened up a box tonight with it and no utility knife or blade I've ever had cut tape and cardboard any nicer or easier. thanks again.
ALL: i have round and square stock in several types and sizes. i'm not sure what exactly i'm going to do with this 7 inch diameter round stock that is 42 inches long. i'm guessing it weighs close to 500 pounds so setting a 300 pound vise on it if i can dig a hole and cement it in the ground isn't out of the question. any thoughts on what i can do with it or any of my other round stock that is 1.5 inches and bigger?
Attachments


vintage nut
Well-known member
The anvil I usually use is a 141# peter wright. For knifemaking it's really perfect. That said I've used a 400# anvil at the blacksmith shop at the local farming museum, and if I had the space I'd love one of those.
One anvil I'm keeping my eye out for is a good old one in the 30# range. Something to put on the bench, and use for peining pins on bolsters. Currently I'm using a piece of rr track that my dad milled the top flat with a carbide face mill. It works good, but I'd prefer having a nice old anvil.
I was going to take a piece of 3" diameter 4140 round stock, face it smooth on the lathe, and harden it, but then my dad suggested milling the rail flat, and saving having to heat treat a big chunk.
you can never have too many tools
drivesitfar
Well-known member
JB: another couple knives that would make any owner of them smile. i'm not sure i'd send an anvil with a sticker on it through USPS system so would like to hear more about how many you have or heard of that were sent that way. I've seen so many anvils chipped so i have to ask the pro to confirm or deny what I've been told.
anvils are made for hitting hot steel on and not cold steel because with cold steel they can chip the edges. true or false? I've been telling members of GJ and friends and clients for years to get a hunk of RR track or thick steel plate to pound their cold steel on and hopefully i'm giving out good information.
i have some thick plate and RR track and i just picked up these 4 inch thick 22 inch pieces of steel that might work for something. yes they are heavy and weigh about 350-400 pounds each i'm told. any ideas on a good use for them?
Attachments


vintage nut
Well-known member
That little vulcan is really sweet!
And thanks! I'm keeping my eye out for something like that too.
Drives, I can see those making quite the base for a grinder, buffer, or vise stand! Weld a heavy piece of pipe coming up, and weld a plate on the top of that. That would sure be a solid stand!
you can never have too many tools
And thanks! I'm keeping my eye out for something like that too.
Drives, I can see those making quite the base for a grinder, buffer, or vise stand! Weld a heavy piece of pipe coming up, and weld a plate on the top of that. That would sure be a solid stand!
you can never have too many tools
vintage nut
Well-known member
I've also got some rr track around. Two smaller chunks are already anvils, and we still have a 2 foot chunk of heavier gauge stuff. Stands about an inch taller than the standard stuff.
you can never have too many tools
you can never have too many tools
drivesitfar
Well-known member
JB: i'll keep the 4 inch rounds in one piece until i can't figure out a good way to use them, but your idea of cutting them up might be their fate.
i know this is probably standard learning 101 basic blacksmithing, but you just mentioning the preheating of an anvil before using it was the first time I've heard that. it sounds like an important step, but without you mentioning it i would have pulled a piece of steel out of a forge and started beating on my big old cold anvil until today.
thanks again for sharing your wisdom and keep posting all those old gems you've made because i'm sure others are admiring your skills.
i bet your blacksmithing friends love to have you come visit and let them know what they are doing right and maybe some tips to do some other things differently to make their end product much better.
cheers and how are the cherries today?? i'm hoping to go for a drive to the raspberry farms about an hour's drive from my house and pick up a few flats for pancakes or just eating because they are my favorite fruit. Rainier cherries are a close second especially right off the tree.
vintage nut
Well-known member
I have to say I've been around a lot of very experienced blacksmiths, and I've never heard of pre heating the anvil before! It's a real good idea though. I've always just been taught that your first few heats of the day won't be very useful as you're just heating up the anvil. If you spend a day in the shop, your anvil is good and warm before too long, and will stay like that all day. Although for the sort of stuff I do, I definitely think I'm going to start pre heating it.
Another approach used by Japanese blacksmiths is to bounce your workpiece on the anvil in time with your blows. So it is only touching the anvil while you hit it. I've tried it, and it's very, very awkward. I guess once you've gotten used to it, it could work well.
you can never have too many tools
Another approach used by Japanese blacksmiths is to bounce your workpiece on the anvil in time with your blows. So it is only touching the anvil while you hit it. I've tried it, and it's very, very awkward. I guess once you've gotten used to it, it could work well.
you can never have too many tools
vintage nut
Well-known member
I think I might start looking around for a 150# ish anvil for myself. My dad definitely wouldn't want to part with his peter wright when I set my shop up. Gonna start hunting around locally. I'm kinda partial to English anvils. Peter wright or mousehole is probably what I'd be after.
Hopefully I'll find something locally. Shipping anvils ***** lol
you can never have too many tools
Hopefully I'll find something locally. Shipping anvils ***** lol
you can never have too many tools
Craptain
Well-known member
I recommend and would also like myself a Mousehole anvil. They were made close to my home in England.
Sent from my LG-D801 using Tapatalk
Sent from my LG-D801 using Tapatalk
vintage nut
Well-known member
I know that the little aluminum anvils are a foundry project in metal shop at my highschool. I also have a little iron or steel record anvil about that size. Basically a paper weight lol
you can never have too many tools
you can never have too many tools
drivesitfar
Well-known member
JB: i wish i had about 20 of those old A & W root beer mugs. I've got a couple and i put them in the freezer. when i pull them out and put water in them from the fridge the water turns to ice.
they are really great for a beer or my ice tea too.
in case you get a chance there is a place in Lincoln City, Or that has steak dinners for about $8 with all the fixins. every time my wife and i spend 4 days down there i usually gain 5 pounds and we walk about 5 miles of beach daily. those deserts are not bad either.
thanks for the heads up on the little aluminum anvil and between salesman sample and Vintage's post about them being a school shop project i still don't see many of them.
i'm going through my shop this week and pulling stuff out to get organized and hoping i find a 150 pound anvil, but i'm pretty sure i sold all the ones i had. it would be like Christmas as a kid if i found one though.
cheers all and enjoy your Sunday
drivesitfar
Well-known member
JB: i know why. because you can. nice and thanks for sharing. i might have to bring over some trading fodder for a few of those mugs that are blocking the view of the other cool stuff on the table and the shelf.
cheers
cheers
Bob Warner
Active member
OK guys, I said I would post some information here to help out the newer guys and maybe even teach the experienced people something new.
Here are a few tips and tricks I've leaned over the years. Maybe one of them will help you out.
WD-40 is some great stuff. Here are a few uses for it.
• WD-40 will remove epoxy from areas you don’t want it, including your fingers.
• WD-40 can be sprayed onto your grinding belts to reduce heat and extend belt life.
• WD-40 takes masking tape gum right off your blade.
• WD-40 if sprayed on titanium will show you the grain pattern of the titanium.
Knife maintenance.
• Use Carnuba wax to coat your knives to avoid tarnishing and keep them shining.
• A pair of ***** hose works GREAT for putting the final polish on a oil finished handle (or gunstock).
Titanium
• To remove broken taps from titanium, soak in muratic acid. The acid will eat the tap but won’t hurt the TI.
• Titanium has a grain, just like steel. There will be less chance of a lock failure if you always cut out the lock side with the grain going length ways.
• Don’t breath the fume's from titanium, they will make you sick.
• Don’t use your best belt's on titanium. Titanium will dull them quickly. However a really dull belt will not cut well and will just "push" the titanium around.
• Jewelling is normally done with a brush or rubber or fiber stick (like a "pencil eraser" in a drill press). The brush or rubber/fiber cylinder is charged with an abrasive and then lowered onto the surface to be jeweled. The circular marks are made in a line, slightly overlapping each other, and then the next line started to overlap the first, etc. Most gunsmithing books in the library will have a "how to" discussion on this. It helps to have an indexing jig to get nice even spacing and straight lines.
• When polishing titanium get as many scratches out of the material as possible. Hand sand to 600 grit removing ALL the scratches. Wet sand with WD40. Then use a cloth wheel on the buffer with white stainless compound, and use LOTS of heavy pressure. The metal heats up pretty quick this way. Turn the work 45 degrees and buff again, using as heavy pressure as possible. You will get an absolutely perfect mirror finish that looks like platinum.
File work
• Use carbide cutters in your router (up side down) to start your file work. This makes the half rounds in a very short time. All file work should be done in annealed steel if possible.
• Practice new file work patterns on the part of the metal that is going to be ground away. Then when it looks right, you can put it where you want it and you've practiced on the same metal that it's going to end up on.
General Knife Making
• Use vinegar to clean up epoxy while it is still wet.
• Glue a scrap of leather to a wood block. When you sand it makes a nice cushion and helps the paper conform to the shape you are sanding.
• When gluing handle slabs use wax paper around them to keep the epoxy from sticking to the clamps.
• Tape a few strips of masking tape onto your counter top. Mix your epoxy on it and pull up to clean up.
• Consider getting foot switches for some of your tools. A drill press can be easy to use when you just walk up and step on a pedal to make it run, let go and it stops.
• For creating great plunge cuts, hang the belt off the edge of the wheel a little. BREAK the edge down a little by using scrap steel to roll it around the edge.
• To remove solder from blade/guard joint, make a small chisel out of copper. The copper is softer than the steel and nickel silver or brass you use for the guard so it will not scratch anything.
• Use pieces of scrap leather to hold knives in a vise. The leather will not let the jaws damage the blade.
• If you don't have a surface grinder and want to get something flat, try taping a piece of sandpaper to a thick piece of glass. Sand on the flat glass. Mark the blade with a black "Sharpie" marker and it will show any uneven spots on the steel. Use a micrometer or calipers to check thickness the length of the piece.
• A chisel made of bamboo works well for removing epoxy from unwanted areas.
• When completely through with a folder, clean all threads of the pivot with acetone before using loc-tite on the pivot screw.
• When buffing thin blades 1/16" thick, take a piece of 2X4X 18" and drive a finishing nail into one face near the end with about 1/4" exposed. This end becomes the Top. Hang the blade on the nail by the top pin hole and with the blade resting on the face of the 2X4 buff the face then turn the blade over and buff the other face.
• The best file handle I have ever seen is golf balls. Take a golf ball and carefully drill a hole a little smaller than the file tang. Jam the file into it and your set to go. Works real well when pushed with the palm of the hand.
• Try putting a few drops of dish soap in the water you use to catch grinding grit and cool things off. It keeps the water molecules form hooking together right so the grit can't float.
• Put in about a 1/2 cup of Baking Soda into 5 gallons of water, this helps stop steel from rusting during grinding and cooling in your dip bucket.
• To keep a file from marking up the tang and making a nice little groove when filing guards and bolster. Grind any file teeth off of the edge of the file and just slightly touch the edges to grind any sharp edges off. This will let you be able to file right next to the tang or blade without making scratches or grooves.
• Use the rubber soles on old sneakers to clean your grinding belts! They work great.
• Stick a magnet to the side of your drill press. Then stick your chuck key to the magnet for easy to find storage.
• Mount a sheet of plywood to the ceiling of your shop and screw the lids of baby food jars to it. Then you can store items in the jars and put them on the ceiling for storage. Just look up and find the item you want.
• If you are preparing to build a new shop, cover the interior walls with plywood. This give a solid surface for hanging stuff. You can pound in a nail anywhere you want and get a good solid spot.
• Glue strong magnets to the bottom of a cookie sheet. This will keep small parts from rolling off of the table during final assembly of your knife.
• Cut a piece of heavy cardboard a little bigger than your knife blade. Push the blade between the layers and then cover with duct tape. You now have a very durable temporary knife sheath to protect your blade during the rest of your work.
• Slip a piece of rubber bicycle inner tube over the blade. The rubber is incredibly tough and if the knife isn't sharpened yet, it will even take a few misplaced file strokes without tearing through to the mirror polished blade.
• If you need to use an open housing motor in a workshop, cover it with nylons. They will keep the dust out of the motor.
Heat Treat
• Temper small pieces by heating a bar of steel on which the piece to be tempered is placed. This gives a great deal of control because the steel heats more slowly than a small piece and the color is more discernible since it is not being held in a flame.
• To prevent Scale during heat treat, use a mixture of borax and boiling water and dip the blades in....1/3 borax in a container and fill the rest with water bring to a boil.. Dip blade in, let dry then go about your normal heat treating. When you quench in oil the protective borax cover will flake right off and leave you with a blade that looks similar to what you started with and you won't have to grind that stubborn scale off!! Works great!!
• SUPER QUENCH -, Super quench is the term coined for a concoction developed to allow low carbon steels to be hardened to some extent. It is a mixture of water, borax, liquid dishwashing soap and a surfactant to eliminate as much surface tension in the water as possible. Even with low carbon steel like 1018 it is possible to make it hard enough to cut unhardened mild steel. This quenching liquid works by wetting the surface of the steel and eliminating all the steam blanket effect. The steel must have a minimum amount of carbon or it will not harden. Too much carbon and there is a risk of catastrophic failure of the work. Start with 5 gallons of water (a plastic dry wall mud bucket) and add a large container 16 oz of LIQUID DISHWASHER SOAP. Mix it up, and then add salt until no more will dissolve, and add at least a handful more. Mix in a bottle of Jet dry dish washing spot remover. Keep the container covered. To use, get the part bright red and then plunge it into the solution with agitation in a small circle. You want to stir it rapidly around in about a 3" circle. When it's cold, check the hardness with a file. You'll be surprised how hard some things will get. NEVER (never) use this solution on spring steel, or anything else that has high carbon content, or that you are uncertain as to the carbon content. You risk shattering the piece and hurting yourself in the process.
Bob Warner
Active member
Here are a few more, my previous post was too long.
Good To Know
• Cutco knife handles are made from bowling balls.
• Keep a notebook handy in your shop. Make note of as many things as possible. This will save you a lot of time when you don’t have to measure every thing 10 times and you won’t forget those shop tips either.
• Use fluorescent lights throughout the shop. But when you get down to the final finish, use an incandescent light (light bulb). The florescent lights hide a lot of sins. The incandescent shows all.
• Paint the walls of your shop white. It will bounce light around and you will be able to see better.
• A magnetic chuck can be made by disassembling an automotive air conditioning compressor. Take the pulley and the ceramic magnet off of the compressor and epoxy together. Run 12 volts to the magnet and you have a magnetic chuck. This is a very strong magnet and will hold your blade well. Don't take to big of bites, it is not so strong that you can hog the steel, just a little at a time.
Kydex
• Use MEK to rub the edges of your kydex sheaths. Smoothes the edge down to a nice shinny finish by melting the plastic.
Determining Surface Feet per Minute: I created this chart and did the math myself. If anyone sees any mistakes, please let me know.
• Don’t think you need a respirator? Blow your nose after grinding for a while, you will want to get a respirator.
• Ferric Chloride (Radio Shack circuit board enchant) is used to etch Damascus. Store in PVC tubes.
• Ever worked purple heart? If not here are a couple of tricks to bring out the purple color. After cutting the slabs and getting them down to the finished size, lay them in a window sill and let the sun light shine on them for a day or two, this will bring out the purple color. You can also lightly burn the outer edge with a propane torch to deepen the color but be careful not to over do it. This is all done before any type of finish is applied, after getting the desired color put about 3 coats of tru oil sanding between coats with 0000 steel wool.
Brass Rod Test
To test your blade lay the edge on a brass rod and push it down to get the blade to flex, then move the blade towards the handle and the blade should flex over the rod and return to normal after it passes over the rod. Do both sides of the blade. If the blade bends and does not return to normal, you went to high on your tempering temperatures and you will need to re- heat treat the blade. If the blade cracks or chips, you went to low on your tempering heat and will need to temper again at a higher temperature. I suggest you do this test before adding bolsters or handle material since they can be damaged during the correcting of any problems. Here are some pictures of the rod test in process.
Storage
• Store your buffing wheels in gallon sized Ziplock bags. This will keep them from gathering dust and grit.
• Store small parts in film canisters, baby food jars or large Tabasco bottles.
Store sandpaper in stack-able in/out boxes like those used in offices.
Amitygravel
Well-known member
Great stuff Bob !
Really like the WD-40 tips. It won't soften the adhesive on grinding belts ?
I have a trivia question for you and Junebuggy , well everyone for that matter.
Does anyone know when mosaic pins came on the custom knife scene for embelishment ?
Really like the WD-40 tips. It won't soften the adhesive on grinding belts ?
I have a trivia question for you and Junebuggy , well everyone for that matter.
Does anyone know when mosaic pins came on the custom knife scene for embelishment ?
Bob Warner
Active member
Not sure on the mosaic pins. I've been making them for years and I have been making knives for about 22 years.
Junebuggy
I understand about pain. After my motorcycle accident (Damn hit and run coward) I had to sell everything to get by and the physical pain of getting tools built and starting back into knives and all the other stuff I do is definitely a cause for big pain.
I have to take drugs to just function and working on anything is very hard to do even with drugs.
This getting old **** is not working out for either of us apparently.