To avoid these ads, REGISTER NOW!

Knoxville Garage Renovation

TCB

Active member
Joined
Jun 19, 2011
Messages
26
Location
Knoxville, TN
Hi everyone,

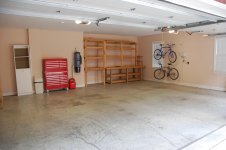
Since this site gave me such great ideas and inspiration, I thought I'd share the before and after of my recent garage renovation. I'm lucky to have a great space to start with. The garage is a standard 3-car appx 23' deep x 30' wide with a 9.5' ceiling. One the right side, there's also a space that's inset about 2', making that side 25' deep.

Since I wouldn't qualify even as a "shade-tree' mechanic, this space will be used mostly for detailing, a workspace for various home projects, and as a nice, clean space to see as you enter the house.

Here are the "before" pictures. I did do a couple of things before these shots were taken. Specifically, I replaced the 2 aging T12 light fixtures with T5HO and got the HF rolling cabinet/top chest combo in place of 2 of the white cabinets like the one to the left of the toolbox.
 

Attachments

  • DSC_2287.jpg
    DSC_2287.jpg
    133.2 KB · Views: 120
  • DSC_2288.jpg
    DSC_2288.jpg
    134.8 KB · Views: 104
  • DSC_2289.jpg
    DSC_2289.jpg
    127.5 KB · Views: 97
  • DSC_2290.jpg
    DSC_2290.jpg
    131.9 KB · Views: 100
To avoid these ads, REGISTER NOW!
OP
T

TCB

Active member
Joined
Jun 19, 2011
Messages
26
Location
Knoxville, TN
Here are the changes I made.

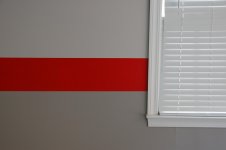
The walls were painted with the ubiquitous GJ light gray/red stripe/darker gray combo. Thanks to everyone on here for the great tips on how to paint the stripe! I did discover that the base colors were bleeding through even after 2 red coats, so I went over it with a gray primer before going back to red. That did a great job of evening out the colors. If anyone is interested the paint colors are:

upper: Sherwin Williams SW6001 "Grayish"
lower: SW6003 "Proper Gray"
stripe: SW 6868 "Real Red"

I used the SW Duration paint in a semi-gloss finish.
 

Attachments

  • DSC_2308.jpg
    DSC_2308.jpg
    133.7 KB · Views: 57
OP
T

TCB

Active member
Joined
Jun 19, 2011
Messages
26
Location
Knoxville, TN
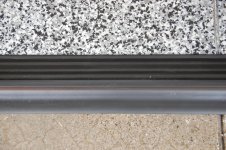
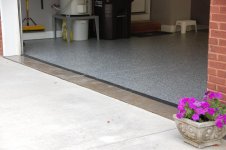
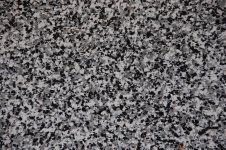
For the floors and cabinets, I decided to go with Premier Garage. A neighbor had his floor done by PG a couple of years ago and it seems to be holding up well. The PG crew completed the job in 2 days. The first day was grinding the floor, fixing a couple of cracks, laying down the base coat, and spreading the flakes. Day 2 was scraping up flakes that didn't bond and covering with the sealant. They also added the trim strip to transition from the epoxy'ed section to the bare concrete (which they also sanded and sealed)

The color is called Graphite with 1/8" chips
 

Attachments

  • DSC_2304.jpg
    DSC_2304.jpg
    151.7 KB · Views: 67
  • DSC_2305.jpg
    DSC_2305.jpg
    144 KB · Views: 82
  • DSC_2302.jpg
    DSC_2302.jpg
    166.6 KB · Views: 58
OP
T

TCB

Active member
Joined
Jun 19, 2011
Messages
26
Location
Knoxville, TN
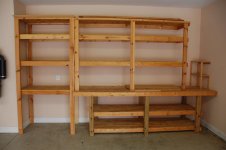
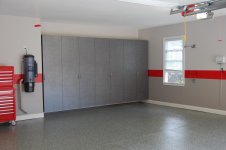
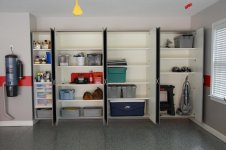
The cabinets are also from Premier. The right side has four cabinets (1 24" and 3 48") in the inset space. All of these are 91" tall.

The 24" cabinet makes a great space for detailing supplies, while the others will be for general storage. Trust me, they wont be that neat for long. Right now, I've only put in the relatively clean stuff that the boss let me keep in the dining room during the project. The rest is in the crawl space . . .

For the workbench, I originally considered using Premier's basic laminate countertop. After looking around here quite a bit, I decided I liked the butcher block look. Unfortunately, Premier's supplier wanted an extra $1K on top of the base price. :eyecrazy: I looked around a bit and found an 8' x 25" x 1.5" piece online at Lumber Liquidators for $259 with free shipping to the store. I cut it down to fit my 6' space and the Premier guys installed it for me. I really like this look, especially since I'm not going to be banging on any transmissions or welding in here.
 

Attachments

  • DSC_2292.jpg
    DSC_2292.jpg
    141.7 KB · Views: 125
  • DSC_2309.jpg
    DSC_2309.jpg
    139.3 KB · Views: 126
  • DSC_2294.jpg
    DSC_2294.jpg
    141 KB · Views: 118
  • DSC_2295.jpg
    DSC_2295.jpg
    137.1 KB · Views: 104
OP
T

TCB

Active member
Joined
Jun 19, 2011
Messages
26
Location
Knoxville, TN
Finally, I wasn't sure what to do about my ladder. Since it's needed in the house fairly often for changing light bulbs, etc I wanted it in the garage where it would be handy. Previously it was up front near the old shelves just leaning against the wall, but I was always worried that it would tip over.

I thought about using the ladder hooks that screw into the wall, but wasn't sure if they would support the weight, since only 1 would be in a stud. I decided just to keep it on the floor, but use a webbing strap & buckle to keep it upright. Its in an out of the way corner, and I don't have to worry about it falling over onto the car.
 

Attachments

  • DSC_2299.jpg
    DSC_2299.jpg
    133 KB · Views: 67
  • DSC_2300.jpg
    DSC_2300.jpg
    133.5 KB · Views: 61
  • DSC_2301.jpg
    DSC_2301.jpg
    152 KB · Views: 68

MajorLeeGassole

Well-known member
Joined
Apr 13, 2010
Messages
392
Location
Fairmont, WV
Amazing transformation! I love how everyone has started to REALLY point out the color schemes lately. Too funny! Did you have the same issues I have? Level floor + level threshold = rain in the garage? I noticed you are using the rubber strip along the entrance. Do you find it to be a pain when trying to sweep out the garage? I do not have a floor drain, so that would just make washing the floor more of a pain trying to push it over the strip. Better than rain coming in!
 

dubber

Well-known member
Joined
Dec 31, 2012
Messages
5,326
Location
Canada's Capital
Wow! I knew i would like this garage. Looking great. Those cabinets are perfect and that little touch with the ladder is great.

EDIT: I spy a nice Red fire extinguisher that would look great mounted up on your wall :)
 
Last edited:

patent pending

Well-known member
Joined
Feb 7, 2012
Messages
271
Location
Charleston, SC
That's a great transformation...floor turned out killer, cabinets look awesome, and the colors help out a lot.

Any info on the trim strip for the floor? Looks nice and wide, which is what I'm looking for.
 
To avoid these ads, REGISTER NOW!

Rockuf8

Well-known member
Joined
Dec 24, 2012
Messages
1,166
Location
Northern NJ
Here are the changes I made.

The walls were painted with the ubiquitous GJ light gray/red stripe/darker gray combo. Thanks to everyone on here for the great tips on how to paint the stripe! I did discover that the base colors were bleeding through even after 2 red coats, so I went over it with a gray primer before going back to red. That did a great job of evening out the colors. If anyone is interested the paint colors are:

upper: Sherwin Williams SW6001 "Grayish"
lower: SW6003 "Proper Gray"
stripe: SW 6868 "Real Red"

I used the SW Duration paint in a semi-gloss finish.

Came out nice, looks nice and uniform, and I like that you did one larger stripe.

In the first pic you should've fixed that crack in the drywall prior to doing all that painting. :p

The upper and lower sections look almost like the same color, a shade slightly darker on the bottom would've helped distinguish between the two better.

Love the floating cabinets, plan on doing that with the new cabinets I have on their way.
 
OP
T

TCB

Active member
Joined
Jun 19, 2011
Messages
26
Location
Knoxville, TN
Wow! I knew i would like this garage. Looking great. Those cabinets are perfect and that little touch with the ladder is great.

Thanks for the kind words!

I spy a nice Red fire extinguisher that would look great mounted up on your wall :)

Yeah, I've just gotta find the bracket that goes with it. Its around here somewhere. :thumbup:
 
OP
T

TCB

Active member
Joined
Jun 19, 2011
Messages
26
Location
Knoxville, TN
In the first pic you should've fixed that crack in the drywall prior to doing all that painting. :p

It looks better now than before I started! I did do some quick repair/sanding on it, but that's about the best I could do. I guess I succumbed to "its-just-a-garage" :)

The upper and lower sections look almost like the same color, a shade slightly darker on the bottom would've helped distinguish between the two better.

They are pretty close . . . only 2 shades apart as you can tell from the paint codes . . . but the contrast is a little more apparent in person than in the pics. The next shade was quite a bit darker, and I was worried it would be too much since I knew the floor would be pretty dark.
 

Rockuf8

Well-known member
Joined
Dec 24, 2012
Messages
1,166
Location
Northern NJ
It looks better now than before I started! I did do some quick repair/sanding on it, but that's about the best I could do. I guess I succumbed to "its-just-a-garage" :)
:)


They are pretty close . . . only 2 shades apart as you can tell from the paint codes . . . but the contrast is a little more apparent in person than in the pics. The next shade was quite a bit darker, and I was worried it would be too much since I knew the floor would be pretty dark.
Not surprised the colors look a lot closer in the pics.
 

patent pending

Well-known member
Joined
Feb 7, 2012
Messages
271
Location
Charleston, SC
I'm pretty sure its the Tsunami Seal. Personally, I didn't have a problem with water seeping in under the garage door, but the strip just made a better transition from the epoxy to the unpainted concrete

Awesome, thanks!

My need for it is two-fold. I got water coming in sometimes AND the transition from my epoxy to unpainted concrete looks terrible:lol_hitti
 
To avoid these ads, REGISTER NOW!
Top Bottom