Hello all, new member, specific issue brought me here.
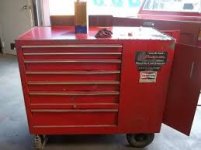
Bought this box yesterday ($400). Has a little surface rust going on at the bottom and some in pry bar box, nothing that'll be hard to remove. This is my second SO box, this one will be specifically for gunsmithing, I like the height for cleaning. Will build a wooden top for it.
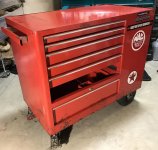
Made a drawer removal tool and took out the drawers and slides, am cleaning it up. May need a few new slides, fingers crossed that they are available.
Few easy questions for ya'll:
Whole cleaning up grease/oil stains the rag pulls off some red paint. My other box is a gloss blue, I can wipe it with just about anything and it stays. Is this typical of older box paint, or do you think the box has been repainted? I hope to avoid repainting it, but might do some touch up if I have to get aggressive to remove the rust.
One of the tire stems is bad. To remove the tire do I have to unbolt the axle brackets from the box? I had hoped that the axle would slide out, but it doesn't seem to.
Sorry that I don't have pics, didn't take any before I started taking it apart. Will post when I get it back together.
Thanks all!
Jim
Bought this box yesterday ($400). Has a little surface rust going on at the bottom and some in pry bar box, nothing that'll be hard to remove. This is my second SO box, this one will be specifically for gunsmithing, I like the height for cleaning. Will build a wooden top for it.
Made a drawer removal tool and took out the drawers and slides, am cleaning it up. May need a few new slides, fingers crossed that they are available.
Few easy questions for ya'll:
Whole cleaning up grease/oil stains the rag pulls off some red paint. My other box is a gloss blue, I can wipe it with just about anything and it stays. Is this typical of older box paint, or do you think the box has been repainted? I hope to avoid repainting it, but might do some touch up if I have to get aggressive to remove the rust.
One of the tire stems is bad. To remove the tire do I have to unbolt the axle brackets from the box? I had hoped that the axle would slide out, but it doesn't seem to.
Sorry that I don't have pics, didn't take any before I started taking it apart. Will post when I get it back together.
Thanks all!
Jim