To avoid these ads, REGISTER NOW!

KRL1003B Overhaul

oneandgone

Well-known member
Joined
Dec 4, 2012
Messages
159
I've been considering doing a repaint on my box for a while now and today I tore into it full bore. The box itself is in good shape overall, but being in a body shop for somewhere around 10 years has taken it's toll on the finish.

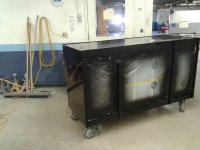
I pulled the trim off and removed all the drawers. All came apart well and was quite simple. After that it was as simple as busting out my trusty Hutchins with a roll of 320 and going to town. I had to fill a couple dings, but nothing major. The main box is painted already and will get cleared first thing tomorrow. I still have to do all of the drawers though, all 23 of them, and it's sure to get tedious. I'll also have to decide what I want to do with the trim.

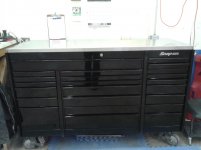
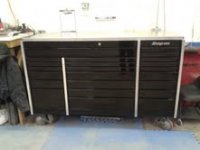
Here's a before pic, should've taken a close-up, it's hard to tell how bad it really looked. Also, a couple pics of it after making a couple repairs and all the sanding.
 

Attachments

  • toolbox (3).jpg
    toolbox (3).jpg
    65.5 KB · Views: 304
  • Repaint 4.jpg
    Repaint 4.jpg
    47.9 KB · Views: 273
  • Repaint 5.jpg
    Repaint 5.jpg
    6.8 KB · Views: 251
  • Repaint.jpg
    Repaint.jpg
    130 KB · Views: 225
To avoid these ads, REGISTER NOW!

CWP1616L

Banned
Joined
Aug 31, 2012
Messages
3,297
Location
USA
You're not gonna take the slides out huh? I heard that Bondo dust reaps havoc on ball bearing slides.
 
OP
O

oneandgone

Well-known member
Joined
Dec 4, 2012
Messages
159
Thanks Todd, I can't wait to have more to show you! Hopefully I can get some shiny ones up tomorrow.

CWP1616L...Couldn't tell ya if it does or not, but I imagine it doesn't help them any. I'd like to pull out all the slides and to clean and grease them, but I can't have that much downtime with this box. I work out of it daily and have to get it back up and running asap. I really I need it back together tomorrow, but I doubt I make it. That's the kind of thing I can do drawer by drawer as time permits later.
 
OP
O

oneandgone

Well-known member
Joined
Dec 4, 2012
Messages
159
Busy day today with this box. I got the main box cleared and all of the right and left bank drawers prepped, painted, and cleared. They will go back into the box first thing in the morning. I still have to prep all of the center bank drawers and the large top drawer. I also still have to decide what to do about the trim. I could have it polished, or paint it, or give it the brushed look...any suggestions? I think SO had some boxes with anodized trim, I wish I had the cash to replace it all with new!

No pics of the drawers yet, they're still hanging in the booth, but here are a couple of the main box. Just call me Wilson.
 

Attachments

  • Repaint 7.jpg
    Repaint 7.jpg
    34.8 KB · Views: 244
  • Repaint 8.jpg
    Repaint 8.jpg
    44.9 KB · Views: 242

Hammer1963

Well-known member
Joined
Jan 2, 2011
Messages
2,048
Location
Kentucky
Looks great ! I can see that I may need to haul my boxes in need of new paint to the Land of Lincoln for some resto work. BTW, who's the guy in the picture :headscrat
 

Hammer1963

Well-known member
Joined
Jan 2, 2011
Messages
2,048
Location
Kentucky
Busy day today with this box. I got the main box cleared and all of the right and left bank drawers prepped, painted, and cleared. They will go back into the box first thing in the morning. I still have to prep all of the center bank drawers and the large top drawer. I also still have to decide what to do about the trim. I could have it polished, or paint it, or give it the brushed look...any suggestions? I think SO had some boxes with anodized trim, I wish I had the cash to replace it all with new!

No pics of the drawers yet, they're still hanging in the booth, but here are a couple of the main box. Just call me Wilson.

I'd go Brushed on the trim. Easy to repair if it gets marred or scratched
 
OP
O

oneandgone

Well-known member
Joined
Dec 4, 2012
Messages
159
Thanks guys! That's me doing my best Wilson impression. I should've put on a fishing hat, eh?!

I was kind of thinking brushed on the trim too. I took a red scotch brite to one of the vertical pieces, but it wasn't coming along as well as I anticipated. Suggestions? Perhaps I need a way to put it on a something with power...I feel like doing it by hand will take weeks. I could just be being too **** though, I have issues with that...
 

alpinewhite

Well-known member
Joined
Aug 4, 2012
Messages
1,315
Location
Orange County, California, USA
Thanks guys! That's me doing my best Wilson impression. I should've put on a fishing hat, eh?!

I was kind of thinking brushed on the trim too. I took a red scotch brite to one of the vertical pieces, but it wasn't coming along as well as I anticipated. Suggestions? Perhaps I need a way to put it on a something with power...I feel like doing it by hand will take weeks. I could just be being too **** though, I have issues with that...
You shot the box at the same time as your fold-down tray, huh? The paint job on the box looks bitchin'
 

V70R

Well-known member
Joined
Jul 17, 2011
Messages
347
Location
Portland, OR
Damn that looks great. I think with that high of gloss 12-1500 on a DA would work great for the trim, and could be touched up easy with your skills. Great work!!
 
Last edited:
OP
O

oneandgone

Well-known member
Joined
Dec 4, 2012
Messages
159
The shelf was done before I decided if I was ready to do the box or not.

Thanks for the compliments guys.

I do like the white SO boxes, but black is my fav. Plus with a color change and how **** I am I would've had to do the whole thing inside-out.

Today I got all the left and right bank drawers installed and filled back up. I went through things as best I could for being in a hurry and threw a few things into a sell pile and some things into a trash pile. I also did a lot of this should be there, not here type of rearranging. I'm going to have to pick up some trays, dividers, etc soon. After getting a cart last week and having this box emptied out I can see a lot of places where things could be better organized and a lot of room could be freed up.

My SO lady came to see me today. She's only been into the shop twice now in the 7 months I've worked there. I called her last week as I needed a couple things warrantied on the box, and needed to order some other things for it. We discussed trim options and she's going to check into what if anything is available and what it will cost.

I only got 4 of the 8 center bank drawers ready to paint today, hopefully tomorrow I can get the rest ready and get them painted and install them on Friday. I have to add that I never could have gotten this done so quickly if it weren't for my buddy at work. I never asked for help, he just jumped right in and started sanding as well as offering to spray it for me. Here's a quick update pic...It's already getting dusty...:sad:
 

Attachments

  • Repaint 9.jpg
    Repaint 9.jpg
    44.8 KB · Views: 199
OP
O

oneandgone

Well-known member
Joined
Dec 4, 2012
Messages
159
No sir, I'm a body man so I know better than to mask the trim off. Instead I removed the trim so the paint won't peel. :)
 
OP
O

oneandgone

Well-known member
Joined
Dec 4, 2012
Messages
159
Thanks str8axle! More than likely I'll brush the trim as well as I can get it and go with it. I think it's going to be too expensive to replace, but will see when I hear back from SO.

I hear that bondo dust wreaks havoc on slides myself. Weird.
 
To avoid these ads, REGISTER NOW!
OP
O

oneandgone

Well-known member
Joined
Dec 4, 2012
Messages
159
How were you able to remove the drawer trim? If you don't mind me asking...

I put the flat side of a screwdriver against one end and tapped it with a hammer until I could slide it off by hand. After removing it I noticed there are 2 dimples on the backside where it's been crimped onto the drawer lip. I think when SO installs it they simply put it parallel to the lip and then slide it on, then crimp it to hold it in place. That said, I thin if you were to get ahold of the backside and roll it away from the drawer a bit you could then slide it down and off of the lip instead.

I heard that ,bondo dust makes you smarters than others, huh

Perhaps you didn't read the whole thread? I'm not sure if it was a coincidence that he made a nearly identical comment about the slides as a previous poster or if he made it to be funny, or to ridicule the aforementioned poster. Regardless, I was trying to be funny. Apologies for my dry humor. I sincerely assumed that there would suddenly be a lot more people posting that they heard bondo dust does some form of havoc on ball bearing slides.

Welcome to GJ btw! There's some great info on here if you can sift through all the other bs.
 

Blake150

Well-known member
Joined
Jan 20, 2013
Messages
93
Location
Indiana
I was just being silly .I get the privilege to breath bondo dust daily so I just had to make the , comment .thanks for the welcome .did you use base clear or single stage it looks nice either way
 

CWP1616L

Banned
Joined
Aug 31, 2012
Messages
3,297
Location
USA
I put the flat side of a screwdriver against one end and tapped it with a hammer until I could slide it off by hand. After removing it I noticed there are 2 dimples on the backside where it's been crimped onto the drawer lip. I think when SO installs it they simply put it parallel to the lip and then slide it on, then crimp it to hold it in place. That said, I thin if you were to get ahold of the backside and roll it away from the drawer a bit you could then slide it down and off of the lip instead.


Thank you for that information, I appreciate it.
 
OP
O

oneandgone

Well-known member
Joined
Dec 4, 2012
Messages
159
Thanks for all the kind words guys and for following along. Today the rest of the drawers got painted and installed. I also got them all filled back up. I'll have to get some pics inside them at some point I suppose. I should probably do that quickly while they're all nice and neat. I should add that although I didn't remove, clean, and lube the slides I did hit them with some spray lube. Even though they never felt bad to me before it was a big improvement! If time allows I'll probably get the trim cleaned up tomorrow. More than likely I'll brush it as well as I can and put it back on. New trim will probably be crazy expensive and I have this stuff just sitting here so... I am loving the all black look though...Hmmm....
 

Attachments

  • Repaint 10.jpg
    Repaint 10.jpg
    37.3 KB · Views: 171

CWP1616L

Banned
Joined
Aug 31, 2012
Messages
3,297
Location
USA
Let me know if you ever take the slides off. I heard that each slide as a pop rivet on it somewhere and I'd be interested in finding out their location.
 
OP
O

oneandgone

Well-known member
Joined
Dec 4, 2012
Messages
159
I finally had the spare time and money to put into my box so I accomplished some major steps this week. Pics to follow!

I've always wanted a stainless top for it, but was unwilling to pay the $900+ that Snap On wants for one so I decided to make my own. After a few simple measurements and a call to the lumber yard I had two 4x8 sheets of 3/4 inch MDF delivered within 30 minutes for $65. They can be found cheaper, but I don't have a truck and the yard was willing to deliver for free so I bit. Didn't even have to go, just called and paid over the phone. So convenient.

I found a nice, long, and straight board to use for a homemade fence for my circular saw. 2 cuts per board and the base for my top was nearly done. My saw doesn't have the power to cut through both at the same time, but after making the cuts I was able to stack them and shave the cut edges a bit to make them nice and even. Base done. Needless to say I have a lot of MDF left.

I have a stomp shear, but I don't have a brake...YET...so the next step was a stop at the heat/ac/plumbing/sheet metal shop down the street. After showing them my drawing and a brief discussion I could do nothing more than wait until they had time to bend it up for me. 2 days later, today, I got the call that it was finished. Final cost on the stainless was $286. I had to buy the whole sheet of 18ga, so again I have a lot of extra.

Since I went with this SS top the only good option for the trim seems to be brushed so I installed the old vertical trim and the caps for it as well. I had already gone over it with scotch brite so it was a 5 minute install. Just a few rivets and it was on. I haven't put the drawer trim on, and I think I may go without it. I like the look as it is.
 

Attachments

  • toolbox 11.jpg
    toolbox 11.jpg
    34.4 KB · Views: 62
  • Toolbox 6.jpg
    Toolbox 6.jpg
    6 KB · Views: 69
  • toolbox 10.jpg
    toolbox 10.jpg
    3.7 KB · Views: 62
  • toolbox 9.jpg
    toolbox 9.jpg
    125.7 KB · Views: 70
  • toolbox 8.jpg
    toolbox 8.jpg
    6 KB · Views: 77
  • toolbox 7.jpg
    toolbox 7.jpg
    5.3 KB · Views: 80
OP
O

oneandgone

Well-known member
Joined
Dec 4, 2012
Messages
159
I love how my phone and/or computer decides to make some pics smaller than others. No idea how that happens, but it really chaps my ***. Sorry I **** at the internet.
 

TerryH

Well-known member
Joined
Dec 8, 2012
Messages
2,248
Location
Springdale, AR
I hope you change your mind. Not only does the drawer trim look fantastic, it also adds comfort to your finger tips.

+1. I know some people like the look but to me it looks kinda nekked without the drawer trim. I think it wold be beautiful with brushed time. Awesome looking paint job BTW!!!
 
Last edited:
To avoid these ads, REGISTER NOW!
Top Bottom