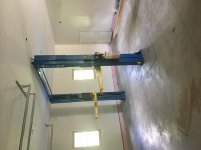
I finally put down the armorpoxy I purchased in the sale last Thanksgiving! Got this done over 3 days from Sept 20-22. Whew! And it looks fantastic! The first photo is before the epoxy. The concrete was poured in 2008 and has been lightly used. Between then and now, I went wild with electric, insulated the entire place, had drywall done, painted the entire thing put in heat and 2 mini splits....lots of work. I did it all except for the drywall. Did not want to do 2 floors of drywall. Painting was tough enough! Thank God for 18" rollers!
Back to the epoxy. First, I scraped all spots that needed it and pressure washed the entire place. (The spinning attachment that is made for floors and keeps overspray from hitting everything is a great add-on - got it at HD and is great for decks and concrete sidewalks). Then I used krud kutter on a few oil spills. Then TSP to neutralize them. Then the muriatic solution supplied with the armorpoxy kit. All this did a great job of cleaning up the floor. I was surprised how long it took to really dry - I let it sit about 10 days. It would be better if it sat for 2-3 weeks to really dry out.
This garage is a 32 x 28 but with 2x6 walls it ends up being 31x27 inside. I bought a 600 ft^2 kit plus an add-on kit so this is supposed to be good for 900 ft^2. I got light grey and bought the primer (2 part armorpoxy 2), the top coat (armor ultra) and I upgraded to the 2 part commercial/military clear coat. So all 3 layers were 2 part epoxies. And the clear came with ultra wear non-skid additive.
The primer was grey and went on easily. I used 18" epoxy glide (wooster from Amazon) rollers for all my applications. I used 2 brushes in all - one for the primer and one for the top coat. Since I'm putting baseboard trim up, I didn't need to go all the way to the edge. A tip - I bought 9 homer Home Depot 5 gallon pails and used 7 of them. Also I went through about 4 of the rollers. You should have a short and long painting pole. I have thin liners for the 18" roller plan and used 3 of these. You'll also definitely want a good respirator. I have all these supplies already; I don't like breathing toxic fumes!
Day 1: The primer set up pretty quickly but I had about an hour of work time with it. I had a fair amount - close to a gallon - left over. The primer was setting up within about 3 to 4 hours after application. Day 2: I expected the top coat to have shorter working time (like 30-45 minutes) and so I split it into 3 even amounts (HD 5 gallon cans) and did 1/3 of the garage at a time. This is when you definitely need the spike shoes (which I also had purchased from Armorpoxy).
This gave me a much greater appreciation for our women! Wearing those spiked shoes was weird! You need to lift your straight feet up or you can easily slide. So I was throwing the chips (yes, straight up so they fall down evenly like rain....I should have practiced because there are definitely some heavy spots...) and noticed what looked like 1/4-20 nuts on the floor. After I found 3 of these and then what looked like a nail/spike I realized the spiked shoes were "falling" apart. Before I realized this I was annoyed at Armorpoxy for mixing nuts in the chips....nope - my fault. I put the spike back in the one shoe and tightened all the nuts (HINT - do this BEFORE starting the job!) Also, adjust the spiked shoes rather tightly on your shoes so they stay on.
I did not use a squeegee at all and just used the rollers to spread all 3 layers around and this approach worked very well.
So by the time I finished the color coat or armor ultra it was probably 3 hours at least since starting and it was not setting up! I was sweating! But by the evening and definitely the next morning all was ok and it was walkable. The weather was great and clear and about 75 to 80F in the mornings when I did the work.
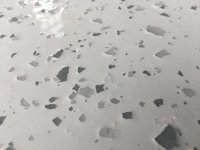
Day 3: The clear coat was easy to apply and what surprised me was that the non skid additive looked more like powder than a grit like sand. But it worked perfectly and gave a non skid surface that is not abrasive to the touch.
The amount I purchased was perfect. I used all the color coat with just a little left over. The same with the clear coat.
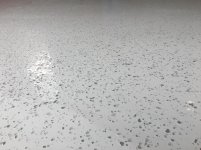
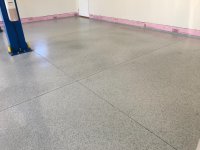
It gave an absolutely beautiful result! The clear coat looks so glossy and smooth that it looks like it is still wet.
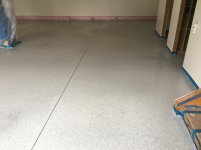
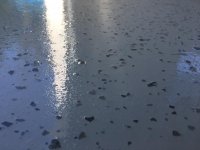
The second through fifth photos are before the clear coat. The last two are after the clear coat. I highly recommend Armorpoxy!
I was a bit concerned about doing a good job but it is definitely doable for anyone. If this 67 year old can do it by himself, anyone can!
Tom
Back to the epoxy. First, I scraped all spots that needed it and pressure washed the entire place. (The spinning attachment that is made for floors and keeps overspray from hitting everything is a great add-on - got it at HD and is great for decks and concrete sidewalks). Then I used krud kutter on a few oil spills. Then TSP to neutralize them. Then the muriatic solution supplied with the armorpoxy kit. All this did a great job of cleaning up the floor. I was surprised how long it took to really dry - I let it sit about 10 days. It would be better if it sat for 2-3 weeks to really dry out.
This garage is a 32 x 28 but with 2x6 walls it ends up being 31x27 inside. I bought a 600 ft^2 kit plus an add-on kit so this is supposed to be good for 900 ft^2. I got light grey and bought the primer (2 part armorpoxy 2), the top coat (armor ultra) and I upgraded to the 2 part commercial/military clear coat. So all 3 layers were 2 part epoxies. And the clear came with ultra wear non-skid additive.
The primer was grey and went on easily. I used 18" epoxy glide (wooster from Amazon) rollers for all my applications. I used 2 brushes in all - one for the primer and one for the top coat. Since I'm putting baseboard trim up, I didn't need to go all the way to the edge. A tip - I bought 9 homer Home Depot 5 gallon pails and used 7 of them. Also I went through about 4 of the rollers. You should have a short and long painting pole. I have thin liners for the 18" roller plan and used 3 of these. You'll also definitely want a good respirator. I have all these supplies already; I don't like breathing toxic fumes!
Day 1: The primer set up pretty quickly but I had about an hour of work time with it. I had a fair amount - close to a gallon - left over. The primer was setting up within about 3 to 4 hours after application. Day 2: I expected the top coat to have shorter working time (like 30-45 minutes) and so I split it into 3 even amounts (HD 5 gallon cans) and did 1/3 of the garage at a time. This is when you definitely need the spike shoes (which I also had purchased from Armorpoxy).
This gave me a much greater appreciation for our women! Wearing those spiked shoes was weird! You need to lift your straight feet up or you can easily slide. So I was throwing the chips (yes, straight up so they fall down evenly like rain....I should have practiced because there are definitely some heavy spots...) and noticed what looked like 1/4-20 nuts on the floor. After I found 3 of these and then what looked like a nail/spike I realized the spiked shoes were "falling" apart. Before I realized this I was annoyed at Armorpoxy for mixing nuts in the chips....nope - my fault. I put the spike back in the one shoe and tightened all the nuts (HINT - do this BEFORE starting the job!) Also, adjust the spiked shoes rather tightly on your shoes so they stay on.
I did not use a squeegee at all and just used the rollers to spread all 3 layers around and this approach worked very well.
So by the time I finished the color coat or armor ultra it was probably 3 hours at least since starting and it was not setting up! I was sweating! But by the evening and definitely the next morning all was ok and it was walkable. The weather was great and clear and about 75 to 80F in the mornings when I did the work.
Day 3: The clear coat was easy to apply and what surprised me was that the non skid additive looked more like powder than a grit like sand. But it worked perfectly and gave a non skid surface that is not abrasive to the touch.
The amount I purchased was perfect. I used all the color coat with just a little left over. The same with the clear coat.
It gave an absolutely beautiful result! The clear coat looks so glossy and smooth that it looks like it is still wet.
The second through fifth photos are before the clear coat. The last two are after the clear coat. I highly recommend Armorpoxy!
I was a bit concerned about doing a good job but it is definitely doable for anyone. If this 67 year old can do it by himself, anyone can!
Tom