To avoid these ads, REGISTER NOW!

Labeling Convention for Wires in Parallel Circuit

mikeinri

Well-known member
Joined
Nov 29, 2019
Messages
8,276
Location
MA
Not seeing answers on this, and would like to fix this ASAP...

I'm a DIY guy, so forgive me if I screw up terminology...

My general question is: Is there a labeling convention to identify lines coming into a outlet (junction) box?

My specific example:

I have a circuit that feeds two outdoor receptacles, and one in the garage. I've confirmed that they're in this order:

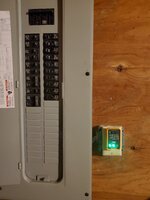
GFCI outlet next to panel in garage.
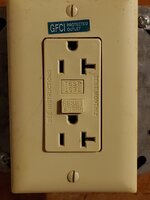
20231221_112829.jpg20231226_163251.jpg

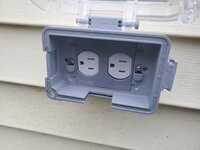
Front outdoor outlet (note, the wire with the black tape is NOT the one coming from the panel, and was covering a nick in the wire).

20231226_163753~2.jpg20231226_180905.jpg

Rear outdoor outlet. Right wire goes to garage (confirmed with meter).

20231226_165725.jpg

Garage outlet (primarily used for our backup / overflow fridge/ freezer.

20231221_115344.jpg20231226_170602.jpg


History:

House was built in 1999/2000. I moved here in 2005.

I previously added GFCI receptacles to each of the outlet boxes downstream of the one at the panel (overkill / rookie mistake).

I am now replacing the panel GFCI (with a new one), and all downstream receptacles will be WR (but non-GFCI) receptacles.

I am also trying to improve the waterproofing of the outdoor boxes. Of course, this is in response to the rain we had last week that filled one of the boxes with water, tripping GFCIs and making me nuts.

But my main question right now is, how should I label the ROMEX in each box, so it's easier to know which one is upstream (closer to the panel/supply), and which one is feeding the next box in the circuit?

Thanks in advance!

Mike
 
Last edited:
To avoid these ads, REGISTER NOW!

sparky 1971

Well-known member
Joined
Oct 9, 2018
Messages
8,009
Location
Central Iowa
I wouldn't worry about labeling. I mark the line side conductors of a GFCI by twisting the hot and neutral together a couple of times and that's it. The rest don't matter, just make good pigtails and you shouldn't ever have to worry about what is what.

On another note, you should have a fitting going into the back of the bell boxes, I use a simple PVC male adapter and put a glob of silicone around the hole. Then, when the box goes on, the silicone gets squished down and seals everything. And, you can drill up to a 1/8" hole in the bottom of the boxes so moisture can drain out. On top of that, I use anti seize on all of the exterior receptacle screws, including the cover screws. There have been a couple of times I didn't have anti seize and used Fluid Film instead.
 
OP
M

mikeinri

Well-known member
Joined
Nov 29, 2019
Messages
8,276
Location
MA
Thanks guys. I "worry" about labeling because that's just me, LOL. I'm not actually worried about it, just trying to make my life easier for troubleshooting next time I have a problem with this...

As for the outdoor boxes, these are metal (weren't grounded, I know I need to fix that). I don't love the idea of plastic boxes outdoors, what do you guys prefer?

I definitely plan to add a fitting to the back of the boxes, and use silicone in back (and I'm planning to use silicone instead of those stupid foam gaskets that don't seem to stay waterproof for very long). I'm assuming this is the best silicone for this job?

20231226_190222.jpg20231226_190251.jpg

I also need to add anchors in the walls, as the box-mounting screws were backing out, especially the rear of the house, which had a large in-use cover (I intend to put new in-use covers on front and back of the house).

Mike
 

sparky 1971

Well-known member
Joined
Oct 9, 2018
Messages
8,009
Location
Central Iowa
Thanks guys. I "worry" about labeling because that's just me, LOL. I'm not actually worried about it, just trying to make my life easier for troubleshooting next time I have a problem with this...

As for the outdoor boxes, these are metal (weren't grounded, I know I need to fix that). I don't love the idea of plastic boxes outdoors, what do you guys prefer?

I definitely plan to add a fitting to the back of the boxes, and use silicone in back (and I'm planning to use silicone instead of those stupid foam gaskets that don't seem to stay waterproof for very long). I'm assuming this is the best silicone for this job?

20231226_190222.jpg20231226_190251.jpg

I also need to add anchors in the walls, as the box-mounting screws were backing out, especially the rear of the house, which had a large in-use cover (I intend to put new in-use covers on front and back of the house).

Mike
Silicone sealant is silicone sealant, I doubt one is better than another. If you really want to be fancy, use Vulkem. Use metal boxes and drill a hole in the bottom. Don't silicone the covers, you'll never get them off and it looks like ****. The gaskets work fine as long as the box is installed properly. Any moisture that does get in will drain out the hole in the bottom.
 
OP
M

mikeinri

Well-known member
Joined
Nov 29, 2019
Messages
8,276
Location
MA
This is installed on vinyl siding. Does that change anything about how to waterproof the backside?

Mike
 

sparky 1971

Well-known member
Joined
Oct 9, 2018
Messages
8,009
Location
Central Iowa
This is installed on vinyl siding. Does that change anything about how to waterproof the backside?

Mike
What's behind the siding? You might be able to cut in an old work box. If not, just silicone around the penetration before you install the box. Bell boxes have little stand offs on the back that will allow water to run behind them and sealing around the hole will keep it from getting in the house. The terminal adapter will keep moisture from getting in the box even if you don't silicone it. You can also put a glob in the screw holes before you run the screws in.
 

Meursault74

Well-known member
Joined
Apr 1, 2019
Messages
22,079
Location
Southern California
Not seeing answers on this, and would like to fox this ASAP...

I'm a DIY guy, so forgive me if I screw up terminology...

My general question is: Is there a labeling convention to identify lines coming into a outlet (junction) box?

My specific example:

I have a circuit that feeds two outdoor receptacles, and one in the garage. I've confirmed that they're in this order:

GFCI outlet next to panel in garage.
20231221_112829.jpg20231226_163251.jpg

Front outdoor outlet (note, the wire with the black tape is NOT the one coming from the panel, and was covering a nick in the wire).

20231226_163753~2.jpg20231226_180905.jpg

Rear outdoor outlet. Right wire goes to garage (confirmed with meter).
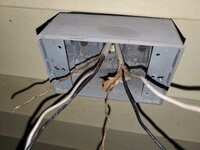
20231226_165725.jpg

Garage outlet (primarily used for our backup / overflow fridge/ freezer.

20231221_115344.jpg20231226_170602.jpg


History:

House was built in 1999/2000. I moved here in 2005.

I previously added GFCI receptacles to each of the outlet boxes downstream of the one at the panel (overkill / rookie mistake).

I am now replacing the panel GFCI (with a new one), and all downstream receptacles will be WR (but non-GFCI) receptacles.

I am also trying to improve the waterproofing of the outdoor boxes. Of course, this is in response to the rain we had last week that filled one of the boxes with water, tripping GFCIs and making me nuts.

But my main question right now is, how should I label the ROMEX in each box, so it's easier to know which one is upstream (closer to the panel/supply), and which one is feeding the next box in the series?

Thanks in advance!

Mike
You mentioning your "unsureness" of technical terms reminded me of this classic Seinfeld scene dealing with a "Rogue Electrician" and his lack of technical language (never mind the use of the term "outlet") :ROFLMAO:

 
OP
M

mikeinri

Well-known member
Joined
Nov 29, 2019
Messages
8,276
Location
MA
What's behind the siding? You might be able to cut in an old work box. If not, just silicone around the penetration before you install the box. Bell boxes have little stand offs on the back that will allow water to run behind them and sealing around the hole will keep it from getting in the house. The terminal adapter will keep moisture from getting in the box even if you don't silicone it. You can also put a glob in the screw holes before you run the screws in.

Behind the vinyl? I'm guessing a moisture barrier, then plywood, then insulation then interior drywall?

I'm not comfortable cutting into this. I don't really know which way the wires run inside the wall. I would assume straight down to the sill, but I don't see that in the basement.

Mike
 

wyliesdiesels

Well-known member
Joined
Aug 14, 2012
Messages
20,073
Location
Modesto, CA
The reason to NOT use silicone is that, when it eventually does leak and require re-sealing, it is virtually impossible to remove all traces of the old silicone and to get new silicone to stick to old silicone.
paintable silicone is easier to move and adhere to
 

Sinatra

Well-known member
Joined
Apr 22, 2013
Messages
117
If for your own purpose, you want to identify which is the LINE or FEED wire in a box, we have the electrician put a wrap of black tape on the FEED cable outer jacket for fire alarm work. Some devices will have a cable marker with the circuit # and the previous or next device number on it. For home work I write FEED on the inside of the box at the cable entry clamp. As I rewired my daughter‘s home I made a layout of the house with each circuit‘s wire route from the panel in and out of each outlet, switch and light fixture.
 

egdede

ALLIANCE MEMBER
Joined
Dec 20, 2009
Messages
2,103
You mentioning your "unsureness" of technical terms reminded me of this classic Seinfeld scene dealing with a "Rogue Electrician" and his lack of technical language (never mind the use of the term "outlet") :ROFLMAO:

Yeah...that's funny. Mods: 'Series' needs to be taken out of the title of this thread : )
 
To avoid these ads, REGISTER NOW!
OP
M

mikeinri

Well-known member
Joined
Nov 29, 2019
Messages
8,276
Location
MA
On another note, you should have a fitting going into the back of the bell boxes, I use a simple PVC male adapter...

Grabbed the only 1/2 inch PVC adapter I saw at HD, it won't fit into the house without cutting a bigger hole:

20231227_131216.jpg

I sort of predicted that, so I grabbed a metal one that's thinner. It also won't fit without cutting:

20231227_131159.jpg

I also have Duct Seal, will that work to seal that hole?

Screenshot_20231227-131953_Photos.jpg

Mike
 

Zeke

Well-known member
Joined
Aug 13, 2009
Messages
17,176
Location
Long Beach CA, the sewer by the sea.
The outlets aren't in series???

Mike
Parallel. (I type slow).

At the point where you are now the line side should be obvious as the wires are disconnected. Looks like the grounds were twisted together. Need to be nutted. Can't tell if there is a hook on the longer one.

Nothing wrong with a good plastic box outside. The drywall screws need to be replaced when you install the anchors. As mention, sealant on those is a good idea.

Labeling? I get by with a simple H or L, but L can be load or lights too. So if you're doing this for the next guy, use something that can't be misread.

There should be some kind of strain device at the box, but many seem to be installed w/o one. I bet you could drive that ****** in if you first took it to your grinder and smoothed one end. Then a lock nut.
 

sparky 1971

Well-known member
Joined
Oct 9, 2018
Messages
8,009
Location
Central Iowa
Grabbed the only 1/2 inch PVC adapter I saw at HD, it won't fit into the house without cutting a bigger hole:

20231227_131216.jpg

I sort of predicted that, so I grabbed a metal one that's thinner. It also won't fit without cutting:

20231227_131159.jpg

I also have Duct Seal, will that work to seal that hole?

Screenshot_20231227-131953_Photos.jpg

Mike
You have plenty of wire. Tape it together on the ends and shove it as far back in the wall that you can without pushing everything inside. Then use a Dremel type tool to cut the hole a little bigger. If you nick the wires it will only be on the end and you can cut that off. And if you use the ****** it should have a bushing on the end. Those things are sharp and will eventually cut into the wire.
 
OP
M

mikeinri

Well-known member
Joined
Nov 29, 2019
Messages
8,276
Location
MA
Thanks again, guys.

Well, I got one done...

Punched the hole in wall open with a 1/2 x 6-inch pipe ******. Probably could have gone up to 3/4, but this worked.

20231227_141139.jpg

Drilled (enlarged) the mounting screw holes, added silicone, and installed plastic anchors (not impressed with those). Also labeled the ROMEX wires.

20231227_150332.jpg

Drilled a 1/8-inch weep hole in the bottom of the box, towards the rear/center.

Installed metal ****** into box. Used teflon tape and a nut (inside). Put a few wraps of teflon tape around the outside edge of the ****** to protect the wire. Added silicone just to the rear box penetrations (not all over the vinyl).

20231227_150459.jpg

Installed a ground wire, and made a key/note inside the box.

20231227_150608.jpg

Screwed the box to the wall, using new screws that came with the anchors. Cut, stripped and twisted the grounds together. Stripped and screwed the hot and neutral wires to the receptacle. All connections are to the screws (not stabbed in).

20231227_154543.jpg

Installed the receptacle. Had to go up to a #8 screw on the left side, as that hole was stripped in the box. Installed the new plastic in-use cover.

20231227_160558.jpg

I preferred my old cover as it had a rubber(?) insert to keep bugs out (this has an opening at the bottom. I may fabricate something like that for this one.

20231227_160606.jpg

It's getting dark, and ready to rain, so I'm not touching the one in the front.

Fire away with comments / corrections...

Mike
 
Last edited:

sparky 1971

Well-known member
Joined
Oct 9, 2018
Messages
8,009
Location
Central Iowa
One thing I would definitely do different is to pig tail the wires. I know they are listed for feed thru, but there's no way I trust those phony little tabs between the screws to carry the load of everything beyond the receptacle. And I would have put the silicone on the siding. There's probably nothing wrong with gooping it on the back of the box, but if I were to do that two things would happen for sure 1) I would stick my fingers in it and 2) I would drop it in the dirt sticky side first. I also like to put some kind of anti seize or lube on the threads of all the screws. It's pretty frustrating when you try to change the receptacle and the screws break off in the box.
 

JohnX14

Well-known member
Joined
Jun 2, 2014
Messages
608
Location
Boston 'burbs
I don't see the need to label the "in and out" cables. Not technically a line and load. A load is typically controlled by something. (disconnect switch, GFCI receptacle, Thermostat etc.) But the labelling is effective, nonetheless. The repair in the OP looks like it will work, I typically use a box like this (This shows dutch lap siding, but they make them for flat/ 1/2" lap/ 5/8" lap as well. A little silicone around the house penetration, and a little more on the "black button" keeps the box very dry.FS8141-2.jpg
 

wyliesdiesels

Well-known member
Joined
Aug 14, 2012
Messages
20,073
Location
Modesto, CA
I don't see the need to label the "in and out" cables. Not technically a line and load. A load is typically controlled by something. (disconnect switch, GFCI receptacle, Thermostat etc.) But the labelling is effective, nonetheless. The repair in the OP looks like it will work, I typically use a box like this (This shows dutch lap siding, but they make them for flat/ 1/2" lap/ 5/8" lap as well. A little silicone around the house penetration, and a little more on the "black button" keeps the box very dry.
you most definitely need it for a GFCI location as you cannot put the feed from the breaker on the load side of the GFCI. unless of course you want to test it which just wastes time
 

Zeke

Well-known member
Joined
Aug 13, 2009
Messages
17,176
Location
Long Beach CA, the sewer by the sea.
Thanks again, guys.

Well, I got one done...

Punched the hole in wall open with a 1/2 x 6-inch pipe ******. Probably could have gone up to 3/4, but this worked.


I preferred my old cover as it had a rubber(?) insert to keep bugs out (this has an opening at the bottom. I may fabricate something like that for this one.

20231227_160606.jpg

It's getting dark, and ready to rain, so I'm not touching the one in the front.

Fire away with comments / corrections...

Mike
Yeah, I went to put my extension cord in an exterior box with an 'in-use' cover only to find that it housed wasps. Not all are clear. And I don't like them unless they are "in use." There should have been an insert to fill the gap if only a convenience receptacle.

And they are not cheap.
 
OP
M

mikeinri

Well-known member
Joined
Nov 29, 2019
Messages
8,276
Location
MA
Finally got some time and weather (dry-ish, and above freezing) to tackle the front outdoor outlet / box.

I followed most of the ideas here, am just realizing that I forgot pigtails on the hot and neutral wires, and antifreeze on the screws...

Instead of the metal pipe ******, I found a 1/2 x 4-inch PVC sprinkler riser (yes, it's basically a plastic pipe ******). Cut that as needed to leave about an inch sticking out of the box. Used pipe tape on the threads, and a nut on the inside. Filed the rough edges left by the hacksaw.

20240127_131310.jpg20240127_131313.jpg20240127_132203.jpg

Used a new metal box. Don't love that the filler plugs were plastic, but that's probably OK. Wrapped those in pipe tape as well.

Had to drill holes to mount it. I upgraded to metal anchors, which came with smaller (#6) screws, so I drilled 5/32 holes, and added a third screw, to make it stop wobbling when plugging / unplugging cords. The third screw is under the Romex opening, so the anchor and screw won't poke the wires (which come down into the box).

20240127_131746.jpg

Also drilled a 1/8 drain / weep hole in the bottom / rear of the box.

The hole in the wall looked like the original electrician used a hatchet instead of a drill. Just a big gash, much taller than needed.

I opened the hole (sideways) with a step drill (goes to 7/8, which was perfect for the 1/2-inch pipe ******). The step drill was free at HF a few weeks ago when I was shopping for tarps.

I filled the top half of the opening in the wall with Great Stuff. It was the only thing I found that said it could be used on wet wood. We've been getting Seattle's weather here since July...

I also labeled the Romex, and made a note inside the box, like I did for the rear of the house.

20240127_161046.jpg20240127_161049.jpg

Used a bunch of silicone (like the box on the back of the house, installed earlier in this project). Put the new in-use cover on, and it's finished. That third mounting screw made a HUGE difference! VERY solidly mounted to the wall now.

20240127_183743.jpg

Unfortunately, things went south after that. The GFCI next to the panel tripped as soon as i turned the breaker on, and wouldn't reset. I replaced the GFCI outlet (forgot to label anything in that box, LOL), but that wouldn't reset out of the package.

Unplugged the garage fridge (last outlet in the circuit), and I was able to get everything to behave normally. Tested all of the outlets (in order in the circuit) with the Fluke tester, everything worked perfectly.

20240127_180358.jpg

As soon as I plugged the fridge back in, the GFCI tripped again. Unplugged it, everything was fine.

Ran an extension cord to plug the fridge into another GFCI on a separate circuit, tripped that GFCI immediately as well. Unplugged, reset, tried again, same failure.

So, I solved the water-in-the-boxes problem (I hope), but need to buy a fridge...

I'll also go back and update the box at the back of the house (needs a plastic ******, third mounting screw, and the metal anchors) when I get some better weather.

Mike
 
Last edited:

mike93lx

ALLIANCE MEMBER
Joined
Dec 9, 2013
Messages
37,921
Location
Richmond, VA
Finally got some time and weather (dry-ish, and above freezing) to tackle the front outdoor outlet / box.

I followed most of the ideas here, am just realizing that I forgot pigtails on the hot and neutral wires, and antifreeze on the screws...

Instead of the metal pipe ******, I found a 1/2 x 4-inch PVC sprinkler riser (yes, it's basically a plastic pipe ******). Cut that as needed to leave about an inch sticking out of the box. Used pipe tape on the threads, and a nut on the inside. Filed the rough edges left by the hacksaw.

20240127_131310.jpg20240127_131313.jpg20240127_132203.jpg

Used a new metal box. Don't love that the filler plugs were plastic, but that's probably OK. Wrapped those in pipe tape as well.

Had to drill holes to mount it. I upgraded to metal anchors, which came with smaller (#6) screws, so I drilled 5/32 holes, and added a third screw, to make it stop wobbling when plugging / unplugging cords. The third screw is under the Romex opening, so the anchor and screw won't poke the wires (which come down into the box).

20240127_131746.jpg

Also drilled a 1/8 drain / weep hole in the bottom / rear of the box.

The hole in the wall looked like the original electrician used a hatchet instead of a drill. Just a big gash, much taller than needed.

I opened the hole (sideways) with a step drill (goes to 7/8, which was perfect for the 1/2-inch pipe ******). The step drill was free at HF a few weeks ago when I was shopping for tarps.

I filled the top half of the opening in the wall with Great Stuff. It was the only thing I found that said it could be used on wet wood. We've been getting Seattle's weather here since July...

I also labeled the Romex, and made a note inside the box, like I did for the rear of the house.

20240127_161046.jpg20240127_161049.jpg

Used a bunch of silicone (like the box on the back of the house, installed earlier in this project). Put the new in-use cover on, and it's finished. That third mounting screw made a HUGE difference! VERY solidly mounted to the wall now.

20240127_183743.jpg

Unfortunately, things went south after that. The GFCI next to the panel tripped as soon as i turned the breaker on, and wouldn't reset. I replaced the GFCI outlet (forgot to label anything in that box, LOL), but that wouldn't reset out of the package.

Unplugged the garage fridge (last outlet in the circuit), and I was able to get everything to behave normally. Tested all of the outlets (in order in the circuit) with the Fluke tester, everything worked perfectly.

20240127_180358.jpg

As soon as I plugged the fridge back in, the GFCI tripped again. Unplugged it, everything was fine.

Ran an extension cord to plug the fridge into another GFCI on a separate circuit, tripped that GFCI immediately as well. Unplugged, reset, tried again, same failure.

So, I solved the water-in-the-boxes problem (I hope), but need to buy a fridge...

I'll also go back and update the box at the back of the house (needs a plastic ******, third mounting screw, and the metal anchors) when I get some better weather.

Mike
Not saying to ignore the tripping issue, but I will never plug a fridge into a gfci, unless maybe it's something just holding drinks.

Fridges, freezers, sewage pumps, and sump pumps don't go on gfci's in my house
 

Norcal

Well-known member
Joined
Mar 16, 2008
Messages
13,769
The box needs a strain relief and a Romex connector would be suitable.
 
To avoid these ads, REGISTER NOW!
Top Bottom