To avoid these ads, REGISTER NOW!

Latest Craftsman Drill Press finds

Tano

Active member
Joined
Feb 1, 2018
Messages
26
Location
Staten Island, NY
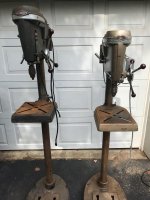
I realize the Craftsman 100 and 150's get a lot of press, but being a member with relatively few posts I wanted to at least share a little of what I have been working on. Here is a pic of my latest acquisition. Both 103's are in relatively unmolested condition and the black 103 has a hi-lo pulley set up, plus the column is almost 70" long, the gold is really in nice shape, with a non craftsman 1/2 Hp motor, and a nice AB push button switch. I originally had to pass on these when I saw them on CL. I had no time to make the 75 mile trip, but the price was very good. Ironically, a guy I have done business with in the past pinged me yesterday and asked if I was interested, so, for a markup, (that was still reasonable) I bought them both from him. I will post pics of this resto as I progress. I have refurbed a fair number of these presses so far and I cannot thank Franklee enough for his incredibly valuable information, as well as others on this board.so many nuggets have saved me from destroying parts during removal. especially how to remove the quill pulley. I never would have located those two screws. :)
 

Attachments

  • 2 craftsman DP's.jpg
    2 craftsman DP's.jpg
    98.7 KB · Views: 131
To avoid these ads, REGISTER NOW!
OP
T

Tano

Active member
Joined
Feb 1, 2018
Messages
26
Location
Staten Island, NY
I thought they had cut the column on the gold too until I measured it, but it is the standard 60" column.
The Black press column is 71" I am not sure why, and it has the machined ID for the Hi-lo which makes me think it is original.
 

FrankLee

Well-known member
Joined
Sep 13, 2010
Messages
3,617
Location
seMI, 48317
I realize the Craftsman 100 and 150's get a lot of press, but being a member with relatively few posts I wanted to at least share a little of what I have been working on. Here is a pic of my latest acquisition. Both 103's are in relatively unmolested condition and the black 103 has a hi-lo pulley set up, plus the column is almost 70" long, the gold is really in nice shape, with a non craftsman 1/2 Hp motor, and a nice AB push button switch. I originally had to pass on these when I saw them on CL. I had no time to make the 75 mile trip, but the price was very good. Ironically, a guy I have done business with in the past pinged me yesterday and asked if I was interested, so, for a markup, (that was still reasonable) I bought them both from him. I will post pics of this resto as I progress. I have refurbed a fair number of these presses so far and I cannot thank Franklee enough for his incredibly valuable information, as well as others on this board.so many nuggets have saved me from destroying parts during removal. especially how to remove the quill pulley. I never would have located those two screws. :)
Very nice Tano!

How did that 80 head casting work?
 

FrankLee

Well-known member
Joined
Sep 13, 2010
Messages
3,617
Location
seMI, 48317
These are always cool! How come one is shorter than the other?

I thought they had cut the column on the gold too until I measured it, but it is the standard 60" column.
The Black press column is 71" I am not sure why, and it has the machined ID for the Hi-lo which makes me think it is original.


The column was shortened from ~67" to ~62" in the 1956 model year.
 
OP
T

Tano

Active member
Joined
Feb 1, 2018
Messages
26
Location
Staten Island, NY
worked like a charm, I gave it a good cleaning with Simple Green and than some lacquer thinner/ wax and grease remover. I started putting it all together the other night but have not painted it yet. i want to try a Red DP for a change just to see how I like the look and i think that one will be the guinea pig. Thanks for the info on the column length as well, very helpful.
 
To avoid these ads, REGISTER NOW!

FrankLee

Well-known member
Joined
Sep 13, 2010
Messages
3,617
Location
seMI, 48317
worked like a charm, I gave it a good cleaning with Simple Green and than some lacquer thinner/ wax and grease remover. I started putting it all together the other night but have not painted it yet. i want to try a Red DP for a change just to see how I like the look and i think that one will be the guinea pig. Thanks for the info on the column length as well, very helpful.

:thumbup:
 

MayerMR

Well-known member
Joined
Feb 13, 2018
Messages
831
Location
Dallas, Texas
The column was shortened from ~67" to ~62" in the 1956 model year.

I apologize for the thread hijack, but I'm getting ready to replace the original 2" column on my Walker-Turner table top drill press with a longer one to make it a standing press. Is 70" about the standard height for a floor press? Also, I was thinking of getting either cold-rolled steel C1026 DOM or stainless... both are 2" diameter w/.188" thick walls. Not sure which would be better, but I'm guessing the stainless would get scratched up (and be much more noticeable) than the standard steel.

Thanks and again, sorry for the hijack
 

mattblast

Well-known member
Joined
Jan 30, 2013
Messages
786
Location
Bridgewater, NJ
Can’t wait to see the restoration process. What process do you use to remove the column from the base for transportation and cleanup?

Ps - that garage door looks familiar!
 
Last edited:
OP
T

Tano

Active member
Joined
Feb 1, 2018
Messages
26
Location
Staten Island, NY
Can’t wait to see the restoration process. What process do you use to remove the column from the base for transportation and cleanup?

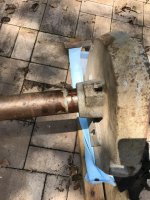
Picked up another press today and remembered that MattBlast asked me to post pics of the tool I made to remove the columns.

This has worked every time. It is essentially 2" Pipe fittings. A 2" cap, a 6" 2" black pipe, but the end is a 2" Electrical Conduit coupler, 2" couplers are too big and the conduit version is perfect.

What i have been doing is hitting the column a few times from the bottom with the driver just to loosen things up, spraying pb blaster, let is sit a half hour, and go back to work on it. Typically I get it removed on the first try. only once did I re-apply PB blaster. I am soaking a column/base right now and will give it a go.
 

Attachments

  • driver.jpg
    driver.jpg
    148.6 KB · Views: 25
  • driver 1.jpg
    driver 1.jpg
    147.7 KB · Views: 27
Last edited:
OP
T

Tano

Active member
Joined
Feb 1, 2018
Messages
26
Location
Staten Island, NY
Can’t wait to see the restoration process. What process do you use to remove the column from the base for transportation and cleanup?

Picked up another press today and remembered that MattBlast asked me to post pics of the tool I made to remove the columns.

This has worked every time. It is essentially 2" Pipe fittings. A 2" cap, a 6" 2" black pipe, but the end is a 2" Electrical Conduit coupler, 2" couplers are too big and the conduit version is perfect.

What i have been doing is hitting the column a few times from the bottom with the driver just to loosen things up, spraying pb blaster, let is sit a half hour, and go back to work on it. Typically I get it removed on the first try. only once did I re-apply PB blaster. I am soaking a column/base right now and will give it a go.

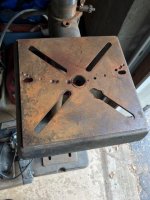
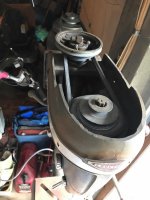
Ok, another successful separation. The first pic shows the progress after 3 solid shots with a BFH. Pic 2 is just the rust inside the base for reference. pic 3 is the column itself. once I had it loose it was just a matter of tapping it out the rest of the way and making sure it did not land on my foot....
I hope this helps someone.
 

Attachments

  • Rust 1.jpg
    Rust 1.jpg
    129.6 KB · Views: 41
  • Rust 2.jpg
    Rust 2.jpg
    129.3 KB · Views: 38
  • Rust 3.jpg
    Rust 3.jpg
    116.5 KB · Views: 33

FrankLee

Well-known member
Joined
Sep 13, 2010
Messages
3,617
Location
seMI, 48317
Can’t wait to see the restoration process. What process do you use to remove the column from the base for transportation and cleanup?

Picked up another press today and remembered that MattBlast asked me to post pics of the tool I made to remove the columns.

This has worked every time. It is essentially 2" Pipe fittings. A 2" cap, a 6" 2" black pipe, but the end is a 2" Electrical Conduit coupler, 2" couplers are too big and the conduit version is perfect.

What i have been doing is hitting the column a few times from the bottom with the driver just to loosen things up, spraying pb blaster, let is sit a half hour, and go back to work on it. Typically I get it removed on the first try. only once did I re-apply PB blaster. I am soaking a column/base right now and will give it a go.

Ok, another successful separation. The first pic shows the progress after 3 solid shots with a BFH. Pic 2 is just the rust inside the base for reference. pic 3 is the column itself. once I had it loose it was just a matter of tapping it out the rest of the way and making sure it did not land on my foot....
I hope this helps someone.

Impressive results, Tano!
 
To avoid these ads, REGISTER NOW!
Top Bottom