To avoid these ads, REGISTER NOW!

Latest fab. project - downhill racer

Jeff Ivers

Well-known member
Joined
Apr 9, 2010
Messages
2,561
Location
Oklahoma
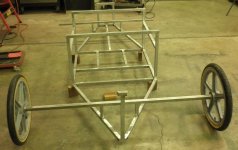
My latest fabrication project is a downhill racer for my almost 7 year old grandson. The rules are fairly loose - maximum weight, maximum height, maximum length and maximum width, and working brakes and steering.
front 07122011.jpg
rear 07122011.jpg
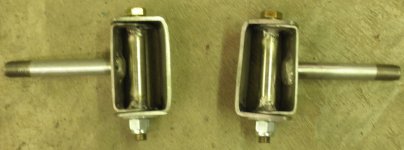
spindles 07122011.jpg
I plan on laying up a fiberglass body once the chassis, steering and brakes are complete.
 
To avoid these ads, REGISTER NOW!

NASTYZEN

Well-known member
Joined
Jun 11, 2010
Messages
2,823
Location
St-Colomban,Que. Canada
Wish I would of had a Grandpaw build me a racer! Had to build my own.
I find it great that you would take the time to do this for him,make sure he gets involved in the build. It will make it all even better.Nice work too.:thumbup:
 

Travis E.

Well-known member
Joined
Apr 20, 2010
Messages
214
Location
Newhall Ca.
Looking good Jeff.
Do you race with some sort of oraganization?
Having raced soapbox cars I would like to share a few things.
Those wheels will flex a lot. If you run pinch brakes they may even lock up in a hard turn. You probably have thought of this but triangulating the front and rear axle with the frame will make your axles much stronger and less likely to fold over if you were to hit a curb.

looking forward to progress pictures.
 
OP
J

Jeff Ivers

Well-known member
Joined
Apr 9, 2010
Messages
2,561
Location
Oklahoma
Travis,

I don't race with any organization. One of the local communities has held this real informal race the last 2 years and is doing it again this year. Thanks for the design comments. I am planning to triangulate the axles, but am waiting until I get the perimeter superstructure complete.

Looking good Jeff.
Do you race with some sort of oraganization?
Having raced soapbox cars I would like to share a few things.
Those wheels will flex a lot. If you run pinch brakes they may even lock up in a hard turn. You probably have thought of this but triangulating the front and rear axle with the frame will make your axles much stronger and less likely to fold over if you were to hit a curb.

looking forward to progress pictures.
 

grego

Well-known member
Joined
Apr 25, 2009
Messages
251
Location
Sac, CA
Very cool, what are you planning to do for brakes and steering. I have done several lame attemps for my girls and I think it is time to step it up a few notches. What are you using to weld?
 

78Bird

Well-known member
Joined
Apr 23, 2010
Messages
528
Location
Charlotte, NC
Put in a way to adjust the weight. you want it as heavy as allowed, and you might reap benefits being able to adjust the balance one way or the other.

think of enclosing the wheels to prevent getting tangled... and besides, rubbing is racing :D
 
OP
J

Jeff Ivers

Well-known member
Joined
Apr 9, 2010
Messages
2,561
Location
Oklahoma
I have made some progress this last week on my "Borrowed Ideas Racing" project.

Some of my inspiration has come from photos taken of cars at the last two years events and some has come from photos of downhill racers built by Lotus and Maserati for the race at the Goodwood Festival of Speed.

One of my big themes in life is trying to repurpose materials. I am fortunate to have a friend who called me whenever the hardware store he worked at was throwing out displays made with metal. That is the source of the entire 62 feet of 20 gauge 1" tubing I have used so far, as well as most of the brackets. An old shoulder harness provided the tow eye.

This is a picture of one of the mostly completed steering spindles.
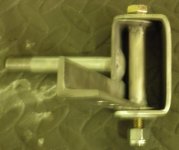
finished spindle.jpg
This is what I started with to create the steering arm.
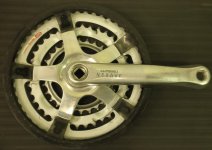
steering arm start.jpg
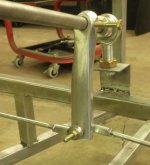
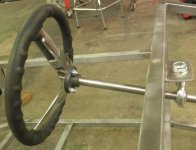
The next three pictures show the finished steering arm and the mounting of the steering shaft.
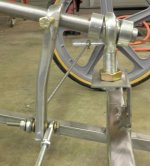
steering 1.jpg
steering 2.jpg
Steering 3.jpg
I have 4 wheels on the ground and working steering. I am presently working on the supports for the "clinch" style bike brakes that will operate on the rear wheels only.

The car was designed with a fixed 4" ground clearance. I built the bottom layer of the chassis first, mounted the axles, completed perimeter superstructure, and then installed the front spindles and steering. I still have some cleanup tasks on the steering - replace a temp. bolt with an actual set screw, shorten some bolts, paint the spindles, etc. After that, I will add some diagonal bracing in strategic places, form a belly pan, and then send the chassis off for powder coating.

I am using a Lincoln Weld-Pak 100 mig welder with argon/CO2 shielding gas. I spend a lot more time grinding my welds than I spend welding! I will say after welding on this almost every day for several weeks, I am starting to lay down some pretty decent beads.
 

dadsEH

Well-known member
Joined
Oct 13, 2010
Messages
3,104
Location
Tangambalanga in the Kiewa valley of North Vic.AU
Fantastic work Jeff, keep the photos coming , dont forget the 'akerman' steering angles . the steering arms off the stub axles should be pointing at the center line of the rear axle in the straight ahead position to get the best response when the wheels are on a sharp lock, (inside wheel then turns tighter radius on turns) otherwise you get tire scrub (dont ask me how I know that). And it looks good too. knowing hotrodders will notice your handywork.
To rework them you could just cut a notch to the bottom flat of the angle section of the arms bend inboard and reweld
you going to use an aluminium belly pan?

Here ya go.... http://en.wikipedia.org/wiki/Ackermann_steering_geometry
 
Last edited:
OP
J

Jeff Ivers

Well-known member
Joined
Apr 9, 2010
Messages
2,561
Location
Oklahoma
Thanks for the tip on ackerman. Yes, I will be using aluminum for the belly pan. I am planning on a fiberglass body. I got slowed down with the process of creating a working brake pedal. I almost have it figured out and will post another update by early next week.

Fantastic work Jeff, keep the photos coming , dont forget the 'akerman' steering angles . the steering arms off the stub axles should be pointing at the center line of the rear axle in the straight ahead position to get the best response when the wheels are on a sharp lock, (inside wheel then turns tighter radius on turns) otherwise you get tire scrub (dont ask me how I know that). And it looks good too. knowing hotrodders will notice your handywork.
To rework them you could just cut a notch to the bottom flat of the angle section of the arms bend inboard and reweld
you going to use an aluminium belly pan?

Here ya go.... http://en.wikipedia.org/wiki/Ackermann_steering_geometry
 

hunter1151

Well-known member
Joined
Jun 19, 2011
Messages
202
Location
Kansas
Does this go mostly in a straight line??? You have what looks like no kingpin inclination(caster) and no camber which helps it corner. If this is a downhiller you want it as free as possible, you will need to play with the toe as well. Remember this just my opinion but it looks like the way you have it set up now it will be a handful to drive. Don't know what speeds you will encounter, but that depends on the hill. Handling is everything when your engine is gravity. Where you put the weight, which in this case is the driver, is very impotant. Lots of good info out there on steering geometry........
 

964haus

Well-known member
Joined
Nov 1, 2010
Messages
498
Location
Vancouver, BC
Like the others said, what a great project! Brings back memories of building my son a wooden downhill racer for our annual block party last year.

Paint scheme based on the old racing Gulf sponsored Porsche's...

Designed on SketchUp, wood cut by my dad, assembled in my back yard. Fully functional steering, hand brake, safety rope for the dad's to run behind the carts as they ran down the street....full street length "track" with the carts getting some serious speed.

All began with a few dads on the street 'suggesting' each could build the best handmade cart.......

Matthew
 

Attachments

  • go cart1.jpg
    go cart1.jpg
    44.7 KB · Views: 798
  • go cart - compilation.jpg
    go cart - compilation.jpg
    120.4 KB · Views: 512
  • IMGP3806.jpg
    IMGP3806.jpg
    144 KB · Views: 570
OP
J

Jeff Ivers

Well-known member
Joined
Apr 9, 2010
Messages
2,561
Location
Oklahoma
I have made a bit of progress in the last 10 days. The downhill race this car will be entered in is a straight line race. Steerig corrections will only be minor due to uneveness of road except when the car is towed back to the start.
After examining a number of other cars designed for this type of race and considering the weight limit is 177 pounds plus the driver (less than 50), I decide to not design in any castor. I have designed in negative camber on the front and will be modifying the car for better ackerman effect.
4 wheels.jpg
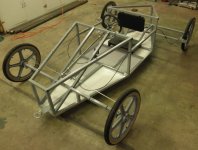
Four wheels on the ground, working steering, and rear brakes mounted.
belly pan 2.jpg
The car upside down, showing the fabricated belly pan. This will be pop riveted on after the chassis is complete.
brake pedal.jpg
The brake pedal, almost finished.
front bracing.jpg
Diagonal front bracing added to stiffen the chassis.
rear bracing.jpg
Diagonal rear bracing and gussets added to stiffen the chassis.
The chassis is constructed of about 80 feet of 20 gauge tubing and 8 feet of 14 gauge tubing for the axles. When the car is supported on the ends and I put my entire 200 pounds on the center, I get hardly any deflection now.
 
OP
J

Jeff Ivers

Well-known member
Joined
Apr 9, 2010
Messages
2,561
Location
Oklahoma
Borrowed Ideas Racing update.

I now have the chassis back from the powder coaters.
rear belly pan install.jpg
This shows the aluminum belly pan pop-riveted to the chassis.
seat install.jpg
This shows the homemade seat being installed.
re-assembly.jpg
This shows the re-assembly in progress.

Next steps:
finish brake pedal and cable hookup
modify front steering arms for better ackerman
begin fiberglass body
 
OP
J

Jeff Ivers

Well-known member
Joined
Apr 9, 2010
Messages
2,561
Location
Oklahoma
Borrowed Ideas Racing Update:

As of today, the chassis is complete and re-assembled after powder coating, with working steering and brakes. Steering corrected for ackerman. Next up is building a body for this bad boy. The race is September 24 in Sand Springs, OK.
brake linkage.jpg
This was the hardest part for me to fabricate - it is part of the brake pedal assembly.
Completed chassis.jpg
The completed chassis.
Cockpit.jpg
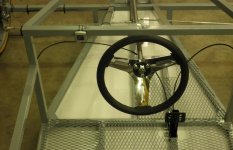
The cockpit, showing the speedometer.
Brake.jpg
Rear brake.
 
To avoid these ads, REGISTER NOW!

1320stang

Well-known member
Joined
Dec 28, 2006
Messages
4,584
Location
Edmond, OK
ooooh, I think I would have put a lot of caster in it. On the drag cars my buddy builds, they have a lot of caster so that they sort of correct themselves.

Been thinking about organizing one of these in Edmond.
 
OP
J

Jeff Ivers

Well-known member
Joined
Apr 9, 2010
Messages
2,561
Location
Oklahoma
I thought about building in castor, but then remembered all the soap box derby cars that have been built over the years and the crude downhill racers I built when I was a kid that had no castor because the wheels were attached to a 2x4 that pivoted in the middle. Since castor, as you inidcated, affects the self-centering of the wheel and this is basically a straight line race, I decided to forego that. The fast cars last year hit about 25 mph. Anyway, Sunday we will be doing some trial runs and I will see then if anything needs to be re-engineered.

ooooh, I think I would have put a lot of caster in it. On the drag cars my buddy builds, they have a lot of caster so that they sort of correct themselves.

Been thinking about organizing one of these in Edmond.
 
OP
J

Jeff Ivers

Well-known member
Joined
Apr 9, 2010
Messages
2,561
Location
Oklahoma
I am curious why you think they won't work. They have used clinch brakes on bikes for years and this is basically a 4-wheel bike with brakes on 2 wheels. Will find out Sunday, as we are planning to do some testing before I get too carried away with making a fibrglass body.

I hope those caliper brakes work better than I think they will!

Great looking project, I'm sure he'll love it!
 

Jim Johnstone

Well-known member
Joined
Apr 11, 2011
Messages
1,841
Location
Brantford, Ontario
I am curious why you think they won't work. They have used clinch brakes on bikes for years and this is basically a 4-wheel bike with brakes on 2 wheels. Will find out Sunday, as we are planning to do some testing before I get too carried away with making a fibrglass body.

Just my experience as a bike mechanic. I have always hated caliper brakes, especially cheap pressed steel versions. I would at a bare minimum install decent road racing pads in them.

Any chance of putting the brakes on the front wheels? You'd get a lot more stopping power from them.
 

adam728

Well-known member
Joined
Aug 9, 2009
Messages
2,900
Location
Michigan
Looks pretty cool

2 things -
I think you'll want some caster as well. It most likely will want to wander all over as is and require constant input.
The brakes. I'd add a brace from the axle to the tubing that the brake is mounted on. Right now you are going to flex that tube, and in turn pull a large amount of the pad surface off the rim. I wouldn't be surprised if it shuddered badly. A fair amount of force on the end of a long cantilever.
 

motorbreath53

Well-known member
Joined
Sep 3, 2010
Messages
113
Location
SoCal
This is cool... and its even cooler that you're open to the constructive critisism from these guys. Post up some trial run pics...
 
OP
J

Jeff Ivers

Well-known member
Joined
Apr 9, 2010
Messages
2,561
Location
Oklahoma
If you organize one in Edmond, be sure to let me know. That is where my grandson lives (presuming you are referring to Edmond, OK).

We spent the day today testing the car and my 6-yearold grandson was able to handle the steering and brakes just fine. He needs to practice smooth steering inputs, as he slowed himself down some by using too much steering input and then correcting. By the end of the day, he was much better.

ooooh, I think I would have put a lot of caster in it. On the drag cars my buddy builds, they have a lot of caster so that they sort of correct themselves.

Been thinking about organizing one of these in Edmond.
 
OP
J

Jeff Ivers

Well-known member
Joined
Apr 9, 2010
Messages
2,561
Location
Oklahoma
Actually, caliper brakes were not my first choice. I wanted to use bike disk brakes until I found out how limited one is on wheel selections that are compatible with disk brakes. I also, considered inboard disk brakes, but ruled that out due to haing to have the wheels fixed to the axle and the axle rotate. We tested the car today and the brakes did fine. I decided to not put the brakes on the front wheels because I would have had to create a mounting mechanism that steered with the wheel.

Just my experience as a bike mechanic. I have always hated caliper brakes, especially cheap pressed steel versions. I would at a bare minimum install decent road racing pads in them.

Any chance of putting the brakes on the front wheels? You'd get a lot more stopping power from them.
 
OP
J

Jeff Ivers

Well-known member
Joined
Apr 9, 2010
Messages
2,561
Location
Oklahoma
Borrowed Ideas Racing update:

I appreciate all the comments and posts. I am referring to this project as "borrowed ideas racing" after I tried for a while to decipher a Physics text to determine design parameters. That process remined me of why I did not like Physics in college. So, when that wasn't working I decided to look at as many similar projects as I could find and then let that guide my design efforts.

Friday night, my son came over and helped me set the toe-in to 0. While he was there, he climbed in the car and I gave him a quick shove across the shop, which led to a panic stop and a failure of my brake pedal. I had wondered, when building it, if it would be strong enough. I spent yesterday reinforcing it with some strategically applied angle iron.

Today, my granson came up and we spent a good portion of the day getting in trial runs on a parking lot. My daughter also made some runs. The only failure we experienced was the magnet I had epoxied to the wheel to actuate the speedometer fell off. I will bolt it on tomorrow. Steering is quick but does not require too much effort for a 6 year old. Brakes worked solidly with no shudder and decelerated the car smoothly.

Now, If I can just figure out a way to make a simple mold for the body, I will be in business. We can enter the car as is, if need be.

Anybody out there have any really slick ideas on fiberglass mold making that would be fast, easy, and cheap?
trial run.jpg
Trial run.
 
Last edited:

rarevair

Well-known member
Joined
Feb 28, 2010
Messages
62
Location
Valley Center, KS
My suggestion on the body would be to make it out of fabric, like the early airplanes. Find the right fabric and you can glue it to your existing frame, heat it and dope it to shrink it tight then paint it. If you want a more rounded shape you can create the framework out of 1/4 or 3/8 tubing. We did this on our Electrathon cars and it worked great.

Since everyone is throwing in their two cents . . . you might want to drill some extra holes in the steering arm coming off the steering shaft . . . if you shorten that up it will slow down the steering, decrease the steering effort and help on the oversteering problem. Most likely too late now, but also check into your "scrub radius". A line extended thru the kingpin should intersect the ground in the middle of the tire patch, otherwise every time the steering is corrected you are scrubbing off extra speed.

Looks like a great job and everyone is having fun. Keep us posted on your progress.
 

RBailey

Well-known member
Joined
Jan 17, 2011
Messages
339
Location
Dubai, UAE (Arabian Gulf)
Borrowed Ideas Racing update:
Now, If I can just figure out a way to make a simple mold for the body, I will be in business. We can enter the car as is, if need be.


Stretch fabrich then fibre glass over the top (common trick for making speaker boxes), check google.

Alternatively you can make the shape out of polystyrene tiles / blocks, put packing tape over the top then GRP. Once set disolve / wash out the polystrene with acetone.
 

rarevair

Well-known member
Joined
Feb 28, 2010
Messages
62
Location
Valley Center, KS
Here are photos of a couple of the Electrathon cars our High School team built using the fabric bodies:

AWB-160.jpg


AWB-60.jpg
 
OP
J

Jeff Ivers

Well-known member
Joined
Apr 9, 2010
Messages
2,561
Location
Oklahoma
Fiberglassing over fabric is a good idea. I had forgotten that we built canoes that way when I was a kid.

My suggestion on the body would be to make it out of fabric, like the early airplanes. Find the right fabric and you can glue it to your existing frame, heat it and dope it to shrink it tight then paint it. If you want a more rounded shape you can create the framework out of 1/4 or 3/8 tubing. We did this on our Electrathon cars and it worked great.

Since everyone is throwing in their two cents . . . you might want to drill some extra holes in the steering arm coming off the steering shaft . . . if you shorten that up it will slow down the steering, decrease the steering effort and help on the oversteering problem. Most likely too late now, but also check into your "scrub radius". A line extended thru the kingpin should intersect the ground in the middle of the tire patch, otherwise every time the steering is corrected you are scrubbing off extra speed.

Looks like a great job and everyone is having fun. Keep us posted on your progress.
 
OP
J

Jeff Ivers

Well-known member
Joined
Apr 9, 2010
Messages
2,561
Location
Oklahoma
Thanks for posting the pics! I like what you did with your Electrathon cars! Would like to see a pic of whats under the skin.

Here are photos of a couple of the Electrathon cars our High School team built using the fabric bodies:

AWB-160.jpg


AWB-60.jpg
 
OP
J

Jeff Ivers

Well-known member
Joined
Apr 9, 2010
Messages
2,561
Location
Oklahoma
Borrowed Ideas Racing update:

I appreciate the ideas posted on ways to fiberglass the car. After careful consideration of the following:

1) Desire to have the body lift off the chassis
2) Materials I had on hand
3) Cost of materials for various techniques

and considering these options:

1) Use aluminum panels that follow the shape of the chassis
2) Creating a tubing framework and stretching fabric and then fiberglass over
3) Building a separate buck to fiberglass over

I decided to go with the 3rd option.

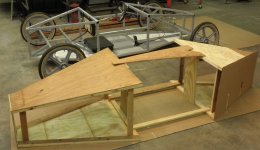
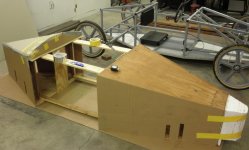
Here are a couple of pics of the buck under construction - I should finish it tomorrow and start fiberglassing the next day. Thank goodness the temperature has finally moderated so I can stand to work with the shop open for ventilation.
buck1.jpg
buck2.jpg
 
OP
J

Jeff Ivers

Well-known member
Joined
Apr 9, 2010
Messages
2,561
Location
Oklahoma
Borrowed Ideas Racing update:

The race is this Saturday and check in is Friday night! I've really had the push on to try to finish a body in time.
buck4.jpg
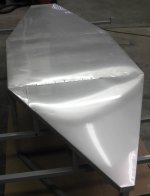
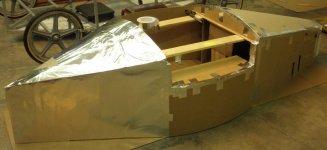
This shows how I finished the buck out with cardboard over the wood and tinfoil taped over the cardboard using foil tape. 2 coats of release wax was applied over the foil and tape.
body1.jpg
This shows the fiberglass being layered on over the foil.
body3.jpg
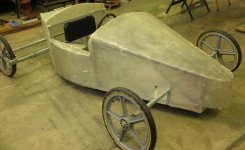
This shows the body removed from the buck.
trial fit 2.jpg
This shows the body trial fit to the chassis.

Tomorrow, I fab the mounts for the body, smooth out and repair a couple of minor areas on the body and then paint the next day. With luck we will make the race with a painted body on the chassis.
 

Nighttrain

Well-known member
Joined
Aug 6, 2009
Messages
2,682
Location
Dripping Springs, Tx
Really cool but that makes me itch. I had a 34' wooden boat that I covered in fiberglass. That made me lose all interest for life in it.

Can't wait to see the final product.
 
To avoid these ads, REGISTER NOW!
Top Bottom