To avoid these ads, REGISTER NOW!

Lathe stand design..

Macrosloth

Well-known member
Joined
Apr 27, 2012
Messages
86
Location
Van
Normally I just lurk here, but I am looking for some feedback on the design of a lathe stand as I just picked up a 12x36 lathe.

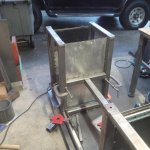
I usually just pick up a bunch of metal and weld it together and see what turns out, but I am sick at the moment and figure I might as well try to actually plan this out. You will have to excuse the lame model attempt as this is my first time using sketchup..

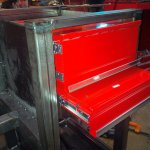
I'm thinking of using the left two boxes for larger items such as the 4 jaw chuck and the right side as a place for an intermediate (middle?) tool box to hold the cutters and other small items. Any suggestions on a tool box?

For material I was thinking of using 2" box 1/8th wall. I will level the feet using some heavy bolts through hockey pucks.

How thick should I make the top plate? I dont have an unlimited budget so do not want to buy anything thicker than required.

Anyways, thanks for the feedback.


To avoid these ads, REGISTER NOW!

nine4gmc

Well-known member
Joined
Mar 24, 2012
Messages
14,357
Location
Dallas
I made one for my 12x36 out of 2" square thick wall and 3/16" server rack material with a couple file cabinets built in.

http://www.garagejournal.com/forum/showthread.php?t=186240

pic02544.jpg


Edit, I see you have a real 12x36, not a hobby lathe like mine so you may want to go heavier on the stand.
 

A_Pmech

Well-known member
Joined
May 8, 2007
Messages
8,002
Location
IL
Welcome Macrosloth,

My first thought is don't make a heavy table top. The top plate doesn't need to be any heavier than sheet metal to keep the chips from falling through the structure. Turn up the edges and weld them so you have a usable chip pan.

Instead, run some boxed 2" x 3/16" or 1/4" wall tube under the attachment points and bolt the machine to that with tapped holes in the tube wall. You'll economize on steel that way and the result will be more rigid than tubing alone.

Speaking of bolting the machine, only bolt the headstock end of the machine to the table. Let the tailstock end float. On most bench lathes there's no need to bolt down the tailstock end of the bed down and all it accomplishes is inducing a twist into the bed which has to be shimmed out.
 

zkling

Well-known member
Joined
Jan 23, 2007
Messages
16,939
What lathe did you get? Nine4's design is simple yet rugged. You really don't need that 3rd leg support on your sketch up design.

Speaking of bolting the machine, only bolt the headstock end of the machine to the table. Let the tailstock end float. On most bench lathes there's no need to bolt down the tailstock end of the bed down and all it accomplishes is inducing a twist into the bed which has to be shimmed out.

I'm going to have to respectfully disagree with you on this one A_Pmech. Again depending on the lathe having a non bolted down tail sock end could really cause some vibrations in the machine. Quite a few of the more serious machines have built in level adjustments in the tail bed support, even if it doesn't a few shims would be all that is needed.
 
Last edited:
OP
M

Macrosloth

Well-known member
Joined
Apr 27, 2012
Messages
86
Location
Van
I've heard about keeping the tail loose, Ill tap it, and have the bolts on that side just finger tight..

The lathe is a gear head model, so I'd say almost 70 percent of the weight is on the left side.

Similar to mine, http://precisionmatthews.com/PM1236Lathe.html I think its the same model, with a different importers name on it.

Any thoughts on intermediate tool boxes to stuff below?

I am thinking of adding some wheels that can be pushed down with a hydraulic jack. Similiar to the heavy welding bench that was on the front page a while ago.
 

EdT

Well-known member
Joined
Sep 21, 2010
Messages
1,104
Location
North Georgia
This may be a matter of personal taste, but I find it nice to have enough table in front of and on either end of the machine to put something down. A tool, some parts, a rag, tapping fluid, etc.. So, unless you're space limited, I'd make the top a bit bigger.
 

larry_g

Well-known member
Joined
Apr 28, 2007
Messages
16,869
Location
oregon
I see you have a crossmember to the far left of the headstock. I would have you consider having a second crossmember under the right hand end of the headstock. What you have is a frame that supports the lathe only at the extreme ends of the lathe, not the best layout IMHO. I also agree with the above poster to make it a bit larger tabletop for storage.

lg
no neat sig line
 

A_Pmech

Well-known member
Joined
May 8, 2007
Messages
8,002
Location
IL
I'm going to have to respectfully disagree with you on this one A_Pmech. Again depending on the lathe having a non bolted down tail sock end could really cause some vibrations in the machine. Quite a few of the more serious machines have built in level adjustments in the tail bed support, even if it doesn't a few shims would be all that is needed.

I suppose if it does vibrate he can always bolt it down and shim it. There's rigidity to be gained by bolting a machine to a solid foundation, but I doubt the bench design he suggests would be sufficient for that task. Thus my suggestion.

Somewhere, I have a War Production Board pamphlet which shows how to build a concrete pedestal for a South Bend lathe, to make it suitable for war production. It required about half a yard of concrete and still left something to be desired.
 

zkling

Well-known member
Joined
Jan 23, 2007
Messages
16,939
I suppose if it does vibrate he can always bolt it down and shim it. There's rigidity to be gained by bolting a machine to a solid foundation, but I doubt the bench design he suggests would be sufficient for that task. Thus my suggestion.

Somewhere, I have a War Production Board pamphlet which shows how to build a concrete pedestal for a South Bend lathe, to make it suitable for war production. It required about half a yard of concrete and still left something to be desired.

Sounds like the old grouting techniques. I can't image an entire stand of concrete. :headscrat

Any thoughts on intermediate tool boxes to stuff below?

Yea, go get a few cheap top boxes and take their tops off. Storage capacity per $ wise, top boxes are usually much easier to find cheaper than a middle boxes.
 
Last edited:

bluebolt

Well-known member
Joined
Dec 28, 2008
Messages
5,435
Location
Benton LA
Consider building something like this workbench around the Harbor Freight 44" roller cabinet like Steevo did.
http://garagejournal.com/forum/showthread.php?t=126086&highlight=steveo

For moving it around I would use the same leveling feet and square tube inserts Steevo did. Get the ones with 4" stems, not 2". On the lower cross beams on the ends set the height up higher then the long side rails that support the roller cabinet. Weld some caster mount plates on and use the Harbor Freight casters you just took off the box. To move it just lower the bench unil the casters touch the ground. Make sure to leave enough room for the swiveling action.
 
OP
M

Macrosloth

Well-known member
Joined
Apr 27, 2012
Messages
86
Location
Van
Attempt 2. I made it about a foot longer, and built it around some harbor freight tool box sides. Gives me an option of a shelf or 26 inch box top in the middle. Room for a 5 gallon coolant bucket and pump on the floor.


Thoughts, feedback? I really need to be in front of the machine to ultimately decide on the table height..
 
Joined
Feb 29, 2012
Messages
14
Ill tell you the heavier the stand the better. I cant bolt mine down because its in the bosses shop so I use 300lbs of sand bags. Its built out of 2x2 1/4 angle probably ways close to 150 with out the lathe attached. By the way mines just a 10" atlas the sand really helped to take chatter marks out of my cuts caused by vibration. Once I get my own shop I will bolt the frame down to the concrete floor.
 

nine4gmc

Well-known member
Joined
Mar 24, 2012
Messages
14,357
Location
Dallas
You'll want the centerline of the chuck near elbow height, unless you are really tall, that may be too high.
 

zkling

Well-known member
Joined
Jan 23, 2007
Messages
16,939
Stands looking good. You may want to put a piece of sheet or cross bracing on the back side for stiffness.

As for the height it can be user dependent. It gets old fast having to stoop over the machine, or having to look hard at the dials. You want the controls at ~90° elbow position height. Maybe a little higher for a small precision machine, a little lower for a large rougher. Mine are in the low to mid 40"s floor to spindle, and I'm a bit vertically challenged so for someone taller they would probably want to add a bit of height.
 

Mattty

Member
Joined
Feb 26, 2013
Messages
13

This is worth watching, it goes for 20min, at 14.00 min he talks about his lathe bench set up, and if its not correct it will cut a taper.
Thanks Matt
 

ert01

Well-known member
Joined
Jun 26, 2011
Messages
151
I suppose if it does vibrate he can always bolt it down and shim it. There's rigidity to be gained by bolting a machine to a solid foundation, but I doubt the bench design he suggests would be sufficient for that task. Thus my suggestion.


Somewhere, I have a War Production Board pamphlet which shows how to build a concrete pedestal for a South Bend lathe, to make it suitable for war production. It required about half a yard of concrete and still left something to be desired.


Any chance you can post up a pic of that design if you can find it? I'm curious to see it.

I have a late 30's southbend and it's currently mounted on a table that my grandpa built for it in the 40's... It's 6' long and 24" wide C-channel with a 4" lip (lip is facing down, the lathe is on the flat back of the C)... About 1/2" thick. It's a super heavy table and I have no doubts it is flat and true but I'm always interested to see other mounts from that era. Seems like everyone came up with something different with the materials they had available.
 

bluebolt

Well-known member
Joined
Dec 28, 2008
Messages
5,435
Location
Benton LA
Attempt 2. I made it about a foot longer, and built it around some harbor freight tool box sides. Gives me an option of a shelf or 26 inch box top in the middle. Room for a 5 gallon coolant bucket and pump on the floor.


Thoughts, feedback? I really need to be in front of the machine to ultimately decide on the table height..

I thought about those HF end boxes as well. After watching the video I also thought about extending the back legs up higher so you could put a back wall and a shelf on.
 

bullnerd

Well-known member
Joined
Sep 17, 2012
Messages
5,690
Location
Jersey
Not sure if it was mentioned but for me I wouldnt like the leg right below the chuck. Thats where you stand while operating a lot of the time. I would be kicking it constantly. It would be like standing at a counter with no toe kick.
 

A_Pmech

Well-known member
Joined
May 8, 2007
Messages
8,002
Location
IL
Any chance you can post up a pic of that design if you can find it? I'm curious to see it.

I've been searching for it since so many have asked. I have 2 Tb of PDF's scavenged off the interwebs and I can't find it. Naturally, I didn't rename the file to something searchable. :sad:

I did come across a photo of a South Bend mounted on the WPB's concrete pedestal at the national archives site one night. I remember thinking "Huh! There's one of those pedestals!" I know I didn't save that photo though.

Ahah!

Lowcountrycamo on Practical Machinist built one almost exactly like the WPB bulletin suggested:

1.jpg


http://www.practicalmachinist.com/vb/general/building-lathe-stand-scraps-256053/
 
Last edited:

jimbbski

Well-known member
Joined
Feb 5, 2009
Messages
67
Location
Chicago Area
I have an old Logan lathe that sits on the factory stand. It consists of two heavy gauge steel cabinets that support the headstock and tailstock. The only thing that connects these two cabinets is the heavy gauge steel chip pan. This design does not add any twist in to the lathe bed as long as the bed is level in both planes, as the chip pan will give while the bed won't.

The best way is to support both ends of the lathe with separate stands/cabinets and then install a chip pan between the lathe bed and the stands that spans the whole length of the lathe. Also install a drain in the pan. I clean my lathe every once in while with liquid solvent and the drain is an easy way to drain it off. I use a ball valve below the pan to seal the drain.
I just put a bucket below and then open the valve.
 
To avoid these ads, REGISTER NOW!

jimbbski

Well-known member
Joined
Feb 5, 2009
Messages
67
Location
Chicago Area
I've been searching for it since so many have asked. I have 2 Tb of PDF's scavenged off the interwebs and I can't find it. Naturally, I didn't rename the file to something searchable. :sad:

I did come across a photo of a South Bend mounted on the WPB's concrete pedestal at the national archives site one night. I remember thinking "Huh! There's one of those pedestals!" I know I didn't save that photo though.

Ahah!

Lowcountrycamo on Practical Machinist built one almost exactly like the WPB bulletin suggested:

1.jpg


http://www.practicalmachinist.com/vb/general/building-lathe-stand-scraps-256053/

That's one stand that going to be heavier then the lathe that sits on it!

I can see where that would make for a very solid stand and no one will ever try to steal it. LOL!
 

bkcorwin

Active member
Joined
Jul 10, 2013
Messages
32
Its very common for lathes to have six mounting points or support points between the base cabinet and the floor. So four points at the head stock and two at the tail stock end. This allows you to adjust the bed of the lathe for warping/twisting. Lathe beds can definitely twist, especially smaller ones like the 12x36 you show. The six points allow you to take out a twist, and a bow in the bed. If you do not make sure the ways of your lathe are not twisted you will get variations in a long shaft. This is in addition to the previously mentioned not aligned tailstock issue.

I also agree with the previous poster who said sand bags. I can't do the concrete base or bolting down so I have a couple bags of gravel on the base shelf of my lathe.

I would also add a backsplash to the lathe. When applying cutting fluid to a spinning part it goes everywhere. I didn't and later added a piece of plywood behind the chuck of my lathe.
 
OP
M

Macrosloth

Well-known member
Joined
Apr 27, 2012
Messages
86
Location
Van
Render 3. This is most likely what I will be going with.


There will be sheet on the outside 16 or 18 gauge, as I have some spare metal, the top will be between 3/8 and 3/4 depending on what I can find. Top cross bars are 3/16 box, everything else is 1/8th wall.

Drawers will be removed from the harbor freight boxes to keep table height approximately 33"
 

coyotejake

Well-known member
Joined
Dec 18, 2013
Messages
93
Location
Washington state
Render 3. This is most likely what I will be going with.


There will be sheet on the outside 16 or 18 gauge, as I have some spare metal, the top will be between 3/8 and 3/4 depending on what I can find. Top cross bars are 3/16 box, everything else is 1/8th wall.

Drawers will be removed from the harbor freight boxes to keep table height approximately 33"

You may want to move that inner front left leg. It would be a pain to have it forever in the way of your left foot. Also, +1 on the tray to put stuff on. Either on top of the motor or off the back of the chip tray, where you can reach it (just NOT in line with the spindle/flying chips!). It's unreal how many little things you'll want to keep close to work with, without leaving your working 'position' to switch back and forth!
I like the design, but look at the empty space between the drawer cabinets. If you go with quick-change tooling, that would be the perfect place for an open sided pull out drawer for your tool holders! Fast access to those is key!
 
Last edited:

bullnerd

Well-known member
Joined
Sep 17, 2012
Messages
5,690
Location
Jersey
"You may want to move that inner front left leg. "- thats what I said on the first page.

Is that sketchup image at the beginning the actual lathe?

Do you have a pic of the lathe?
 
OP
M

Macrosloth

Well-known member
Joined
Apr 27, 2012
Messages
86
Location
Van
Been a while since I posted to solicit feedback.

Pictures for those who care.


I've never built something this big/complicated before. The challange with this was to constrain table height to 33 1/2 inches. Its hard to fit a harbour freight 33inch box inside a 33 1/2 inch frame when you consider the following. Top of table adds 2.5 inches to the height (box+plate). Bottom of table adds about 2 inches to the height. Hence the need to remove the drawers from the boxes.

Things I've learned.
You can never have to many clamps.
When tapping 1/2 threads use a bigger hammer.
Bottle jacks are great for managing distortion.
 

Attachments

  • IMG_00000681.jpg
    IMG_00000681.jpg
    133.8 KB · Views: 80
  • IMG_00000577.jpg
    IMG_00000577.jpg
    136.6 KB · Views: 80
  • IMG_00000667.jpg
    IMG_00000667.jpg
    135.4 KB · Views: 65
  • IMG_00000693.jpg
    IMG_00000693.jpg
    132.7 KB · Views: 59
  • IMG_00000695.jpg
    IMG_00000695.jpg
    133 KB · Views: 75
  • IMG_00000699.jpg
    IMG_00000699.jpg
    132.1 KB · Views: 64
  • IMG_00000709.jpg
    IMG_00000709.jpg
    133.9 KB · Views: 69
Last edited:
OP
M

Macrosloth

Well-known member
Joined
Apr 27, 2012
Messages
86
Location
Van
More images.

Foot threads tig welded on.

Exploding die grinder wheels ****.
 

Attachments

  • IMG_00000725.jpg
    IMG_00000725.jpg
    135.2 KB · Views: 74
  • IMG_00000724.jpg
    IMG_00000724.jpg
    136.5 KB · Views: 70
  • IMG_00000720.jpg
    IMG_00000720.jpg
    135.6 KB · Views: 63
  • IMG_00000714.jpg
    IMG_00000714.jpg
    131 KB · Views: 59
  • IMG_00000710.jpg
    IMG_00000710.jpg
    131.6 KB · Views: 924
  • IMG_00000735.jpg
    IMG_00000735.jpg
    137.1 KB · Views: 59
  • IMG_00000737.jpg
    IMG_00000737.jpg
    138 KB · Views: 65
Last edited:

A_Pmech

Well-known member
Joined
May 8, 2007
Messages
8,002
Location
IL
It's coming together nicely!

That must be one hell of a dull tap, or the hole was too small to start with. 1/2-13 should be doable with a 9" tap wrench. Be careful you don't snap that thing off! :)
 
OP
M

Macrosloth

Well-known member
Joined
Apr 27, 2012
Messages
86
Location
Van
Thanks for the drawers/sliders harbour freight!

Now what to do with the side cabinets...

This is how we level machines in Canada.
 

Attachments

  • IMG_00000761.jpg
    IMG_00000761.jpg
    139.1 KB · Views: 66
  • IMG_00000763.jpg
    IMG_00000763.jpg
    138.3 KB · Views: 75
  • IMG_00000769.jpg
    IMG_00000769.jpg
    136.1 KB · Views: 123
  • IMG_00000616.jpg
    IMG_00000616.jpg
    142.2 KB · Views: 85
OP
M

Macrosloth

Well-known member
Joined
Apr 27, 2012
Messages
86
Location
Van
It was doable with the 9 inch that came with it. It was even easier with the 36" extensions..

Smaller threads I usually just use my cordless drill and set the clutch accordingly.
 

moonpool145

Well-known member
Joined
Jul 2, 2009
Messages
673
Location
South Florida
Very nice. I really like the drawer design. As I am doing this as well I would be very interested in how you leveled the bed. Did you bolt the bed to the table and then level by gauging the ways?

Looks fantastic
 
OP
M

Macrosloth

Well-known member
Joined
Apr 27, 2012
Messages
86
Location
Van
My lathe was originally on two stout columns with some sheet metal in-between.

With a small lathe think 7x12 class, a solid table can add rigidity. With a lathe like this, unless the table is a few inches of solid steel, nothing I will do will change things.

With that said, I bolted the left side tight, and left the right side finger tight, so if my table surface is not flat, it should not influence the ways. I then levelled the lathe by the hockey puck feet.
 
OP
M

Macrosloth

Well-known member
Joined
Apr 27, 2012
Messages
86
Location
Van
Motodave - having seen the husky boxes (and owning a 26). I can say that I'm not impressed with them. They feel cheap to me. IMHO the harbor freight model is worth the extra money.
 

zkling

Well-known member
Joined
Jan 23, 2007
Messages
16,939
Good job on the build. :thumbup: I like that craftsman box, a bit different. What are you planning on doing with the side cabinet shells? Maybe make cabinets out of them?
 
OP
M

Macrosloth

Well-known member
Joined
Apr 27, 2012
Messages
86
Location
Van
Good job on the build. :thumbup: I like that craftsman box, a bit different. What are you planning on doing with the side cabinet shells? Maybe make cabinets out of them?

Not sure what I'm going to do with the side cabinets. I dont have that much space so they might go up on craigslist.
 
To avoid these ads, REGISTER NOW!
Top Bottom